01 Overview & How It Works
HamMixer Server turns your home station into a remotely-accessible rig. It runs on the Windows PC at your QTH, connects to your transceiver via USB, and serves both CAT control and audio to a single remote client — your HamMixer Desktop or Mobile app, anywhere in the world.
The Transparent Tunnel
Here's the key concept: the server is a dumb pipe. It does not interpret, parse, or cache radio commands. Your client app drives everything — frequency changes, mode selection, filter settings, all of it. The server simply ferries bytes between the client and the radio's serial port, and streams audio in both directions.
This means the server works identically whether you have an Icom rig speaking CI-V, a Kenwood or Yaesu using ASCII CAT, or an Elecraft K3. The server doesn't need to know or care about the protocol — it just passes the data through.
How the Pieces Fit Together
The architecture is straightforward:
- Server ↔ Radio: USB cable provides both the serial connection (CAT control) and audio (USB Audio CODEC)
- Server ↔ Client (Control): TCP connection on port 7300, encrypted with TLS — carries all radio commands, authentication, and heartbeats
- Server ↔ Client (Audio): UDP connection on port 7301, encrypted with AES-128-CTR — carries 48 kHz Opus audio at 48 kbps in both directions
Only one client can be connected at a time — it's an exclusive lock, just like sitting in front of your rig. When a client connects, they get full control. When they disconnect, the server immediately releases PTT (so your rig is never left stuck in transmit) and waits for the next connection.
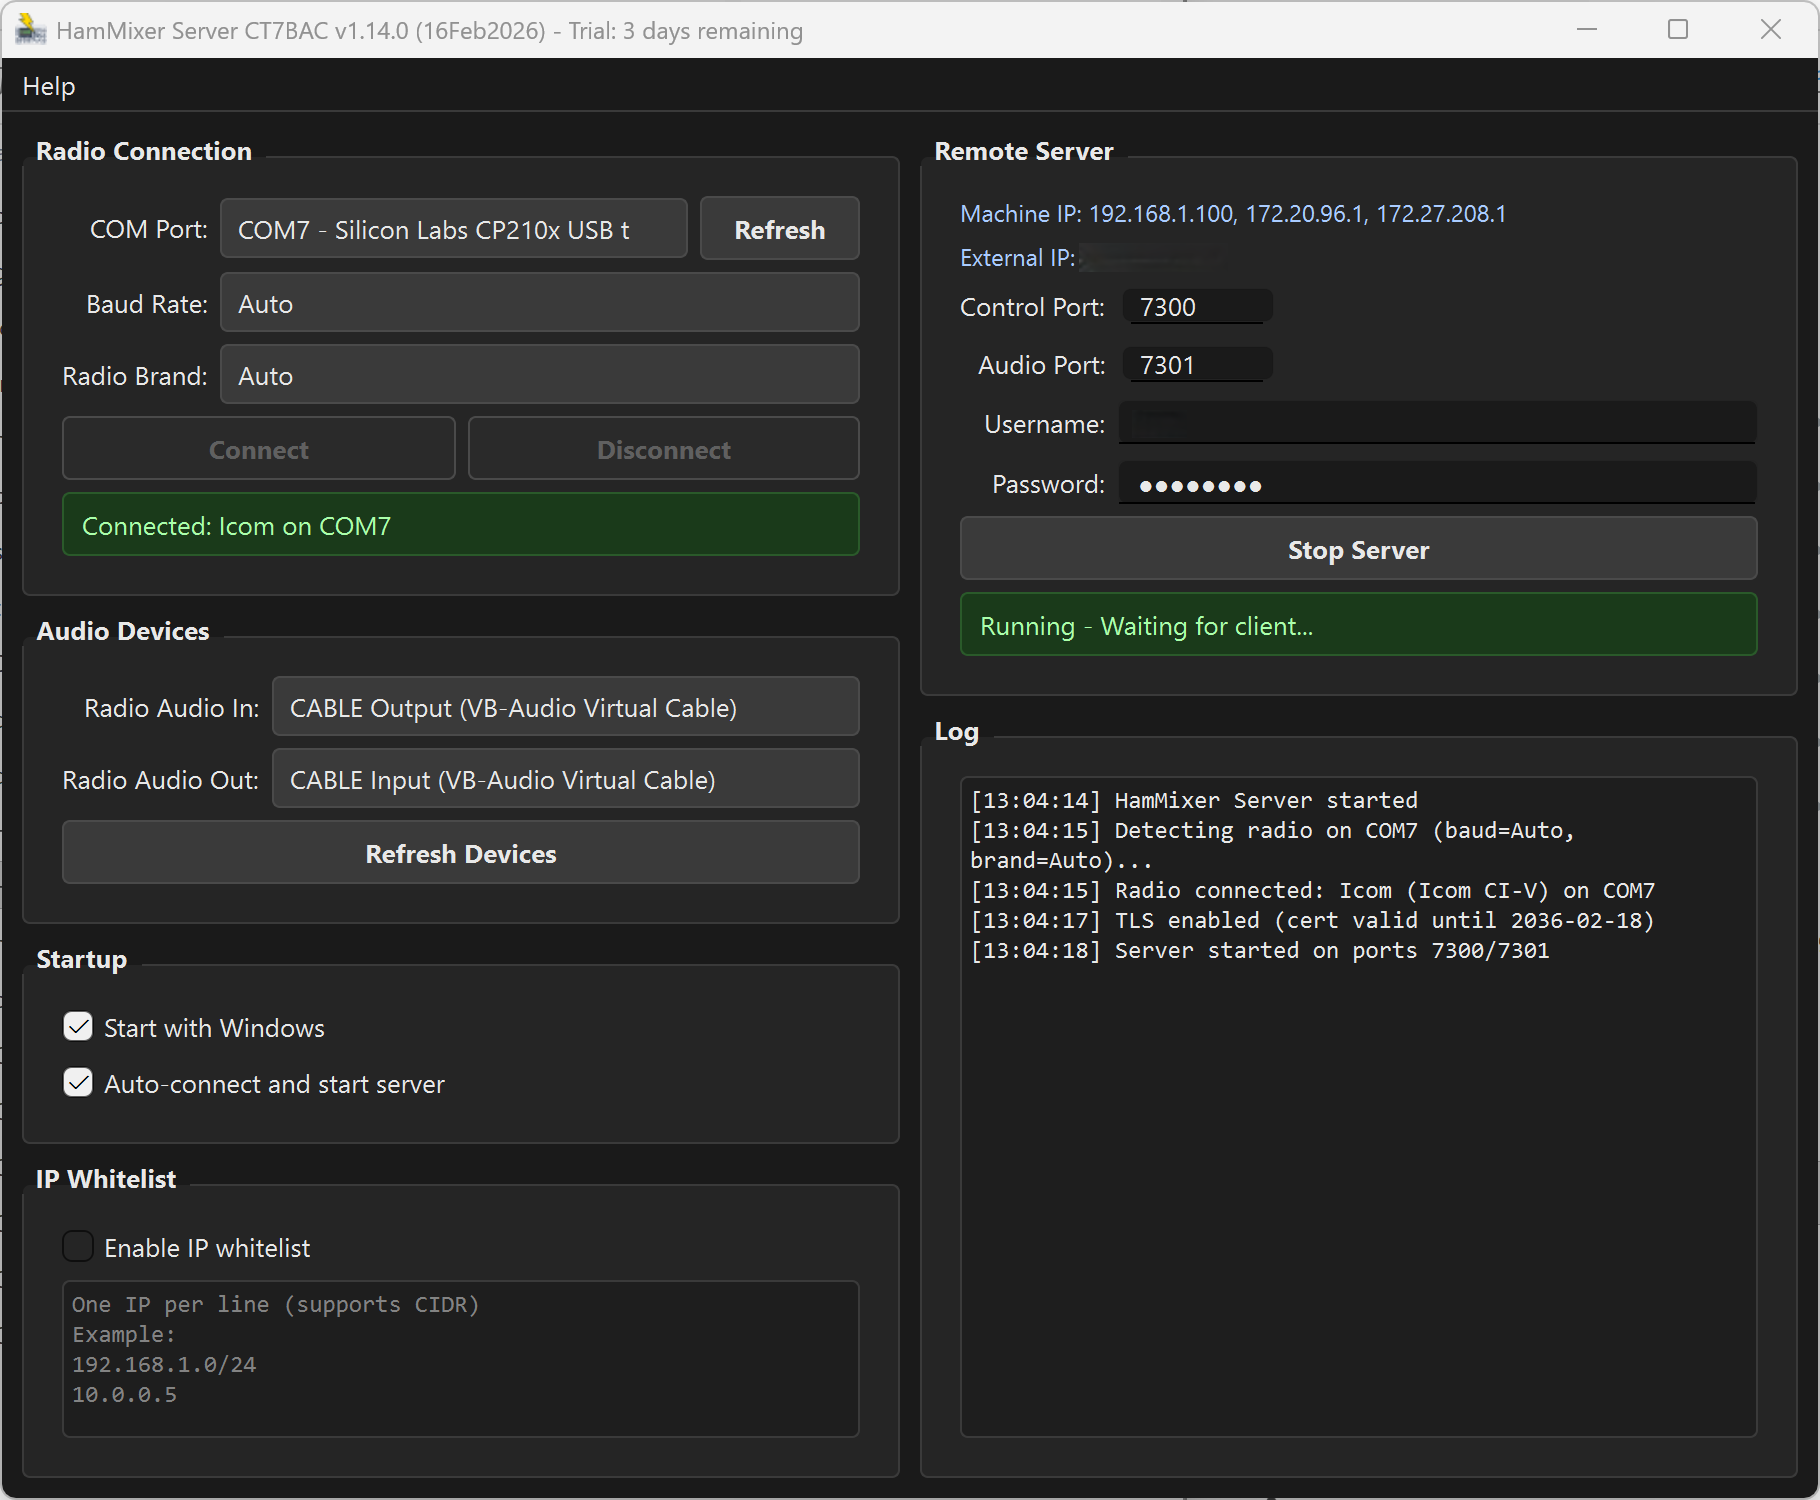 The server main window — radio connected (left column), server running and ready for clients (right column).
02 System Requirements
What You Need
- Windows 10 or 11 (64-bit)
- Visual C++ Redistributable 2022 — the installer checks for this automatically; if missing, you'll be prompted to download it from Microsoft
- 4 GB RAM minimum
- 50 MB disk space
- A radio with USB serial + USB audio — Icom (CI-V), Kenwood (CAT), Elecraft (CAT), or newer Yaesu models with Kenwood-compatible CAT
- Stable internet connection — 1 Mbps upload minimum for comfortable audio
03 Installation & First Launch
Download the latest installer from ct7bac.com and run it. The setup wizard will guide you through — accept the defaults unless you have a reason to change the install location.
First Launch
HamMixer Server is completely free for personal, non-commercial amateur-radio use. The first time you launch it, you'll be asked to complete a quick one-time free registration — just your name, callsign, and email. There's no trial countdown, no license key, and nothing to buy.
Where Things Live
- Settings:
%APPDATA%\HamMixerServer\config.json - TLS certificates:
%APPDATA%\HamMixerServer\certs\ - Debug log:
hamserver_debug.login the same folder as the .exe
Keep that debug log path in mind — it's the first place to look if anything goes sideways.
04 Finding Your Radio's COM Port
If you've been using CAT software like WSJT-X or HRD, you probably already know which COM port your radio is on. If not, here's how to find it.
Using Device Manager
- Press Win+X and select Device Manager, or press Win+R, type
devmgmt.msc, and hit Enter. - Expand Ports (COM & LPT) in the device tree.
- Look for your radio's USB-to-serial adapter. Common names include:
- Silicon Labs CP210x USB to UART Bridge — most Icom radios
- Prolific USB-to-Serial Comm Port — some Kenwood models
- USB Serial Device — generic Windows driver
- Note the COM port number in parentheses, e.g., (COM7).
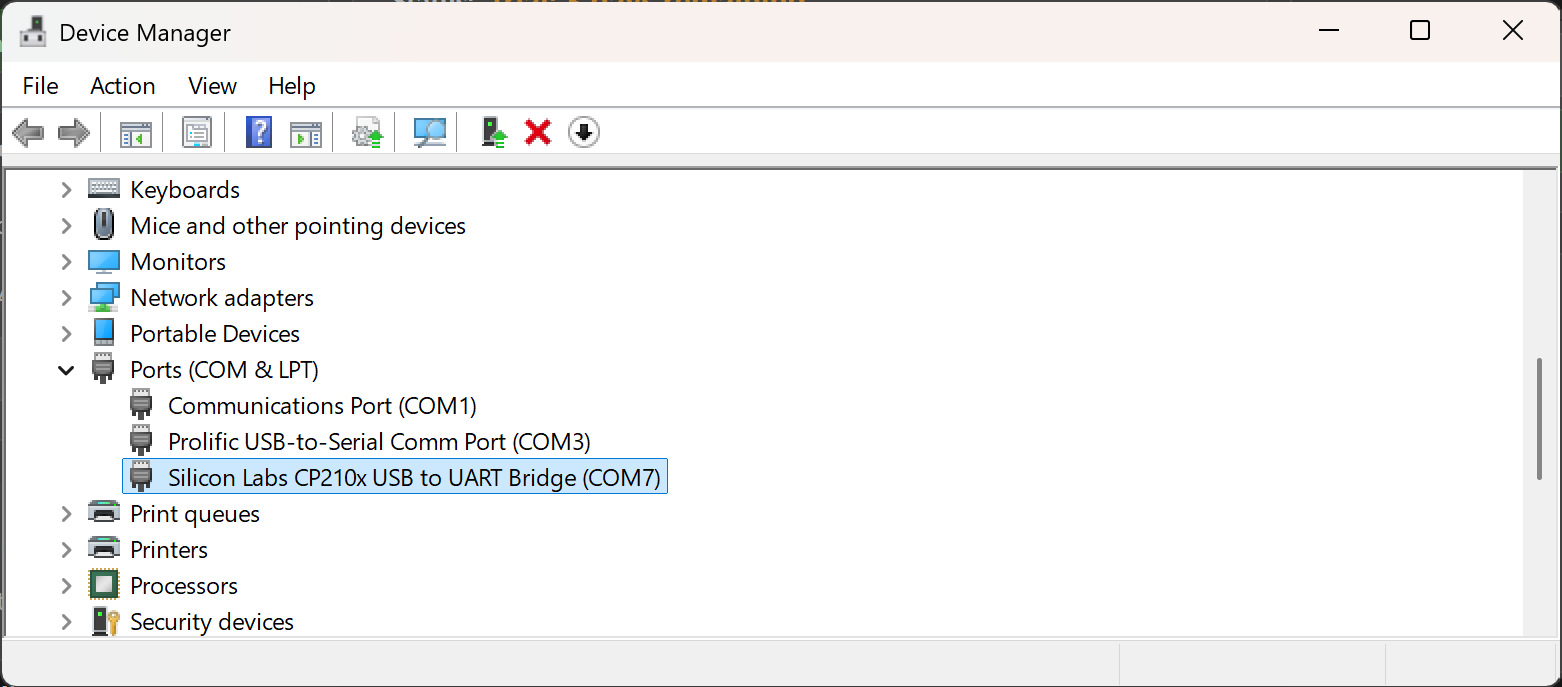 Device Manager showing the radio's virtual COM port under Ports (COM & LPT).
The Unplug Trick
Not sure which one is your radio? Unplug the USB cable, note which port disappears from the list, then plug it back in. The one that reappears is your radio.
If you see multiple COM ports from a single USB cable, your radio may expose two virtual ports — one for CAT control and one for CI-V. Try the lower-numbered one first.
05 Connecting Your Radio
With your COM port identified, let's hook up the radio.
- In the Radio Connection panel (left column), select your COM port from the dropdown. The list shows the port number and a description (e.g., "COM7 — Silicon Labs CP210x").
- If you just plugged in the cable and don't see it, click the Refresh button to rescan ports.
- Leave Baud Rate on Auto unless you know the exact rate your radio requires. Auto tries common rates for each protocol family.
- Leave Radio Brand on Auto for most radios. Select Elecraft only if you have a K3/K3S/KX2/KX3 — this skips the Icom CI-V probing and speeds up detection.
- Click Connect. Detection takes 1–2 seconds.
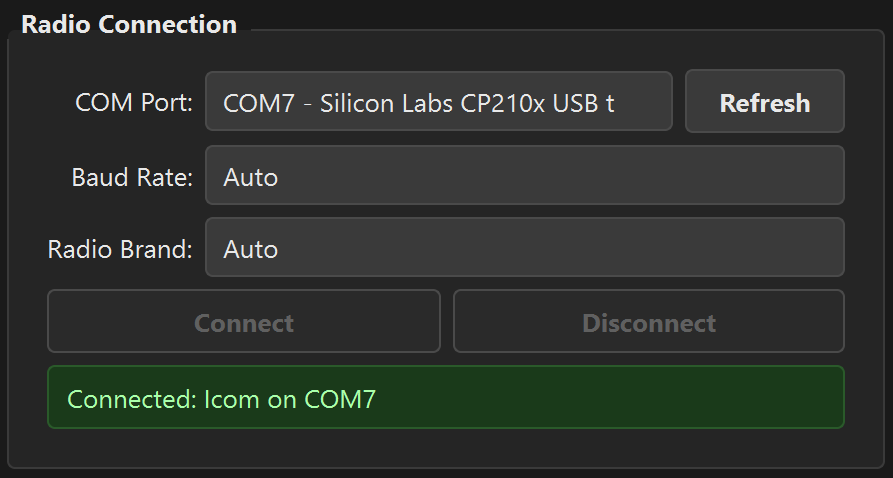 The Radio Connection panel after successful detection — green status with model and port.
The status label turns green and shows your radio model: "Connected: IC-7300 on COM7" (or whatever rig you have). This model and protocol information is passed to the remote client when it authenticates, so the client knows exactly how to talk to your rig.
Supported Protocols
| Brand | Protocol | Typical Models |
|---|---|---|
| Icom | CI-V (binary) | IC-705, IC-7100, IC-7300, IC-7610, IC-7851, IC-9700 |
| Kenwood | CAT (ASCII) | TS-480, TS-590S/SG, TS-890S, TS-2000 |
| Elecraft | CAT (ASCII) | K2, K3, K3S, K4, KX2, KX3 |
| Yaesu | CAT (ASCII) | FT-991/A, FT-710, FTDX10, FTDX101D |
If Detection Fails
Run through this checklist:
- Is the radio powered on?
- Is the USB cable firmly connected at both ends?
- Did you select the correct COM port?
- Is another program holding the serial port?
- Try setting an explicit baud rate instead of Auto (115200 for Icom, 9600 or 38400 for Elecraft)
06 Audio Device Setup
The server needs to capture audio from the radio (receiver audio you'll hear remotely) and play audio to the radio (your microphone when transmitting remotely). Two dropdowns, two audio paths.
Understanding the Two Audio Paths
- Radio Audio In = the radio's USB audio output (receiver audio). The server captures this and streams it to the remote client.
- Radio Audio Out = the radio's USB audio input (microphone audio). The server plays the remote client's mic audio here for transmitting.
Think of it this way: "In" means audio coming in to the server from the radio. "Out" means audio going out of the server to the radio.
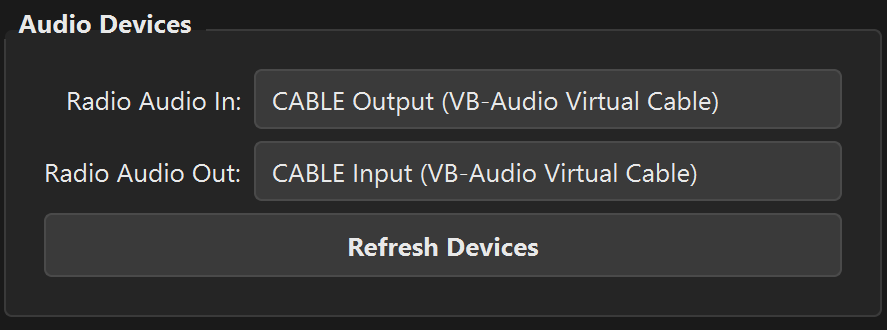 Audio Devices panel — both dropdowns pointed at the radio's USB audio interface.
Common device names you'll see in the dropdowns:
- USB Audio CODEC — Icom IC-7300, IC-7610
- Microphone (USB Audio CODEC) — capture side
- Speakers (USB Audio CODEC) — playback side
If you plugged in your radio after launching the server, click Refresh Devices to rescan the audio hardware.
Audio Parameters
- Sample rate: 48,000 Hz
- Bit depth: 16-bit PCM (auto-converts from IEEE float if your device requires it)
- Buffer size: ~10 ms
- Codec: Opus at 48 kbps, mono
- Total bandwidth: ~60 kbps including UDP overhead
07 Server Configuration
Before you start the server, you need to set up credentials and verify the network ports.
Username & Password
Set a username and a strong password in the Server Configuration panel. This is what your remote client will use to authenticate. The password is securely hashed using bcrypt — the plaintext is never saved to disk.
Choose a strong password. This protects your transmitter from unauthorized access — you don't want someone keying up your rig without your knowledge.
Network Ports
| Port | Protocol | Purpose |
|---|---|---|
| 7300 | TCP | Control channel — radio commands, authentication, heartbeats. Encrypted with TLS. |
| 7301 | UDP | Audio channel — Opus audio in both directions. Encrypted with AES-128-CTR. |
IP Addresses
- Machine IP: Your local network address(es), shown automatically. Use this if the client is on the same LAN.
- External IP: Your public internet IP, auto-detected. Use this for remote access from outside your network. If it shows "unavailable", check your internet connection.
08 Security Features
Your rig is on the air, and it's accessible over the internet. Security matters. Here's how HamMixer Server protects your station.
TLS Encryption
All control traffic is encrypted with TLS 1.2 or higher. The server auto-generates a self-signed RSA-2048 certificate on first launch using the Windows CryptoAPI — no OpenSSL installation needed. The certificate is stored in %APPDATA%\HamMixerServer\certs\, valid for 10 years, and automatically renewed if it's within 30 days of expiry.
Audio Encryption
UDP audio packets are encrypted with AES-128-CTR using a fresh random key generated for each session. The key is exchanged securely over the TLS control channel. Nobody can eavesdrop on your QSO.
Brute-Force Protection
After multiple failed login attempts from the same IP address, the server applies exponential backoff lockouts (up to 60 seconds). Stale bans automatically expire after 1 hour. This makes automated password guessing impractical.
IP Whitelist
For an extra layer of security, you can restrict which IP addresses are allowed to connect. Enable the IP Whitelist checkbox and enter one address or CIDR range per line. Lines starting with # are treated as comments.
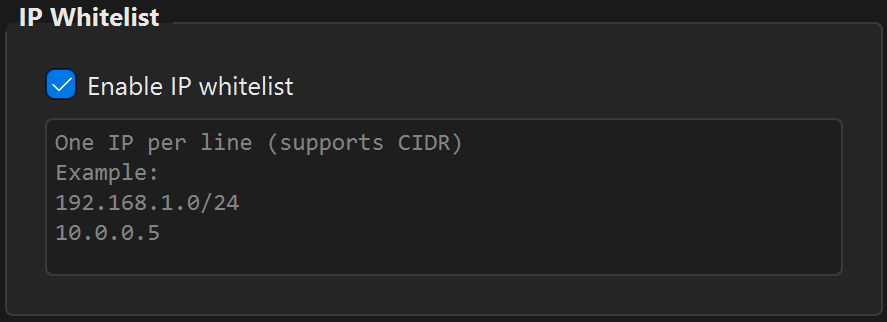 IP Whitelist with a couple of allowed addresses — only these IPs can connect to your server.
Exclusive Client Lock
Only one client can be connected at a time. If a second client tries to connect, they get a "Server busy" response. No risk of two operators fighting over the same rig.
PTT Safety
If the client disconnects unexpectedly — network drop, app crash, laptop battery dies — the server immediately forces PTT off. Your rig will never be left stuck in transmit. This is a hard safety guarantee, not a best-effort timeout.
09 Network Setup & Port Forwarding
If you're operating remotely from a different location (the whole point, right?), you need to make your server reachable from the internet. This section walks you through it.
Same LAN — No Forwarding Needed
If your client and server are on the same local network (e.g., laptop in the living room, server in the shack), just use the Machine IP shown in the server window. You're done — skip the rest of this section.
Over the Internet — Port Forwarding
To reach your server from outside your home network, you need to forward two ports on your router:
- TCP 7300 → your server PC's local IP address
- UDP 7301 → your server PC's local IP address
Step-by-Step Port Forwarding
- Find your router's admin page. This is usually
192.168.1.1or192.168.0.1— check the sticker on the back of your router if you're not sure. - Log in with the router's admin credentials (also often on the sticker, unless you've changed them).
- Find the Port Forwarding, NAT, or Virtual Servers section. The exact name varies by router brand (TP-Link, Netgear, ASUS, etc.).
- Create a rule for TCP port 7300, pointing to your server PC's local IP address (e.g., 192.168.1.100).
- Create a second rule for UDP port 7301, pointing to the same local IP.
- Save and apply the changes.
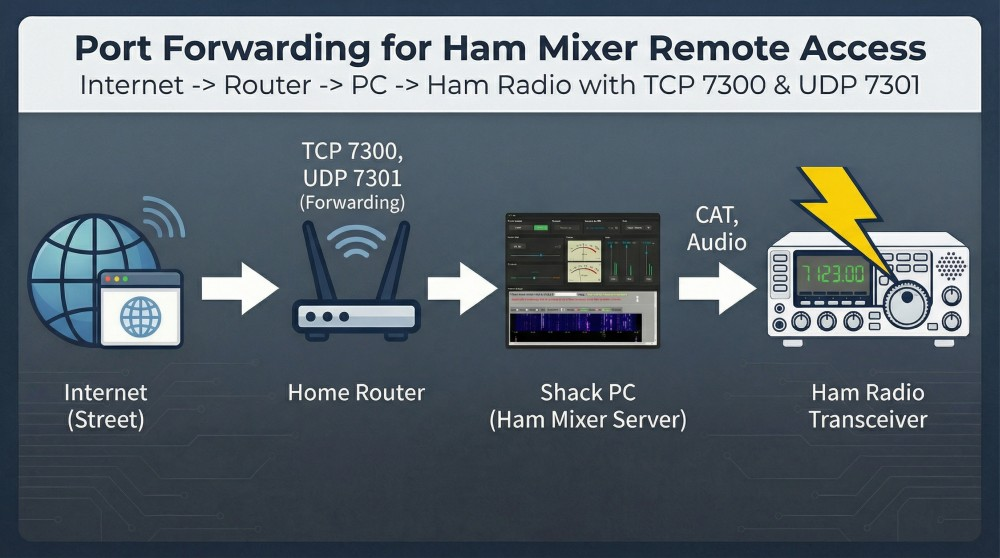 Port forwarding overview — TCP 7300 and UDP 7301 forwarded from the router to the server PC.
Static Local IP
Your router assigns local IP addresses via DHCP, and they can change over time. If your server PC gets a new local IP, your forwarding rules will point to the wrong machine. To prevent this:
- Set a static IP on the server PC (Windows: Network adapter settings → IPv4 → Manual), or
- Create a DHCP reservation on your router (ties your PC's MAC address to a fixed IP)
Dynamic DNS
Most home ISPs give you a dynamic public IP that changes periodically. A Dynamic DNS (DDNS) service gives you a fixed hostname (like mystation.duckdns.org) that always points to your current public IP. Free options include:
- DuckDNS (free, simple)
- No-IP (free tier available)
- Many routers have built-in DDNS clients — check your router's settings
Windows Firewall
On first start, the server attempts to create Windows Firewall inbound rules automatically — you'll see a UAC elevation prompt. If that fails (or you click "No"), you'll need to create the rules manually:
- Open Windows Defender Firewall with Advanced Security (search for "firewall" in Start).
- Click Inbound Rules → New Rule.
- Select Port, then TCP, enter 7300, and allow the connection.
- Repeat for UDP 7301.
10 Starting the Server & Going Live
Everything's configured. Time to go live.
Prerequisites
- Radio connected — green status in the Radio Connection panel
- Audio devices selected
- Username and password set
Start Sequence
Click the Start Server button. Here's what happens behind the scenes:
- The TLS certificate is loaded from
%APPDATA%\HamMixerServer\certs\(or generated fresh on first run). - Windows Firewall rules are checked and created if needed (UAC prompt on first run).
- TCP port 7300 starts listening for incoming client connections.
- UDP port 7301 opens for bidirectional audio.
- Audio capture and playback streams start on the selected devices.
The status label turns green: "Running — Waiting for client..."
Giving Your Client the Connection Details
Your remote client needs three things:
- Address: your External IP (or DDNS hostname) for internet access, or Machine IP for LAN access
- Port: 7300 (or whatever you configured)
- Username & Password: the credentials you set in the server
When a Client Connects
The status changes to "Client connected from [IP]" and the Client Statistics panel appears with live data. The remote operator now has full control of your rig — frequency, mode, filters, everything — just as if they were sitting in front of it.
Stopping the Server
Click Stop Server. Any connected client is disconnected, audio streams close, and the configuration controls become editable again.
11 Monitoring & Client Statistics
Once a client connects, the server gives you a live dashboard of the connection health. This is invaluable for diagnosing audio issues or network problems.
Client Statistics Panel
This panel appears automatically when a client authenticates and disappears when they disconnect. It updates every second.
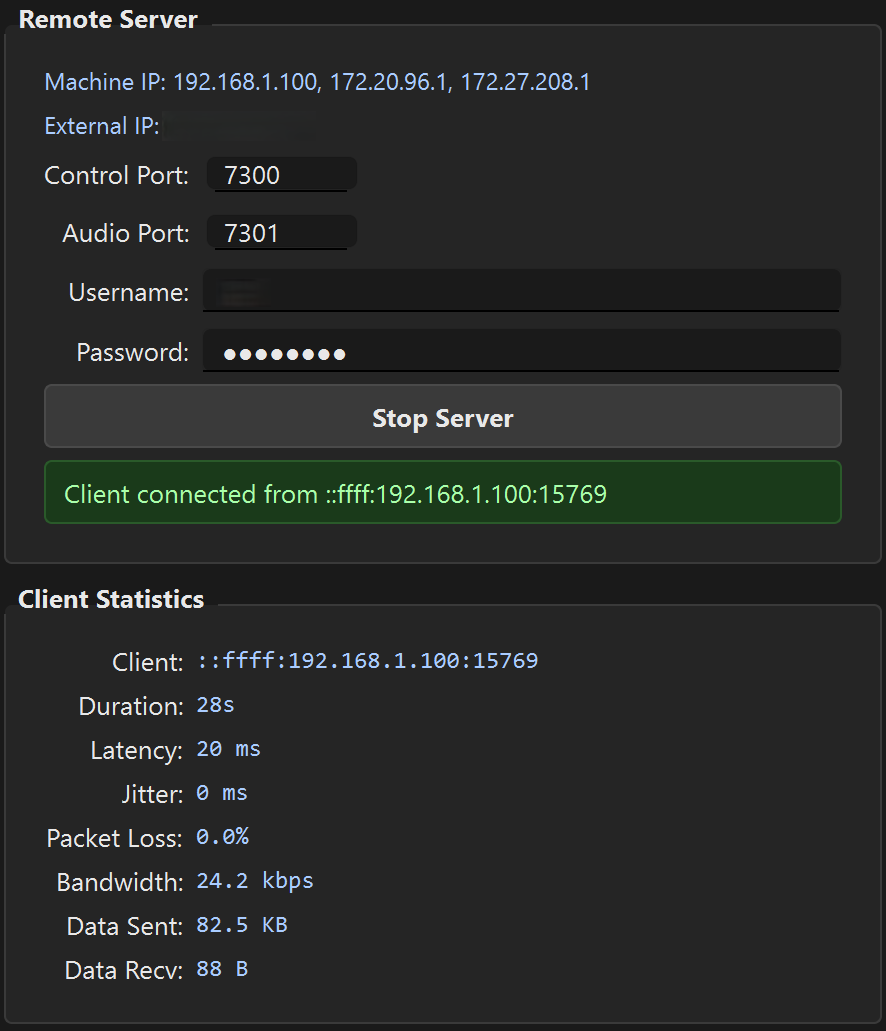 Client Statistics panel with a remote client connected — live network health data at a glance.
| Field | What It Means |
|---|---|
| Client | IP address of the connected remote operator |
| Duration | How long the current session has been active |
| Latency | Round-trip delay on the control channel (ms). Under 100 ms feels instant; 200+ ms starts to feel sluggish. |
| Jitter | Variation in audio packet arrival timing (ms). Lower is better. Under 15 ms is excellent; over 30 ms may cause audio glitches. |
| Packet Loss | Percentage of audio packets that didn't arrive. Should be under 1% for clean audio; over 2% will be noticeable. |
| Bandwidth | Average data throughput (kbps). Typically ~60 kbps for audio alone. |
| Data Sent / Received | Total data transferred in this session. Auto-scales from bytes to KB, MB, or GB. |
Log Panel
The bottom of the server window shows a timestamped log of everything that happens: client connections and disconnections, authentication attempts, radio detection results, device changes, and errors. This is your real-time event feed.
For more detailed debugging, check the hamserver_debug.log file in the server's installation folder.
12 Unattended Operation
Want to leave the server running 24/7 so you can connect to your rig any time, from anywhere? HamMixer Server is built for it.
Start with Windows
Check the Start with Windows option. This adds the server to your Windows startup (registry HKCU\...\Run), so it launches automatically every time you log in.
Auto-Connect & Auto-Start
Enable Auto-connect and start server to have the server automatically connect to your radio and begin serving 2 seconds after launch. Combined with "Start with Windows", this gives you a fully hands-free station — power on the PC, and the server is live.
Automatic Device Recovery
If the radio's USB connection is lost — a cable bump, the radio's LCD going to sleep, or Windows USB power management acting up — the server automatically retries every 5 seconds for up to 1 hour. The client stays connected during recovery, and audio resumes automatically when the radio comes back online.
Path: Power Options → Change plan settings → Change advanced power settings → USB settings → USB selective suspend → Disabled.
13 Registration & Updates
Free Software
HamMixer Server is free for personal, non-commercial amateur-radio use, with no time limit. There's no trial countdown, no license key, and nothing to purchase. Commercial use requires separate written permission — contact ct7bac@gmail.com.
Registration
The first time you launch HamMixer Server, you'll be asked to complete a quick one-time free registration. Enter your name, callsign, and email, and you're done — this simply lets the developer know who is using HamMixer. No payment, no license key.
Updates
The server checks for updates automatically 3 seconds after launch. If a new version is available, a dialog shows the changelog with three options: Download & Install, Skip, or Remind Me Later. You can also check manually via Help → Check for Updates. Updates are always free.
A Troubleshooting
Quick-reference solutions for the most common issues.
| Problem | Solution |
|---|---|
| "No compatible radio detected" | Check: radio powered on, USB cable connected, correct COM port selected, no other software holding the port. Try an explicit baud rate instead of Auto. |
| No audio from radio | Verify the correct device is selected in "Radio Audio In". Check Windows Sound settings — the radio's USB audio must not be muted or set to exclusive mode by another application. |
| Client can't connect | Check port forwarding (TCP 7300 + UDP 7301). Check Windows Firewall rules. Verify the server is running (green status). Check IP whitelist if enabled. |
| Choppy remote audio | Check Jitter and Packet Loss in Client Statistics. High values indicate network congestion. Try wired Ethernet instead of WiFi on both ends. |
| "Device lost — reconnecting..." | The USB audio device was temporarily lost. The server retries automatically every 5 seconds. Check the USB cable and disable USB selective suspend in Windows Power Options. |
| "Missing Dependency" on launch | Install the Visual C++ 2015-2022 Redistributable (x64) from Microsoft. |
| Forgotten password | Edit %APPDATA%\HamMixerServer\config.json, clear the password_hash field, restart the server, and set a new password. |
| Firewall prompt doesn't appear | Run the server as Administrator once, or manually create inbound rules for TCP 7300 and UDP 7301 in Windows Defender Firewall. |
| Multiple COM ports, unsure which one | Use the unplug trick: disconnect the USB cable, note which port disappears in Device Manager, reconnect. Try the lower-numbered port first. |
B Quick Reference Card
HamMixer Server at a Glance
| Control port | TCP 7300 (TLS 1.2+ encrypted) |
| Audio port | UDP 7301 (AES-128-CTR encrypted) |
| Config file | %APPDATA%\HamMixerServer\config.json |
| TLS certificates | %APPDATA%\HamMixerServer\certs\ |
| Debug log | hamserver_debug.log (same folder as .exe) |
| Audio codec | Opus 48 kHz, mono, 48 kbps (~60 kbps total) |
| Encryption | TLS 1.2+ (control), AES-128-CTR (audio) |
| Max clients | 1 (exclusive lock) |
| Heartbeat | 5-second interval, 15-second timeout |
| Auto-reconnect | Every 5 seconds, up to 1 hour |
| License | Free for personal, non-commercial amateur-radio use |
| Supported radios | Icom CI-V, Kenwood CAT, Elecraft CAT, newer Yaesu |
See also: Desktop Manual | Mobile Manual