01 Overview — Local & Remote Operation
HamMixer is a dual-source audio mixer and full radio control suite for Windows. It sits between your transceiver and your ears, letting you mix two independent audio sources in real time — your radio's receiver audio and a WebSDR or KiwiSDR tuned to the same band. Monitor the same frequency from your antenna and a remote SDR simultaneously. Great for DX chasing, contesting, propagation monitoring, or just comparing what your station hears versus what the rest of the world hears.
Two Modes of Operation
- Local mode: Your radio is connected directly via USB serial and USB audio. HamMixer controls the rig via CAT, captures receiver audio, loads a WebSDR in its embedded browser, and mixes everything together. This is the classic shack setup.
- Remote mode: Your radio is at home, connected to HamMixer Server. You run HamMixer Desktop from anywhere in the world — a hotel, a friend's QTH, a portable setup. Full radio control plus low-latency Opus audio over the internet. It feels like sitting in front of your rig.
What You Can Do
- Full CAT control — frequency, mode, filters, AGC, tuner, CW, voice memories, power, VFO A/B
- Dual SDR support — WebSDR 2.x (PA3FWM) and KiwiSDR, with automatic frequency and mode sync
- Audio mixing with delay compensation and GCC-PHAT auto-sync
- Waterfall display with click-to-tune and drag tuning — requires a radio with built-in spectrum scope output (e.g., IC-7300, IC-7610, IC-705, IC-9700)
- CW keyer with 12 macros, live or buffered transmission, adjustable WPM speed, and BLE iambic paddle support with local sidetone
- HRD-compatible TCP server for logging software integration
- Keyboard, USB encoder, and BLE accessory module function mapping (36 radio functions)
- Auto-detection for Icom, Kenwood, Elecraft, and newer Yaesu radios
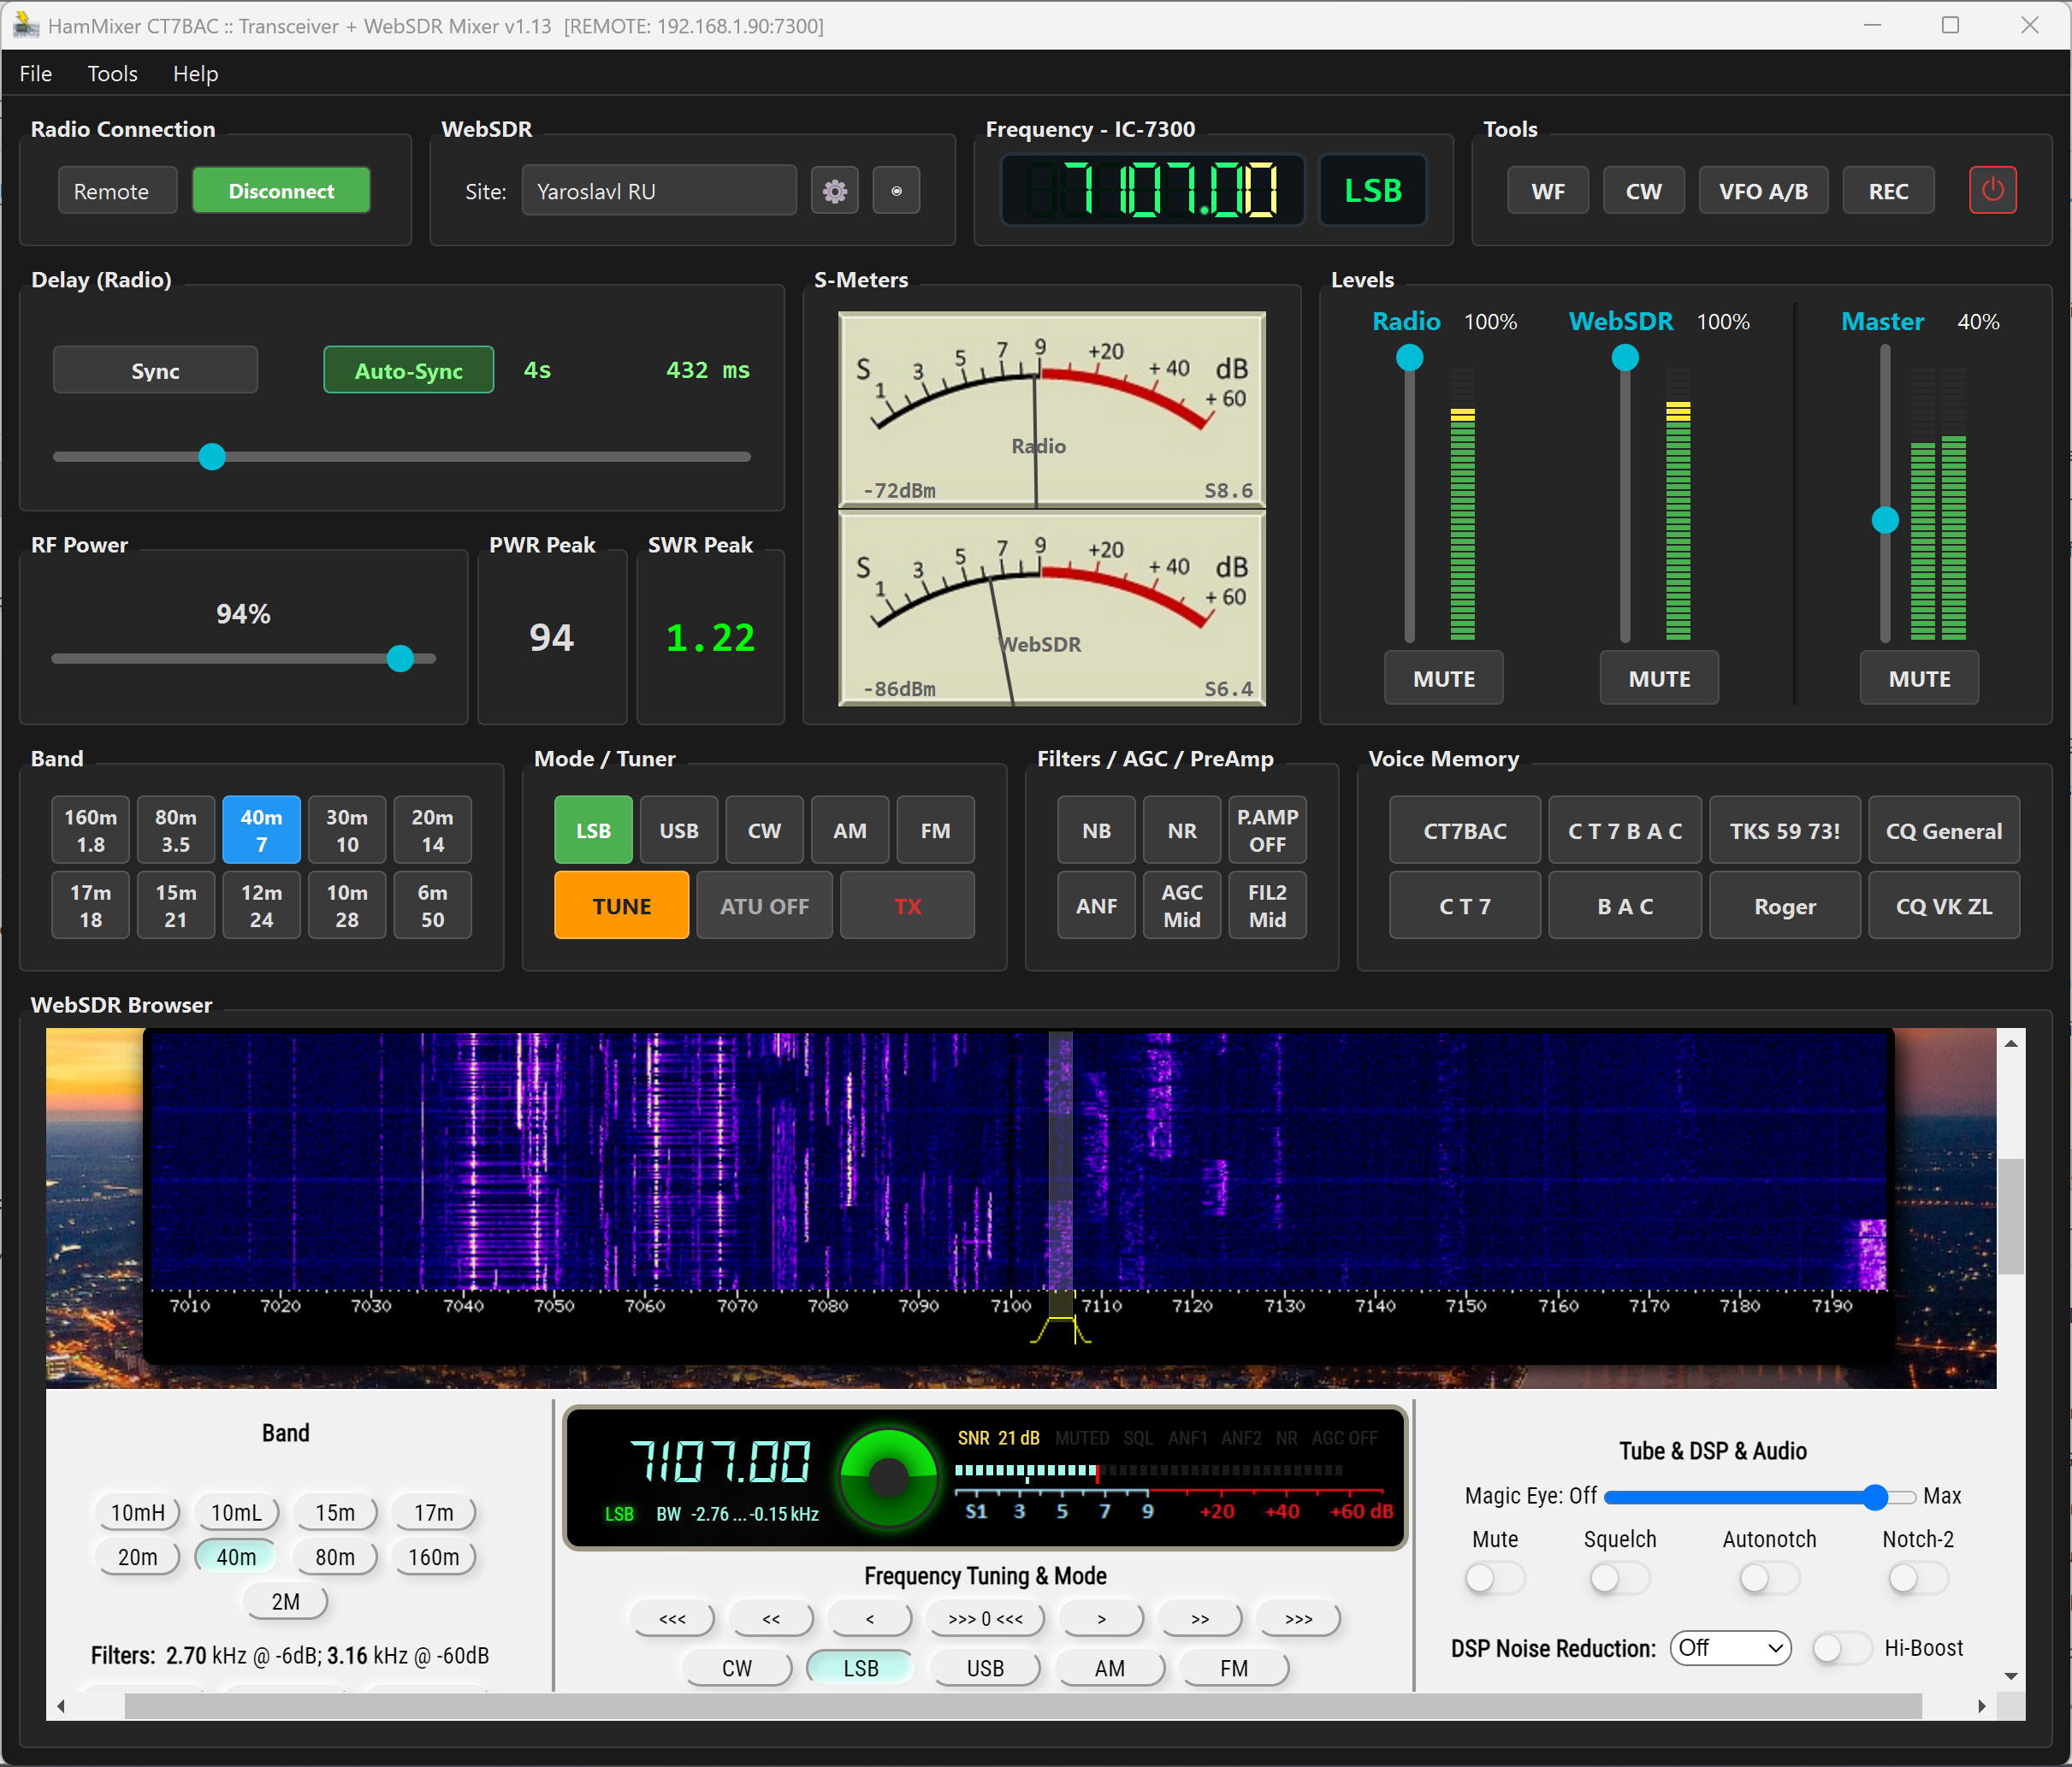 The main window in local mode — frequency LCD, mixer area with dual S-meters, and the WebSDR browser below.
02 Installation & System Requirements
System Requirements
- Windows 10 or 11 (64-bit)
- 8 GB RAM recommended (4 GB minimum — the embedded browser is the main consumer)
- Visual C++ Redistributable 2022 — the installer checks for this automatically; if missing, you'll be prompted to download it from Microsoft
- Audio interface with WASAPI support (all modern Windows sound devices)
- Serial port (physical or USB) for local radio connection
- Internet connection for WebSDR, remote operation, and first-launch registration
Download the latest installer from ct7bac.com and run the setup wizard. Accept the defaults unless you have a reason to change the install location. A desktop shortcut is created automatically.
First Launch
HamMixer is completely free for personal, non-commercial amateur-radio use. The first time you launch it, you'll be asked to complete a quick one-time free registration — just your name, callsign, and email. There's no trial countdown, no license key, and nothing to buy.
On first launch, if VB-Cable (a virtual audio cable driver) isn't detected on your system, HamMixer will offer to open the download page. VB-Cable is how WebSDR audio gets routed into the mixer — more on that in the next section.
Where Things Live
- Settings:
%APPDATA%\HamMixer\config.json - Saved configurations:
configurations\folder next to the .exe - Debug log:
hammixer_debug.login the same folder as the .exe
03 Audio Device Setup
HamMixer works with three audio streams simultaneously. Open Tools > Audio Devices to configure them.
The Three Audio Paths
- Radio Input: Your radio's USB audio output — the receiver audio you hear through the rig. This feeds the "Radio" channel strip in the mixer.
- System Loopback: Captures audio from your system's audio output — specifically, the WebSDR playing in the embedded browser. This is where VB-Cable comes in.
- Audio Output: Your speakers, headphones, or external DAC — where the final mixed audio comes out.
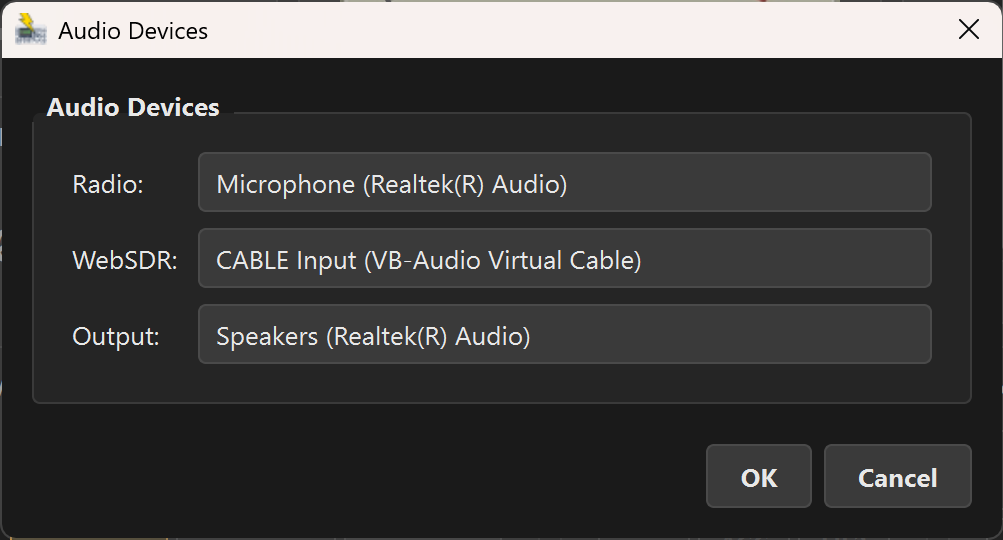 Audio Devices dialog — three dropdowns for the complete audio path.
VB-Cable — Why You Need It
Here's the problem: the WebSDR plays audio through a web browser. To get that audio into HamMixer's mixer, you need a virtual audio cable that acts as a loopback — the browser's audio output becomes HamMixer's audio input.
VB-Cable is a free virtual audio device that does exactly this. Once installed, it appears as both a playback device ("CABLE Input") and a recording device ("CABLE Output") in Windows.
- Download and install VB-Cable from VB-Audio (free). Reboot if prompted.
- In HamMixer, go to Tools > Audio Devices and set System Loopback to
CABLE Output (VB-Audio Virtual Cable). - The embedded WebSDR browser automatically uses VB-Cable as its audio output. No browser configuration needed — HamMixer handles the routing internally.
Audio Parameters
- Sample rate: 48,000 Hz
- Bit depth: 16-bit signed PCM stereo (auto-converts from IEEE float if your device requires it)
- Buffer size: 1024 samples per callback (~21 ms latency)
- API: Windows WASAPI shared mode
04 Connecting Your Radio
Go to Tools > Radio Settings to configure your COM port, baud rate, and brand hint. Or just click Connect and let auto-detection do its thing.
Auto-Detection
HamMixer tries to identify your radio automatically. The detection order is:
- Icom CI-V — sends a broadcast inquiry (address 0x00) at 115200, then 57600 baud. If the radio responds with its CI-V address, it's identified instantly.
- Elecraft — only if you set the Brand hint to "Elecraft". Sends an
OM;command at 38400, then 9600 baud. - Kenwood / Yaesu — tries the
ID;command at 115200 down to 4800 baud. Newer Yaesu radios (FT-991A, FTDX10, etc.) use Kenwood-compatible ASCII CAT.
Supported Radios
| Brand | Protocol | Models |
|---|---|---|
| Icom | CI-V (binary) | IC-705, IC-7100, IC-7300, IC-7300 MK2, IC-7610, IC-7851, IC-9700 |
| Kenwood | CAT (ASCII) | TS-480, TS-590S/SG, TS-890S, TS-2000 |
| Elecraft | CAT (ASCII) | K2, K3, K3S, K4, KX2, KX3 |
| Yaesu | CAT (ASCII) | FT-991/A, FT-710, FTDX10, FTDX101D |
 Radio connected — frequency LCD showing 14.205.00 MHz in USB, with all controls active.
Baud Rate Recommendations
- Icom: 115200 (set in radio menu under CI-V Baud Rate)
- Kenwood: 115200 for TS-590SG/TS-890S, 9600 for TS-480/TS-2000
- Elecraft: 38400 (K3/K3S/K4) or 9600 (KX2/KX3)
- Yaesu: 38400 (typical default)
Leave Baud Rate on Auto unless detection is failing — then try the recommended rate for your brand.
Check Auto-connect on startup to have HamMixer automatically connect to your radio every time you launch the app.
05 The Main Window — A Guided Tour
HamMixer packs a lot into a single window. Here's a quick map of what's where.
The main window with all major areas labeled. Each area is detailed in the sections that follow.
Top Bar (Radio Control Panel)
- Local/Remote dropdown: Switch between local serial connection and remote server mode
- Connect button: Connects to the radio (local) or the remote server (remote mode)
- WebSDR site selector: Dropdown to choose which WebSDR or KiwiSDR site to load
- Cogwheel button: Opens WebSDR site management
- Eye button: Toggles WebSDR browser visibility (compact/full view)
- Frequency LCD: 7-segment display showing the current frequency with highlighted tuning digit
- Mode label: Current operating mode (LSB, USB, CW, AM, FM)
- Tools buttons: WF (waterfall), CW (keyer), VFO A/B, REC (recording), Power Off
Radio Controls Row
- Band buttons: 160m through 6m (10 bands, 2 rows of 5). Currently active band is highlighted
- Mode buttons: LSB, USB, CW, AM, FM — exclusive selection
- Tuner: TUNE (start tuning cycle) and ATU (toggle antenna tuner on/off)
- Filter/AGC matrix: 2×3 grid of NB, NR, P.AMP, ANF, AGC, FIL — orange when active
- Voice memory: M1–M8 buttons (2 rows of 4), customizable labels
Mixer Area
- Delay controls: Manual delay slider (0–2000 ms), Sync button, Auto Sync checkbox
- RF Power: Slider with PWR Peak and SWR Peak readouts during TX
- Dual S-meters: Analog needles with spring-damper physics for Radio and WebSDR
- Channel strips: Radio and WebSDR volume sliders with mute buttons and LED level meters
- Crossfader: Slide left for Radio-only, center for balanced mix, right for WebSDR-only
- Master strip: Master volume, stereo level meter, master mute
WebSDR Browser
The bottom portion of the window is an embedded Chromium browser showing the selected WebSDR or KiwiSDR site. Toggle visibility with the eye button in the top bar. When hidden, WebSDR audio still routes through the mixer — only the visual is hidden.
06 Audio Mixer & Synchronization
The mixer is the heart of HamMixer. It takes two audio sources — your radio and a WebSDR — and blends them into a single output. Here's how each piece works.
Channel Strips
- Radio channel: Volume slider (0–100%), mute button, LED level meter. Controls the audio from your transceiver's USB output.
- WebSDR channel: Same controls for the WebSDR/KiwiSDR audio captured via the System Loopback device.
- Master strip: Master volume, stereo level meter, and master mute. This is the final output going to your speakers or headphones.
Crossfader
The crossfader is a quick way to blend between the two sources. Slide left to hear only your radio, center for a 50/50 mix, right for WebSDR-only. The individual channel volumes still apply on top of the crossfader position, so you have fine-grained control over the final mix.
Delay & Synchronization
Here's the challenge: your radio hears a signal at the speed of light via your antenna, but the WebSDR signal takes a detour through the internet — encode, transmit, decode, buffer. That adds anywhere from 200 ms to 2000 ms of delay depending on the SDR site. If you don't compensate, the two audio streams sound like an echo.
- Manual delay slider: 0–2000 ms. Drag to add delay to your radio audio so it lines up with the slower WebSDR stream.
- Sync button: One-shot auto-sync using GCC-PHAT cross-correlation. HamMixer listens to both streams, finds the delay offset, and sets the slider automatically. Works best when there's a strong signal on the band (a CQ call, a beacon, SSB speech).
- Auto Sync checkbox: Enables continuous sync — re-measures and adjusts every 5 seconds. The green checkbox stays lit when active.
The delay label next to the slider changes color: orange means unsynchronized (manual or no sync run yet), green means the auto-sync has locked onto a valid delay value.
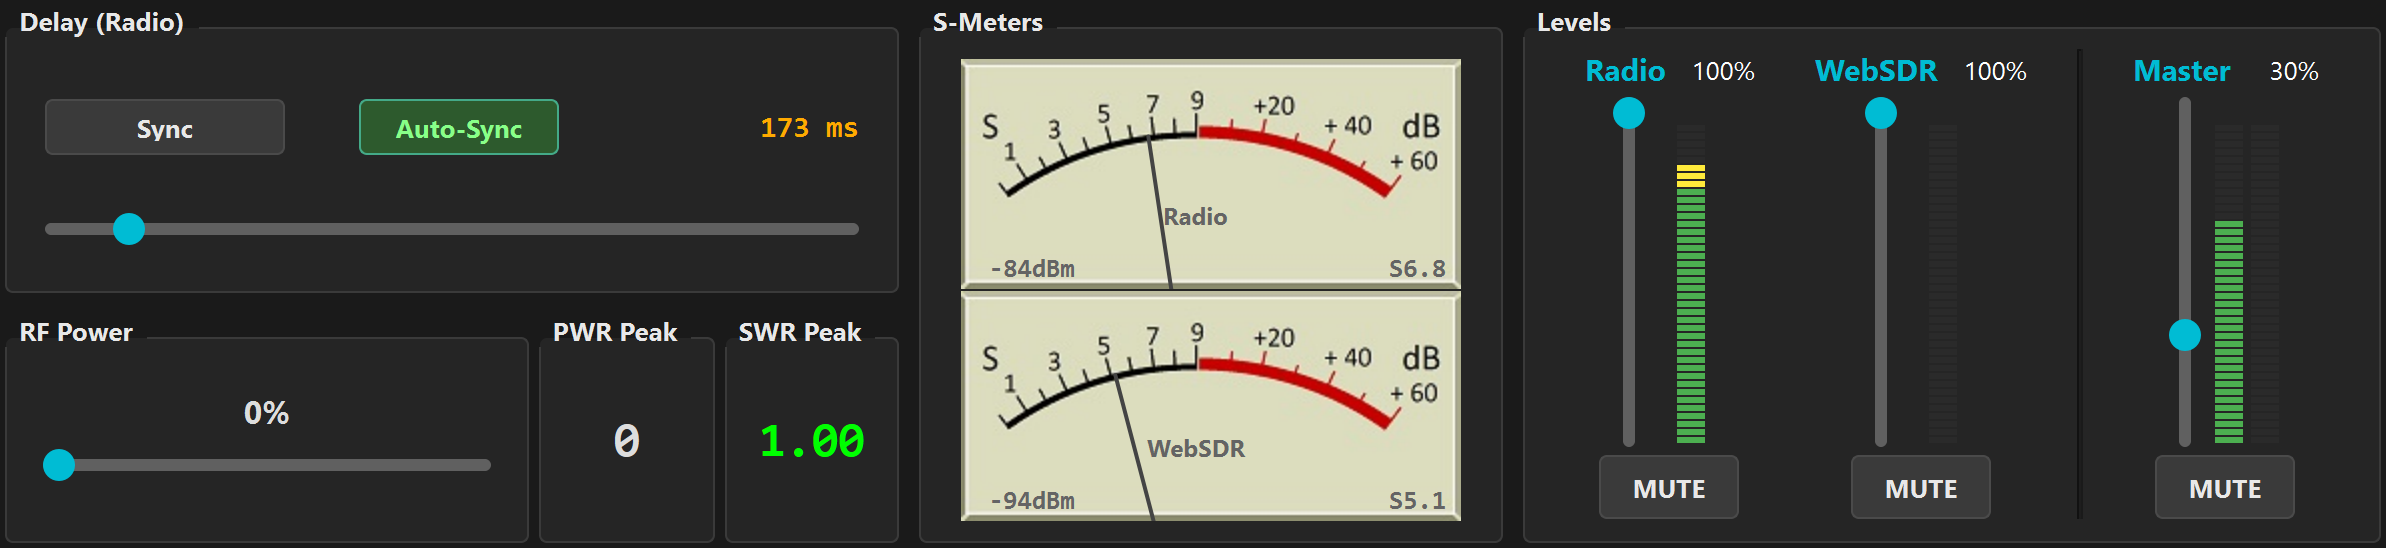 The mixer area — delay synced (green label), both S-meters showing signal, channel strips with different volume levels.
Smart Delay Behavior
When you mute the WebSDR channel, the delay automatically drops to zero (no point delaying your radio audio when there's nothing to sync with). When you unmute, the delay restores to its previous value. Seamless.
Voice vs. CW Sync
The auto-sync algorithm adapts to the current mode. In voice modes (SSB, AM, FM), it uses Voice Activity Detection (VAD) with a bandpass filter to isolate speech energy. In CW mode, it switches to envelope correlation — pitch-independent, so it works regardless of the CW tone or sidetone frequency.
S-Meters
Both S-meters use analog needle physics — a spring-damper model that gives them realistic needle movement, just like the meters on a classic rig. The scale runs from S0 to S9+60 dB, with a dBm readout below. The Radio S-meter reads from the CAT protocol; the WebSDR S-meter is extracted from the SDR's web interface.
Recording
Hit the REC button in the Tools row to start recording the mixed output as a WAV file. The button blinks red while recording. Press again to stop. Recordings are saved to the directory configured in Tools > Recording Settings.
07 WebSDR & KiwiSDR Integration
This is what makes HamMixer unique: listen to the same band from two completely different locations at the same time. Your antenna at your QTH, plus a WebSDR or KiwiSDR receiver somewhere else in the world.
Managing SDR Sites
Click the cogwheel button in the top bar (or go to Tools > Manage SDR Sites) to open the site manager. Here you can:
- Add new WebSDR or KiwiSDR sites (name, URL, type, optional password for KiwiSDR)
- Edit or delete existing sites
- Reorder sites with the Move Up/Down buttons (the first site is the default)
HamMixer comes with several pre-configured sites. The dropdown in the top bar lets you switch between them on the fly.
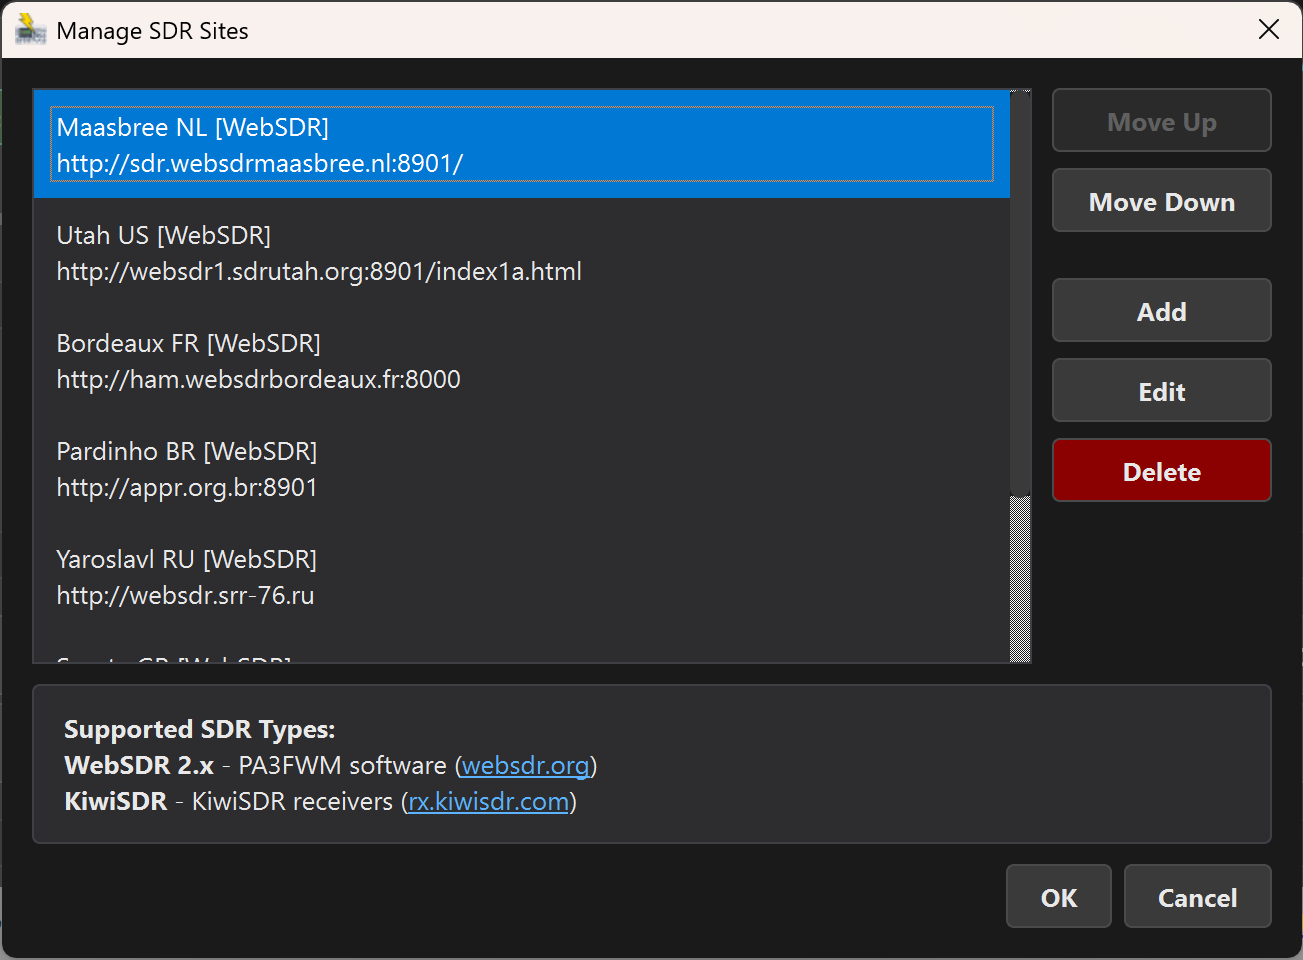 The SDR Sites manager — a mix of WebSDR and KiwiSDR sites, ready to go.
WebSDR 2.x (PA3FWM)
These are the classic WebSDR sites running PA3FWM's software. HamMixer loads them in the embedded browser and injects JavaScript to sync frequency and mode. When you tune your radio, the WebSDR follows. Change mode on the radio, and the WebSDR switches too.
KiwiSDR
KiwiSDR receivers use a WebSocket JSON protocol for real-time frequency and mode control. The sync is tighter and more responsive than WebSDR. Some KiwiSDR sites require a password for extended listening sessions — enter it in the site manager.
Frequency & Mode Sync
Whenever you change frequency on your radio (via the LCD, band buttons, or external VFO), HamMixer automatically tunes the WebSDR to match. Mode changes sync too — switch from LSB to USB on the radio, and the SDR follows. This is bidirectional: it also works when you click a frequency on the WebSDR waterfall.
Browser View Options
- Eye button OFF: Browser is hidden. Audio still plays through the mixer — only the visual is gone. Saves screen space.
- Eye button ON (compact): Browser visible in the lower portion of the window.
- Eye button ON (expanded): Click the expand button to let the browser fill more of the screen. Useful when you want to interact with the WebSDR's waterfall or controls.
TX Auto-Mute
When you transmit, the master audio automatically mutes. This prevents you from hearing your own delayed signal bouncing back from the WebSDR — which is confusing and distracting, especially in SSB. Audio unmutes instantly when you release PTT.
08 Radio Controls
The radio controls row sits between the top bar and the mixer area. Everything here sends CAT commands to your rig in real time, and the buttons stay in sync with the radio's actual state.
 The full radio controls row — bands, modes, tuner, filters, and voice memory.
Band Buttons
Ten buttons covering 160m through 6m, arranged in two rows of five. Click a band to switch to it. HamMixer remembers the last frequency and mode you used on each band (Band Stacking Register) — so when you come back to 20m, you'll be right where you left off.
The currently active band is highlighted. Default frequencies are set to the middle of each band's phone segment, but they update as you tune.
Mode Buttons
Five buttons: LSB, USB, CW, AM, FM. Click to change the radio's operating mode. The active mode is highlighted. These stay in sync with the radio — if you change mode on the rig's front panel, the button updates to match.
Antenna Tuner
- TUNE: Starts a tuning cycle. Automatically enables the ATU first (if it's off), sends a low-power carrier, waits for the tuner to match, then returns to your original power and mode. The button pulses during the tune cycle.
- ATU: Toggles the antenna tuner on/off. Some operators prefer to leave it off on well-matched antennas.
Voice Memory (M1–M8)
Eight voice memory buttons arranged in two rows. Click to play pre-recorded voice messages stored in your radio. Customize the button labels in Tools > Voice Memory Settings (e.g., "CQ Contest", "59", "QRZ"). Long labels scroll with a marquee effect.
The TS-590 uses a single-digit format and supports M1–M5 only.
RF Power & SWR
The RF power slider sets your transmit power from 0 to 100%. During transmission, two readouts appear:
- PWR Peak: Peak forward power in watts
- SWR Peak: Peak SWR reading, color-coded — green (<1.5), yellow (1.5–2.0), red (>2.0)
VFO A/B Exchange
One click swaps VFO A and VFO B. The implementation is protocol-aware: CI-V uses command 0x07/0xB0, Kenwood uses SV;, the TS-590 uses an FA/FB swap (since SV is Memory Transfer on that rig), and Elecraft uses SWT11;.
TX Indicator
A small LED in the Tools section turns red during transmission and green during receive. Quick visual confirmation of your TX/RX state.
Power Off
Sends a power-off command via CAT. A safety confirmation dialog prevents accidental power-downs. The button glows green when the radio is connected.
Dial Step Sizes
Five step sizes: 50 Hz, 100 Hz, 1 kHz, 10 kHz, 100 kHz. The currently active step is reflected by a highlighted digit on the frequency LCD — the digit that changes when you turn the encoder or scroll the mouse wheel.
09 DSP Filters & AGC
The 3×2 button matrix in the radio controls row gives you quick access to your radio's DSP features. Each button toggles or cycles through the available states. Orange highlight means active.
NB — Noise Blanker
Removes impulse noise (ignition, power line, switching noise). Icom and Elecraft: simple on/off toggle. TS-590: cycles through OFF → NB1 → NB2 (NB2 is more aggressive).
NR — Noise Reduction
DSP noise reduction for continuous noise (hiss, hum, QRN). Icom and Elecraft: on/off toggle. TS-590: cycles OFF → NR1 → NR2 (two reduction algorithms).
P.AMP — Preamplifier
RF preamplifier for weak signals. Icom: cycles OFF → P.AMP1 → P.AMP2 (two gain levels). Kenwood and Elecraft: simple on/off toggle.
ANF — Auto Notch Filter
Automatically notches out continuous carriers (heterodynes, tuning signals) that sit on top of the signal you're trying to copy. Simple on/off toggle on all brands.
AGC — Automatic Gain Control
Controls how fast the receiver recovers from strong signals. Icom: cycles Fast → Mid → Slow. Elecraft K3: Fast → Slow. TS-590: Off → Slow → Fast (uses the GC command, not GT).
FIL — IF Filter Width
Cycles through the radio's IF filter presets. Icom: FIL1 (Wide) → FIL2 (Mid) → FIL3 (Narrow) — three filters. TS-590: two filter widths. The label on the button updates to show which filter is active.
Bi-directional Sync
All six buttons poll the radio every 100 ms. If you toggle NR on the radio's front panel, the button in HamMixer updates within a tenth of a second. Works the other way too — click the button, and the radio changes state. True two-way sync.
10 Waterfall & Spectrum Scope
The waterfall displays real-time spectrum data from the radio's built-in scope. This feature is only available on radios that natively output spectrum scope data — currently Icom models such as the IC-7300, IC-7610, IC-705, and IC-9700. For radios without a built-in scope (Kenwood, Elecraft, older Icom models), the WF button is greyed out.
Click the WF button in the Tools row to open the waterfall window (1000×700 pixels).
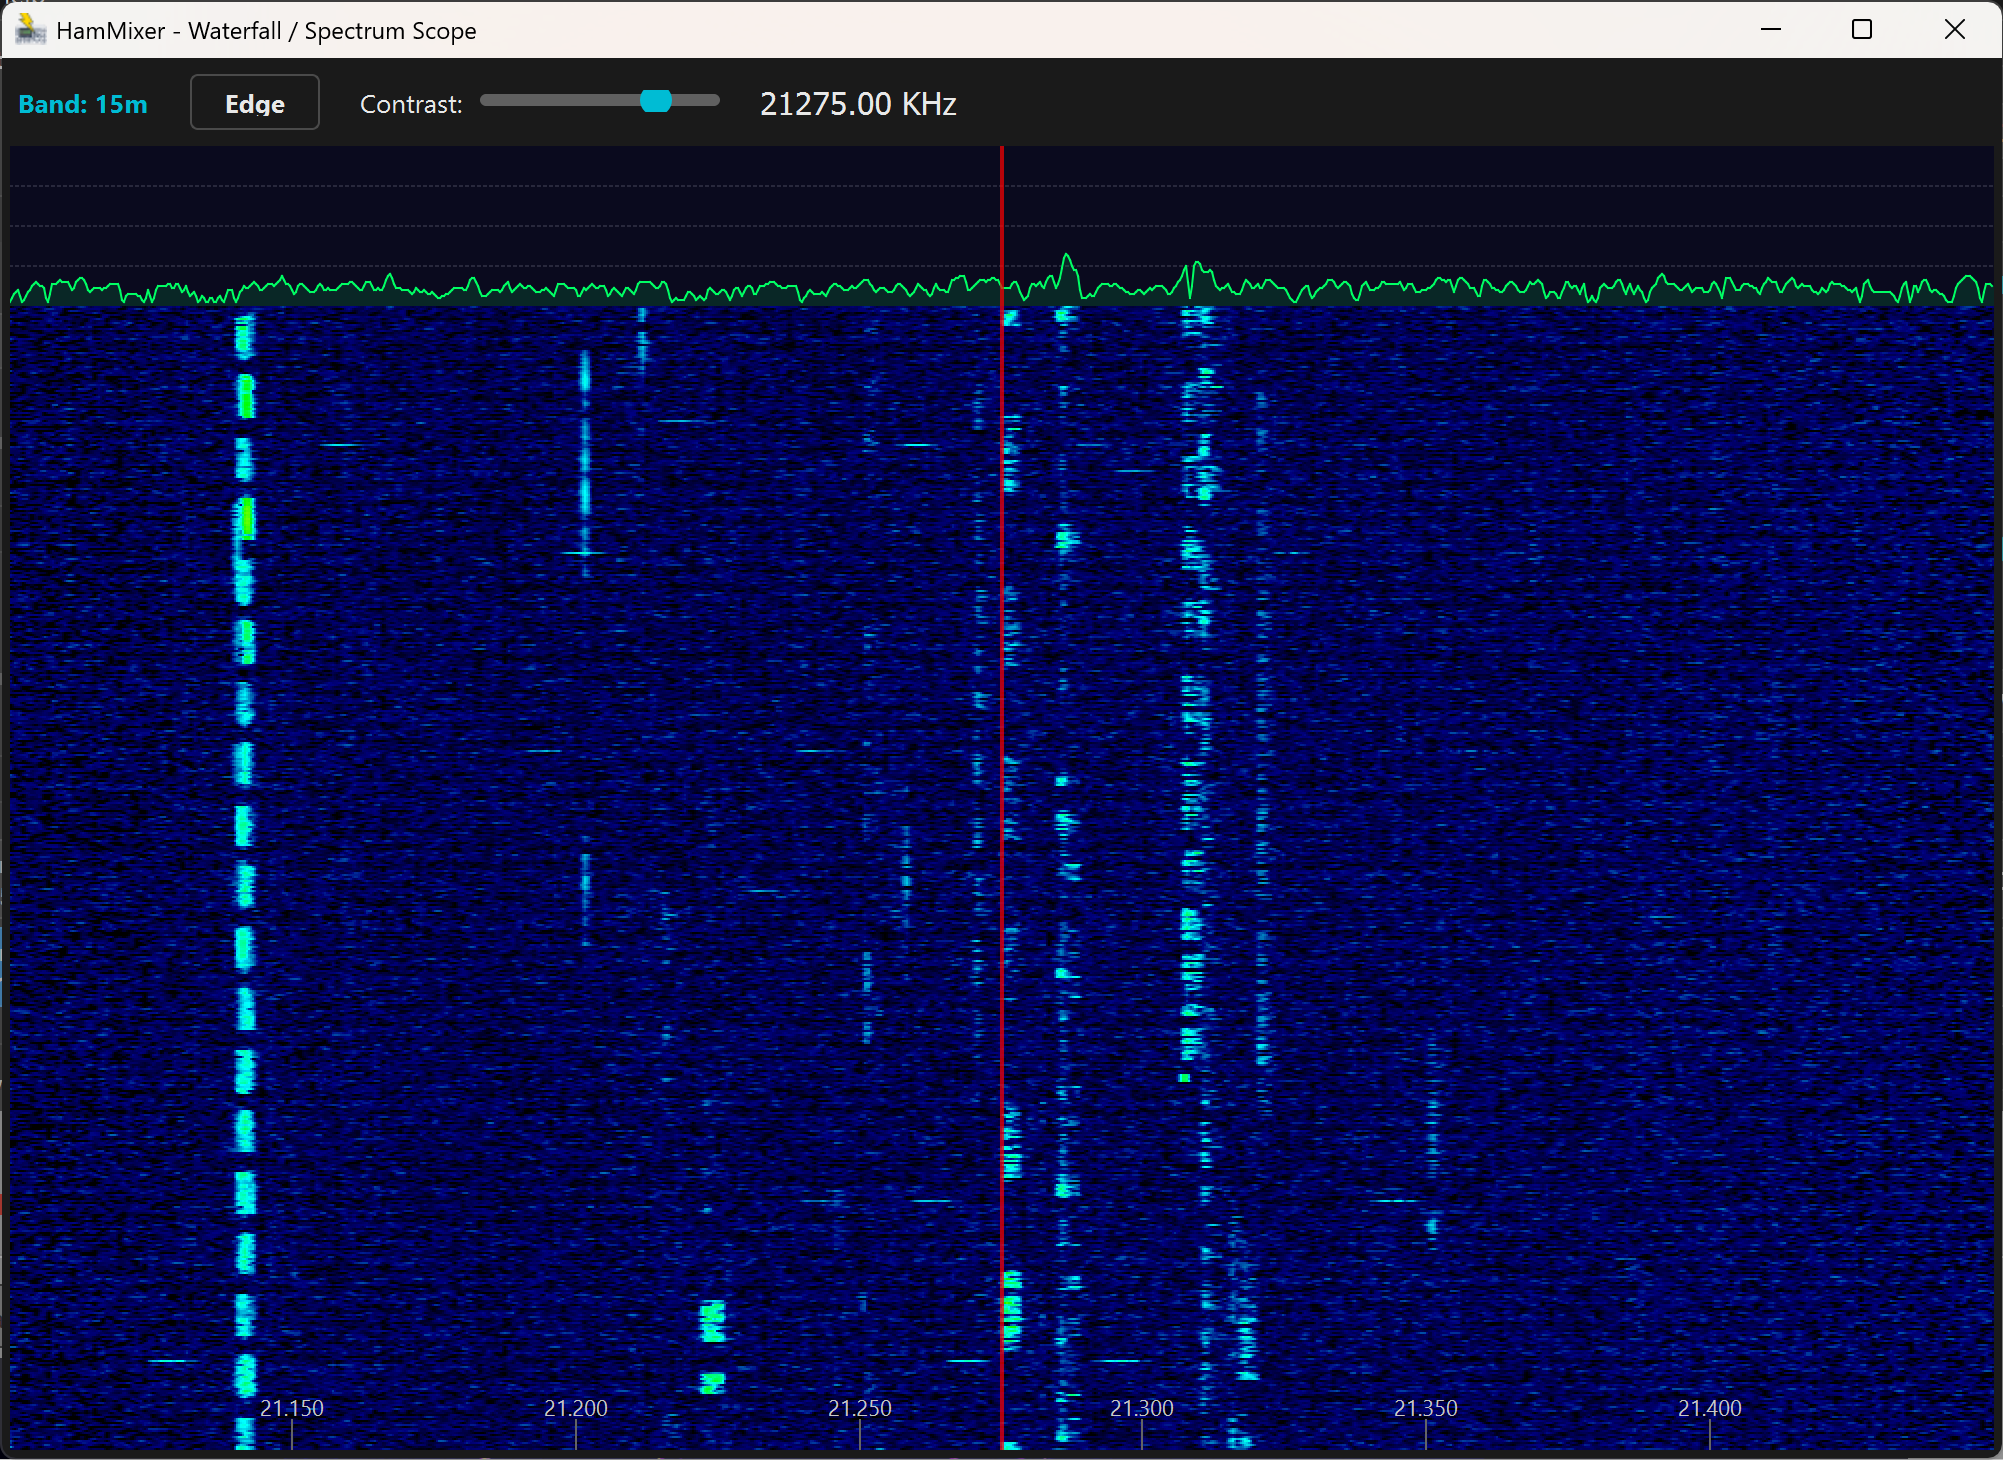 The waterfall window — spectrum graph on top, scrolling waterfall below. Several signals visible across the band.
What You See
- Top section: Real-time spectrum graph (amplitude vs. frequency). Signal peaks show as spikes above the noise floor.
- Bottom section: Scrolling waterfall. Time moves downward — current signals are at the top, older signals scroll down. Signal strength is color-coded (weak = dark blue, strong = yellow/white).
Click-to-Tune
Click anywhere on the waterfall or spectrum to instantly tune your radio to that frequency. See a signal pop up 5 kHz away? Just click it. The frequency LCD and radio update immediately.
Drag Tuning
Click and drag horizontally for continuous tuning. The tuning speed is velocity-based: slow drag = 50 Hz steps (fine tuning), fast drag = 1 kHz steps (quick scanning). Frequencies snap to 50 Hz boundaries for clean tuning.
Controls
- Edge button: Cycles through the radio's 4 preset scope edge widths (e.g., ±25 kHz, ±50 kHz, ±100 kHz, ±250 kHz)
- Contrast slider: Adjusts the color mapping of the waterfall. Default is 60%. Turn it up to make weak signals more visible (at the cost of a noisier display).
Waterfall Mode & Polling
When the waterfall window is open, HamMixer suspends non-essential polling commands to give the serial bus full priority for scope data. This ensures smooth, high-refresh-rate waterfall scrolling without stuttering. Polling resumes normally when you close the waterfall window.
11 CW Keyer
Click the CW button in the Tools row to open the CW keyer window. It stays open alongside the main window (modeless), so you can send CW while monitoring the mixer, waterfall, or WebSDR.
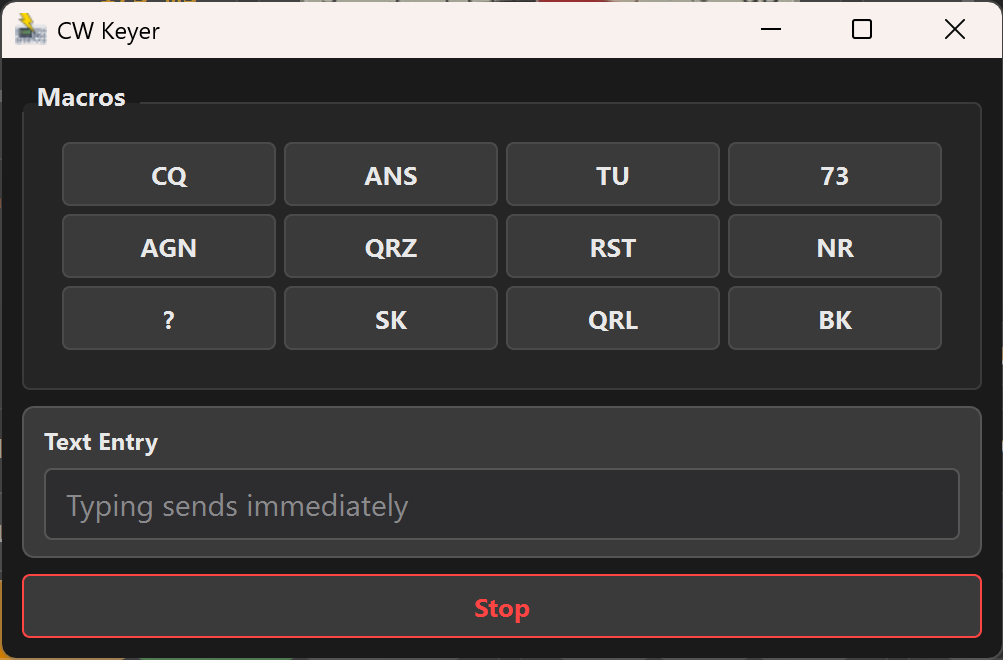 The CW window — 12 macros in a 4×3 grid, speed slider with SET button, Live/Buffer mode toggle, text entry field, and the Stop button.
Macro Buttons
Twelve programmable macros in a 4×3 grid. Default labels: CQ, ANS, TU, 73, AGN, QRZ, RST, NR, ?, SK, QRL, BK. Click any button to send that message in CW. Macros always send immediately, regardless of the send mode setting.
Right-click any macro button to edit its label and text content. You can customize all 12 macros for your operating style — contest exchanges, ragchew templates, whatever you need.
Speed & Mode Controls
The speed and mode bar sits between the macros and the text entry field:
- WPM slider (6–48) — drag to select your desired speed, then click SET to send it to the radio. The speed is also saved to your config for next time.
- LIVE / BUFFER toggle — choose your preferred send mode (see below). Your choice persists across sessions.
Live Mode vs. Buffer Mode
The CW keyer supports two send modes, selectable via the LIVE / BUFFER toggle:
- LIVE — Each character is sent to the radio as you type, character-by-character. The radio’s internal keyer queues them for perfect timing. This is the fastest way to send if your typing speed matches or exceeds your WPM setting.
- BUFFER — Type your full message first, then click SEND to transmit the entire text at once. This avoids ugly pauses between letters when you type slower than the radio’s CW speed. The SEND button only appears in buffer mode.
Stop Button
The red Stop button immediately halts CW transmission and clears any queued text. Useful when you need to break off mid-message.
CW Speed (Settings)
The WPM speed can also be configured in Tools > CW Config (the slider there has the same 6–48 WPM range). The speed is set on the radio’s internal keyer via CAT — timing is perfect regardless of network latency.
Multi-Protocol Support
The CW keyer adapts to your radio's protocol automatically:
- Icom: CI-V command 0x17 (send CW text)
- Kenwood:
KYcommand - Elecraft:
KYcommand (K4 supports up to 60 characters)
BLE CW Paddle (Iambic Keyer)
For a traditional CW feel, connect a standard CW paddle to the BLE accessory module's 3.5 mm TRS jack and key Morse wirelessly from your desk. HamMixer runs a full Iambic keyer locally — paddle events are processed on your PC with low-latency sidetone, and only the resolved characters are sent to the radio via CAT. Network latency does not affect your keying timing.
Setup
- Connect a CW paddle to the 3.5 mm TRS jack on your BLE accessory module (Tip = Dit, Ring = Dah, Sleeve = GND).
- In Tools > Function Mapping, enable Enable Paddle in the BLE Accessory section.
- Go to Tools > CW Config and select BLE Paddle as the CW input source. This option is only available when the paddle role is enabled.
- Choose Iambic Mode A or Mode B, set your paddle WPM (6–48), and enable/disable Sidetone (700 Hz).
- If your paddle is wired the opposite way, reverse the contact mapping in the same dialog.
- Open the CW window (click CW in the Tools row) — it switches to Paddle Monitor mode automatically when the paddle is used. Alternatively, it auto-opens on the first paddle press.
Paddle Monitor
When using the BLE paddle, the CW window switches to a paddle monitor view showing:
- Transcript — scrolling display of resolved characters as you key.
- Current symbols — the in-progress morse pattern (e.g., "
-..-") before the character is committed. - Connection health — BLE sequence number, dropped events, and transport latency.
The sidetone plays on a dedicated WASAPI audio device (independent from the main mixer) so it never glitches or interferes with received audio. During keying, radio RX audio is automatically suppressed with a smooth tail guard to prevent clicks.
Iambic Modes
- Mode A — releasing both paddles during a squeeze stops after the current element.
- Mode B — releasing both paddles during a squeeze completes the current element and plays one more of the opposite type.
CW Configuration (Tools > CW Config)
All CW settings are in one dialog:
- CW input source: Keyboard (text-to-morse) or BLE Paddle (iambic keyer)
- Speed: 6–48 WPM for both keyboard and paddle (independent settings)
- Iambic mode: Mode A or Mode B (paddle input only)
- Sidetone: Enable/disable the 700 Hz local tone during paddle keying
- Contact mapping: Swap Tip/Ring assignment if your paddle is wired the other way
- 12 macros: Label and text for each macro button
12 Remote Operation
Remote mode turns HamMixer into a client that connects to HamMixer Server running at your home station. Full radio control, bidirectional Opus audio, and even the waterfall — all over the internet.
Getting Connected
- Select Remote from the Local/Remote dropdown in the top bar.
- Open Tools > Remote Operation.
- Enter your server's address (IP or hostname), ports (default 7300/7301), username, and password.
- Click Connect. HamMixer authenticates over TLS and starts receiving audio.
Once connected, the window title changes to [REMOTE: server-address] and a compact quality indicator dot appears in the main window.
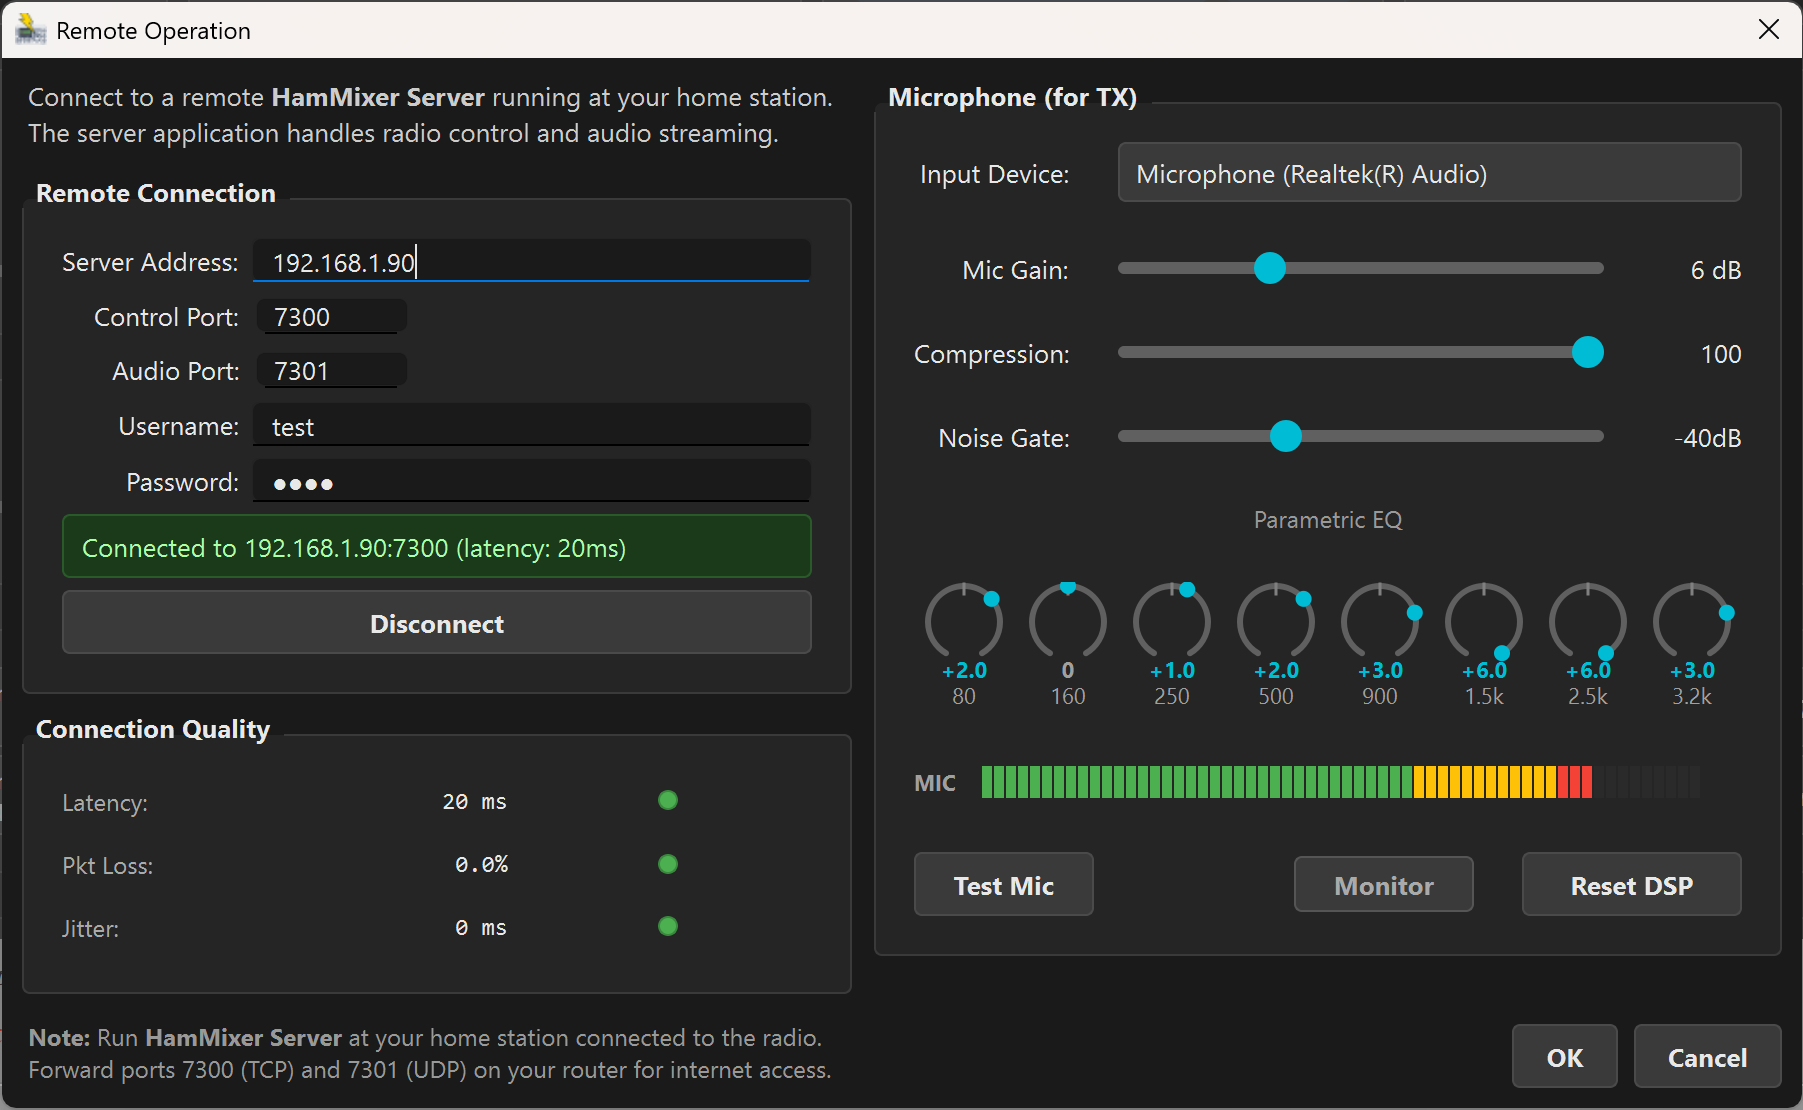 The Remote Operation dialog — connection settings on the left, mic DSP controls on the right.
Connection Quality
The left column of the Remote dialog shows a real-time connection quality widget with color-coded indicators:
- Latency: Round-trip delay in milliseconds. Green < 100 ms, yellow 100–200 ms, red > 200 ms.
- Packet loss: Percentage of audio packets that didn't arrive. Should be under 1%.
- Jitter: Variation in packet arrival timing. Under 15 ms is excellent.
Mic DSP for TX
The right column of the Remote dialog is your transmit audio processing chain — everything between your microphone and the radio:
- Mic input device: Select your local microphone from the dropdown
- Gain: 0–20 dB input boost
- Compressor: 0–100% compression ratio for consistent audio levels
- Noise gate: −60 dB to 0 dB threshold (OFF at −60 dB). Cuts background noise when you're not speaking.
- 8-band parametric EQ: Eight rotary knobs covering 80 Hz to 3.2 kHz, ±6 dB per band. Shape your voice for maximum clarity on air.
- Mic level meter: Real-time input level display
- Test Mic: Records 5 seconds of your microphone audio and plays it back so you can hear what you sound like
- Monitor: Real-time 250 ms loopback — hear yourself as you speak
- Reset DSP: Returns all DSP settings to defaults
WebSDR on Remote
When you authenticate to the server, the WebSDR browser loads automatically. You get the full dual-source mixing experience even in remote mode — your radio's audio from the server, plus a WebSDR of your choice. The delay sync works the same way.
Auto-Reconnect
If the connection drops — brief internet hiccup, router restart, server-side issue — HamMixer automatically attempts to reconnect with exponential backoff. You don't need to manually reconnect after a transient network glitch.
TX Safety During Network Failures
A common concern: "What if I'm transmitting and my internet drops?" HamMixer Server has multiple safety layers to prevent the radio from being stuck in transmit:
- Heartbeat timeout (10 seconds): The server expects a heartbeat from the client every 5 seconds. If two consecutive heartbeats are missed, the server disconnects the client and immediately sends PTT OFF to the radio.
- TCP disconnect detection: If the TCP connection drops cleanly (e.g., the client crashes or the socket resets), the server detects it within milliseconds and releases PTT.
- PTT watchdog timer (2 minutes): As an ultimate safety net, the server automatically releases PTT after 2 minutes of continuous transmission, regardless of client state. This protects against any edge case where the heartbeat mechanism fails.
- Emergency PTT release: When the client disconnects (intentionally or due to a network failure), it attempts to send a PTT OFF command as the very last action before closing the connection.
In the worst case (completely silent network failure), your radio will stop transmitting within 10 seconds. In most cases (clean TCP disconnect), it stops within milliseconds.
Latency & Audio Quality Tips
Remote operation is only as good as your network. Here's what makes the difference between "feels like I'm in the shack" and "this is unusable":
- Use wired headphones (3.5 mm jack) or your shack loudspeaker. Zero local audio latency. This alone can make a 200 ms connection feel like 100 ms.
- Wired Ethernet > WiFi on both client and server side. WiFi jitter causes audio dropouts and glitches. A single concrete wall between you and the access point can double your jitter.
- Bandwidth is not the bottleneck. Opus at 48 kbps needs only ~60 kbps total. Even a modest mobile data connection handles it fine. Stability and low jitter matter far more than raw speed.
- Latency under 100 ms feels instant for tuning, PTT, and CW. 200 ms+ starts to feel sluggish for rapid VFO knob movements, though CW still sounds perfect (the radio's keyer handles timing).
- Mobile data tip: 4G/LTE typically gives 30–60 ms latency with stable jitter. It's often better than hotel WiFi, which can spike to 300 ms+ during peak hours.
13 TCP Server & External Programs
HamMixer can share your radio's frequency and mode with logging software and other programs — without giving up serial port ownership.
HRD Protocol Emulation
HamMixer includes a built-in TCP server that speaks the Ham Radio Deluxe (HRD) protocol. Logging programs that support HRD as a rig control source can connect to HamMixer and read frequency, mode, and other status data in real time.
- In Tools > Radio Settings, check Enable HRD-compatible TCP server.
- In Tools > TCP Server, set the port (default 7809).
- In your logging software (HRD Logbook, N1MM Logger+, Log4OM, etc.), configure it to connect to
localhost:7809using the HRD/TCP rig control method.
The server binds to localhost only (127.0.0.1) — it's not accessible from the network. This is by design: the HRD protocol has no authentication, so network exposure would be a security risk. Up to 8 simultaneous clients can connect.
Program Auto-Launch
Go to Tools > Program Settings to configure up to 5 program slots. Each slot has:
- Program path: The executable to launch
- Run checkbox: When checked, the program auto-launches after a successful radio connection (1-second stagger between launches)
- Close checkbox: When checked, the program is automatically closed when HamMixer exits (sends WM_CLOSE, with a 3-second force-terminate fallback)
Typical use: auto-launch your logger and a digital mode program after connecting to the radio, and auto-close them when you're done.
Windows Startup
Check Start with Windows in Program Settings to have HamMixer launch automatically when you log into Windows. Combine with auto-connect for a fully hands-free startup sequence.
Configuration Management
- File > Save Configuration: Saves the current setup to a named file
- File > Open Configuration: Loads a previously saved configuration
- File > Open Recent: Quick access to recently used configurations
Configuration files are stored in the configurations\ folder next to the HamMixer executable. Settings auto-save on exit, and window position is remembered between sessions.
14 Function Mapping & USB/BLE Controller
Go to Tools > Function Mapping to map keyboard keys, key combinations, or USB controller buttons to any of HamMixer's 36 radio functions. You can also connect the BLE accessory module for wireless VFO tuning and hardware buttons. No mouse clicks needed — control everything from your keyboard or a hardware controller.
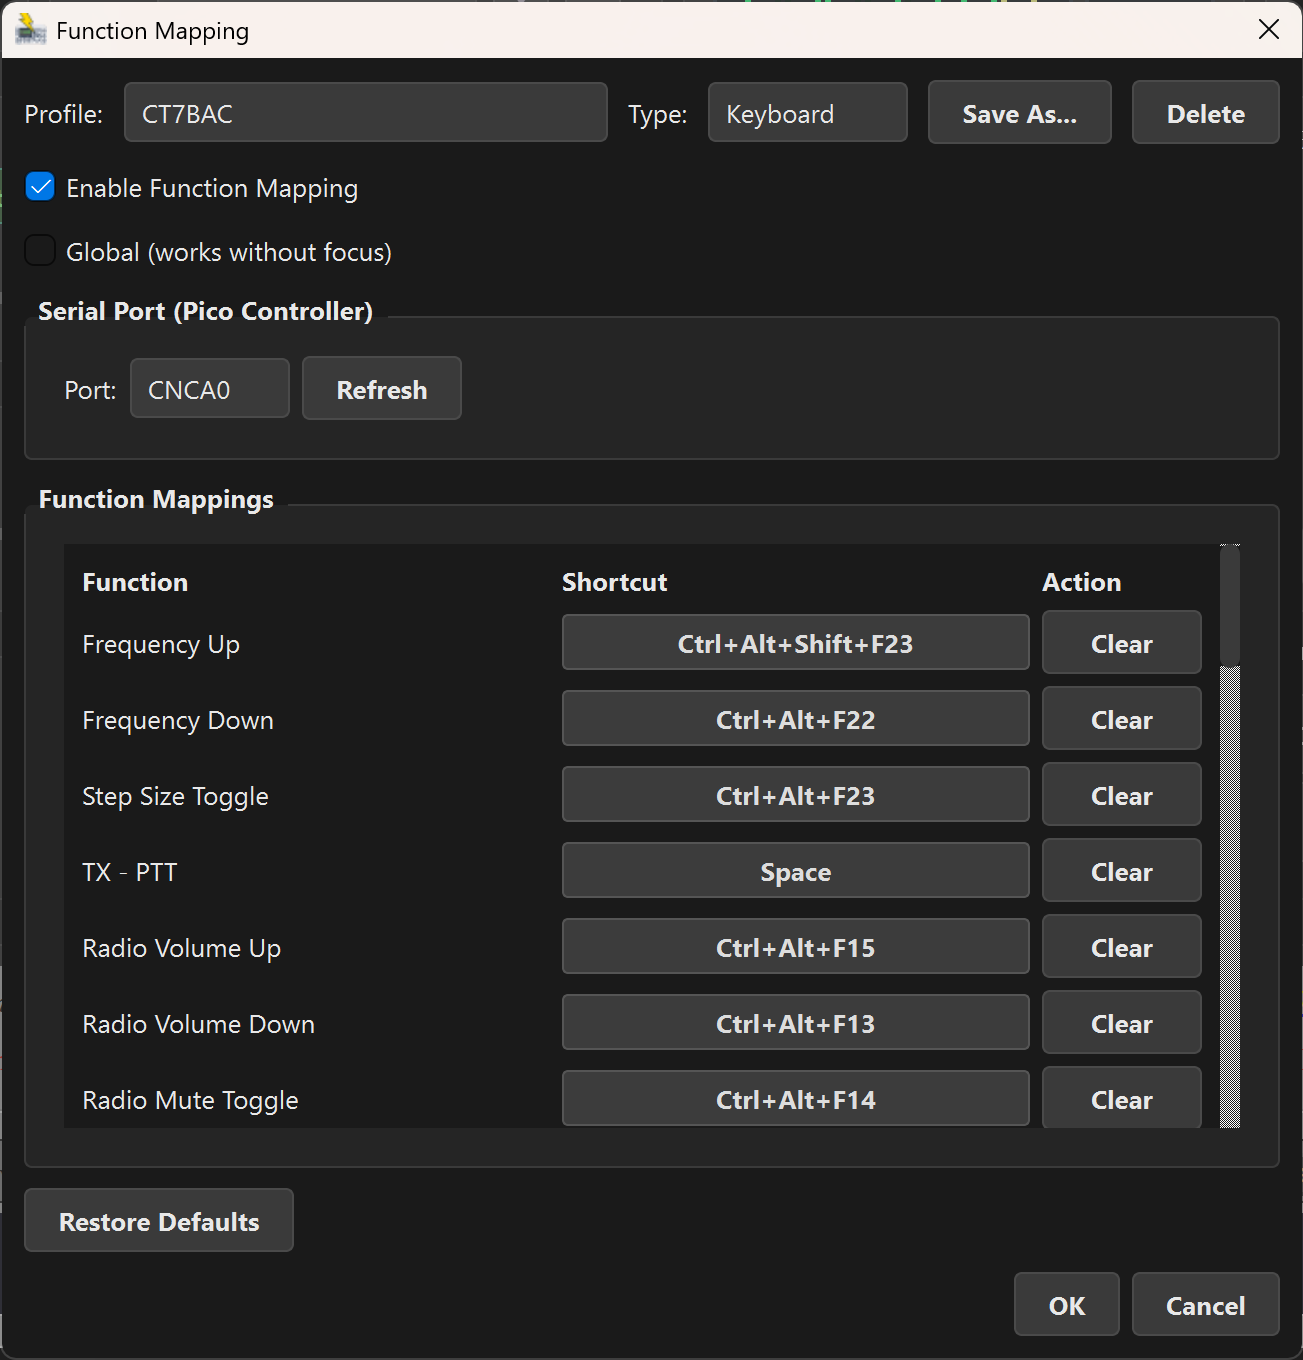 Function Mapping dialog with a serial profile — encoder and button functions assigned.
Keyboard Profiles
Map keyboard keys or combinations (e.g., F1, Ctrl+Up) to radio functions. You can create multiple named profiles and switch between them — one for contesting, one for ragchewing, one for DXing.
Enable Global mode to make keyboard mappings work system-wide, even when HamMixer isn't the focused window. This uses a low-level keyboard hook, so your mapped keys are intercepted regardless of which application is in the foreground.
Serial Profiles (Pico Encoder)
Map button events from a Raspberry Pi Pico USB controller to radio functions. The Pico encoder is a custom hardware project: a 600 PPR optical encoder plus 11 buttons and 1 modifier button, all in a compact desktop unit.
Serial profiles are focus-independent by nature — the Pico sends serial data regardless of which window is active.
Available Functions (36)
Here's what you can map:
- Frequency: tune up/down in the current step size
- Volume: Radio volume, WebSDR volume, Master volume (up/down each)
- RF Power: increase/decrease transmit power
- Sync: trigger one-shot sync
- VFO A/B: exchange VFOs
- Band: band up/down
- Mode: mode up/down
- Tuner: start tune cycle, toggle ATU
- DSP: toggle NB, NR, ANF, P.AMP, cycle AGC, cycle FIL
- Voice memory: trigger M1–M8
- Step size: cycle through dial step sizes
- PTT: push-to-talk toggle
Pico Encoder Details
The encoder supports two-speed acceleration — slow turns for fine tuning, fast turns for quick frequency jumps. Each of the 11 buttons has four event types: short press, long press, modifier + short press, modifier + long press. That's up to 44 distinct events from 12 physical buttons.
The encoder itself can be mapped to five functions: Frequency, Radio Volume, SDR Volume, Master Volume, or RF Power. The modifier + encoder rotates a different function (e.g., frequency on the encoder normally, volume on modifier + encoder).
BLE Accessory Module
The BLE accessory module connects wirelessly via Bluetooth Low Energy. It provides a physical rotary encoder for VFO tuning (same two-speed acceleration as the USB encoder), two configurable hardware buttons, and a 3.5 mm CW paddle jack. The recommended board is the Seeed Studio XIAO nRF52840 (Zephyr RTOS firmware); the Raspberry Pi Pico W is also supported. Configure it in Tools > Function Mapping under the BLE Accessory section.
Each accessory feature has its own enable toggle: Enable Encoder, Enable Macro Buttons, and Enable Paddle. At least one role must be enabled before you can connect. The encoder PPR, button assignments, and connection controls only appear when their corresponding role is enabled.
- VFO encoder: Wireless tuning with configurable PPR per device.
- Button 1 & 2: Assignable to any radio function or Disabled (default: PTT / Tune).
- CW paddle jack: Connect a standard paddle for iambic CW keying. The BLE Paddle option in Tools > CW Config is only selectable when the paddle role is enabled.
- Auto-reconnect: Automatically reconnects with exponential backoff (0 / 2 / 5 / 10 / 20 seconds) when the module comes back into range. Backoff resets on app focus.
The module uses Nordic UART Service over BLE. Flash the XIAO nRF52840 firmware from the hammixer_ble_accessory_nrf/ directory, or the Pico W firmware from hammixer_ble_accessory_picosdk/.
Profile Management
Create, switch, and delete named profiles from the dropdown at the top of the Function Mapping dialog. Your active profile persists between sessions.
15 Registration & Updates
Free Software
HamMixer is free for personal, non-commercial amateur-radio use, with no time limit. There's no trial countdown, no license key, and nothing to purchase. Commercial use requires separate written permission — contact ct7bac@gmail.com.
Registration
The first time you launch HamMixer, you'll be asked to complete a quick one-time free registration. Enter your name, callsign, and email, and you're done — this simply lets the developer know who is using HamMixer. No payment, no license key.
Updates
HamMixer checks for updates automatically 3 seconds after launch. If a new version is available, a dialog shows the changelog with three options: Download & Install, Skip This Version, or Remind Me Later. You can also check manually via Help > Check for Updates. Updates are always free.
A Troubleshooting
Quick-reference solutions for the most common issues.
| Problem | Solution |
|---|---|
| "No compatible radio detected" | Check: radio powered on, USB cable connected, correct COM port selected, no other software holding the port. Try an explicit baud rate instead of Auto. For Elecraft, set the Brand hint to "Elecraft". |
| No audio from radio | Verify the correct device is selected in Radio Input (Tools > Audio Devices). Check Windows Sound settings — the radio's USB audio must not be muted or set to exclusive mode by another application. |
| No WebSDR audio | Check that VB-Cable is installed and selected as System Loopback. Make sure the WebSDR site is loaded and playing audio in the embedded browser. Check the WebSDR channel strip isn't muted. |
| WebSDR not following frequency | Verify the SDR site type (WebSDR vs. KiwiSDR) is set correctly in the site manager. Some WebSDR sites use non-standard JavaScript that blocks frequency injection. Try a different site. |
| Audio out of sync | Tune to a frequency with a strong signal and click Sync. For CW, the envelope correlator works best with a clear CW signal. For distant KiwiSDR sites, you may need up to 2000 ms of delay — if Sync doesn't find it, increase the manual slider. |
| Remote connection fails | Check port forwarding on the server's router (TCP 7300 + UDP 7301). Check Windows Firewall rules on the server PC. Verify the server is running and shows green status. Try connecting from mobile data to rule out local network issues. |
| No audio in remote mode | Verify the Audio Output device is set in Tools > Audio Devices. Check that the server's audio devices are configured correctly (see Server Manual — Audio Setup). |
| Choppy remote audio | Check the connection quality indicators in the Remote dialog. High jitter (>30 ms) or packet loss (>2%) means a network problem. Use wired Ethernet instead of WiFi. Avoid Bluetooth headphones (they add 40–200 ms latency). |
| High CPU usage | The embedded Chromium browser (Qt WebEngine) is the main CPU consumer. Hide the browser with the eye button when you don't need to see the WebSDR interface. Closing the browser view reduces CPU usage significantly. |
| "Missing Dependency" on launch | Install the Visual C++ 2015-2022 Redistributable (x64) from Microsoft. |
| Multiple COM ports, unsure which one | Unplug the USB cable, note which port disappears in Device Manager, reconnect. The one that reappears is your radio. If you see two ports from one cable, try the lower-numbered one first. |
B Quick Reference Card
HamMixer Desktop at a Glance
| Config file | %APPDATA%\HamMixer\config.json |
| Sample rate | 48,000 Hz |
| Bit depth | 16-bit signed PCM stereo (auto-converts IEEE float) |
| Buffer size | 1024 samples (~21 ms latency) |
| Delay range | 0–2000 ms (96,000 samples max) |
| Remote control port | TCP 7300 (TLS 1.2+ encrypted) |
| Remote audio port | UDP 7301 (AES-128-CTR encrypted) |
| HRD TCP server port | TCP 7809 (localhost only, no auth) |
| Audio codec (remote) | Opus 48 kHz, mono, 48 kbps (~60 kbps total) |
| HRD max clients | 8 simultaneous connections |
| Supported radios | Icom CI-V, Kenwood CAT, Elecraft CAT, newer Yaesu (ASCII CAT) |
| Supported SDRs | WebSDR 2.x (PA3FWM), KiwiSDR |
| License | Free for personal, non-commercial amateur-radio use |
| Polling interval | 100 ms (configurable) |
| S-meter update rate | 30 Hz |
| BLE accessory | Nordic UART (WinRT), VFO encoder, 2 buttons, CW paddle jack (3.5 mm TRS) |
| CW paddle keyer | Iambic A/B, 6–48 WPM, 700 Hz sidetone (dedicated WASAPI device) |
See also: Server Manual | Mobile Manual