01 Overview & What You Need
HamMixer Mobile turns your phone or tablet into a remote control for your home station. It connects to HamMixer Server running at your QTH, giving you full rig control and bidirectional audio from anywhere in the world. It's the same TLS+UDP protocol as the desktop client — the server doesn't care which client connects. Your shack in your pocket.
How It Works
The architecture is straightforward: HamMixer Server sits at your home station, connected to your radio via USB. The mobile app connects to that server over the internet. TCP port 7300 (encrypted with TLS) carries all control commands — frequency changes, mode selection, PTT, filter settings. UDP port 7301 (encrypted with AES-128-CTR) carries Opus audio in both directions — you hear the radio, the radio hears you.
Only one client can be connected at a time — it's an exclusive lock, just like sitting in front of your rig. The app is not a standalone radio app. Without HamMixer Server running at your QTH, there's nothing to connect to.
What You Can Do
- Full frequency, mode, and band control — same as being at the rig
- Press-and-hold PTT with real-time bidirectional Opus audio
- DSP filters: NB, NR, P.AMP, ANF, AGC, IF filter width
- Antenna tuner control (ATU on/off, tune cycle)
- Real-time waterfall display (requires a radio with built-in spectrum scope output)
- CW keyer with 8 programmable macros, live or buffered text entry, and quick WPM control
- QSO logging with ADIF export and optional QRZ.com upload
- DX Cluster with real-time spots, DXCC resolution, and one-tap tune-and-log
- Voice memory playback (M1–M8)
- RF power control (0–100%)
- VFO A/B exchange and Split mode
- BLE module with wireless VFO encoder and two configurable hardware buttons (27 mappable functions)
- Bluetooth keyboard with 26 mappable radio functions
Requirements
- Mobile or tablet running Android 7.0+ or iOS 15+
- HamMixer Server running at the home station (see Server Manual)
- Wi-Fi or mobile data connection
- Icom radio with CI-V (current version — Kenwood/Elecraft mobile support coming)
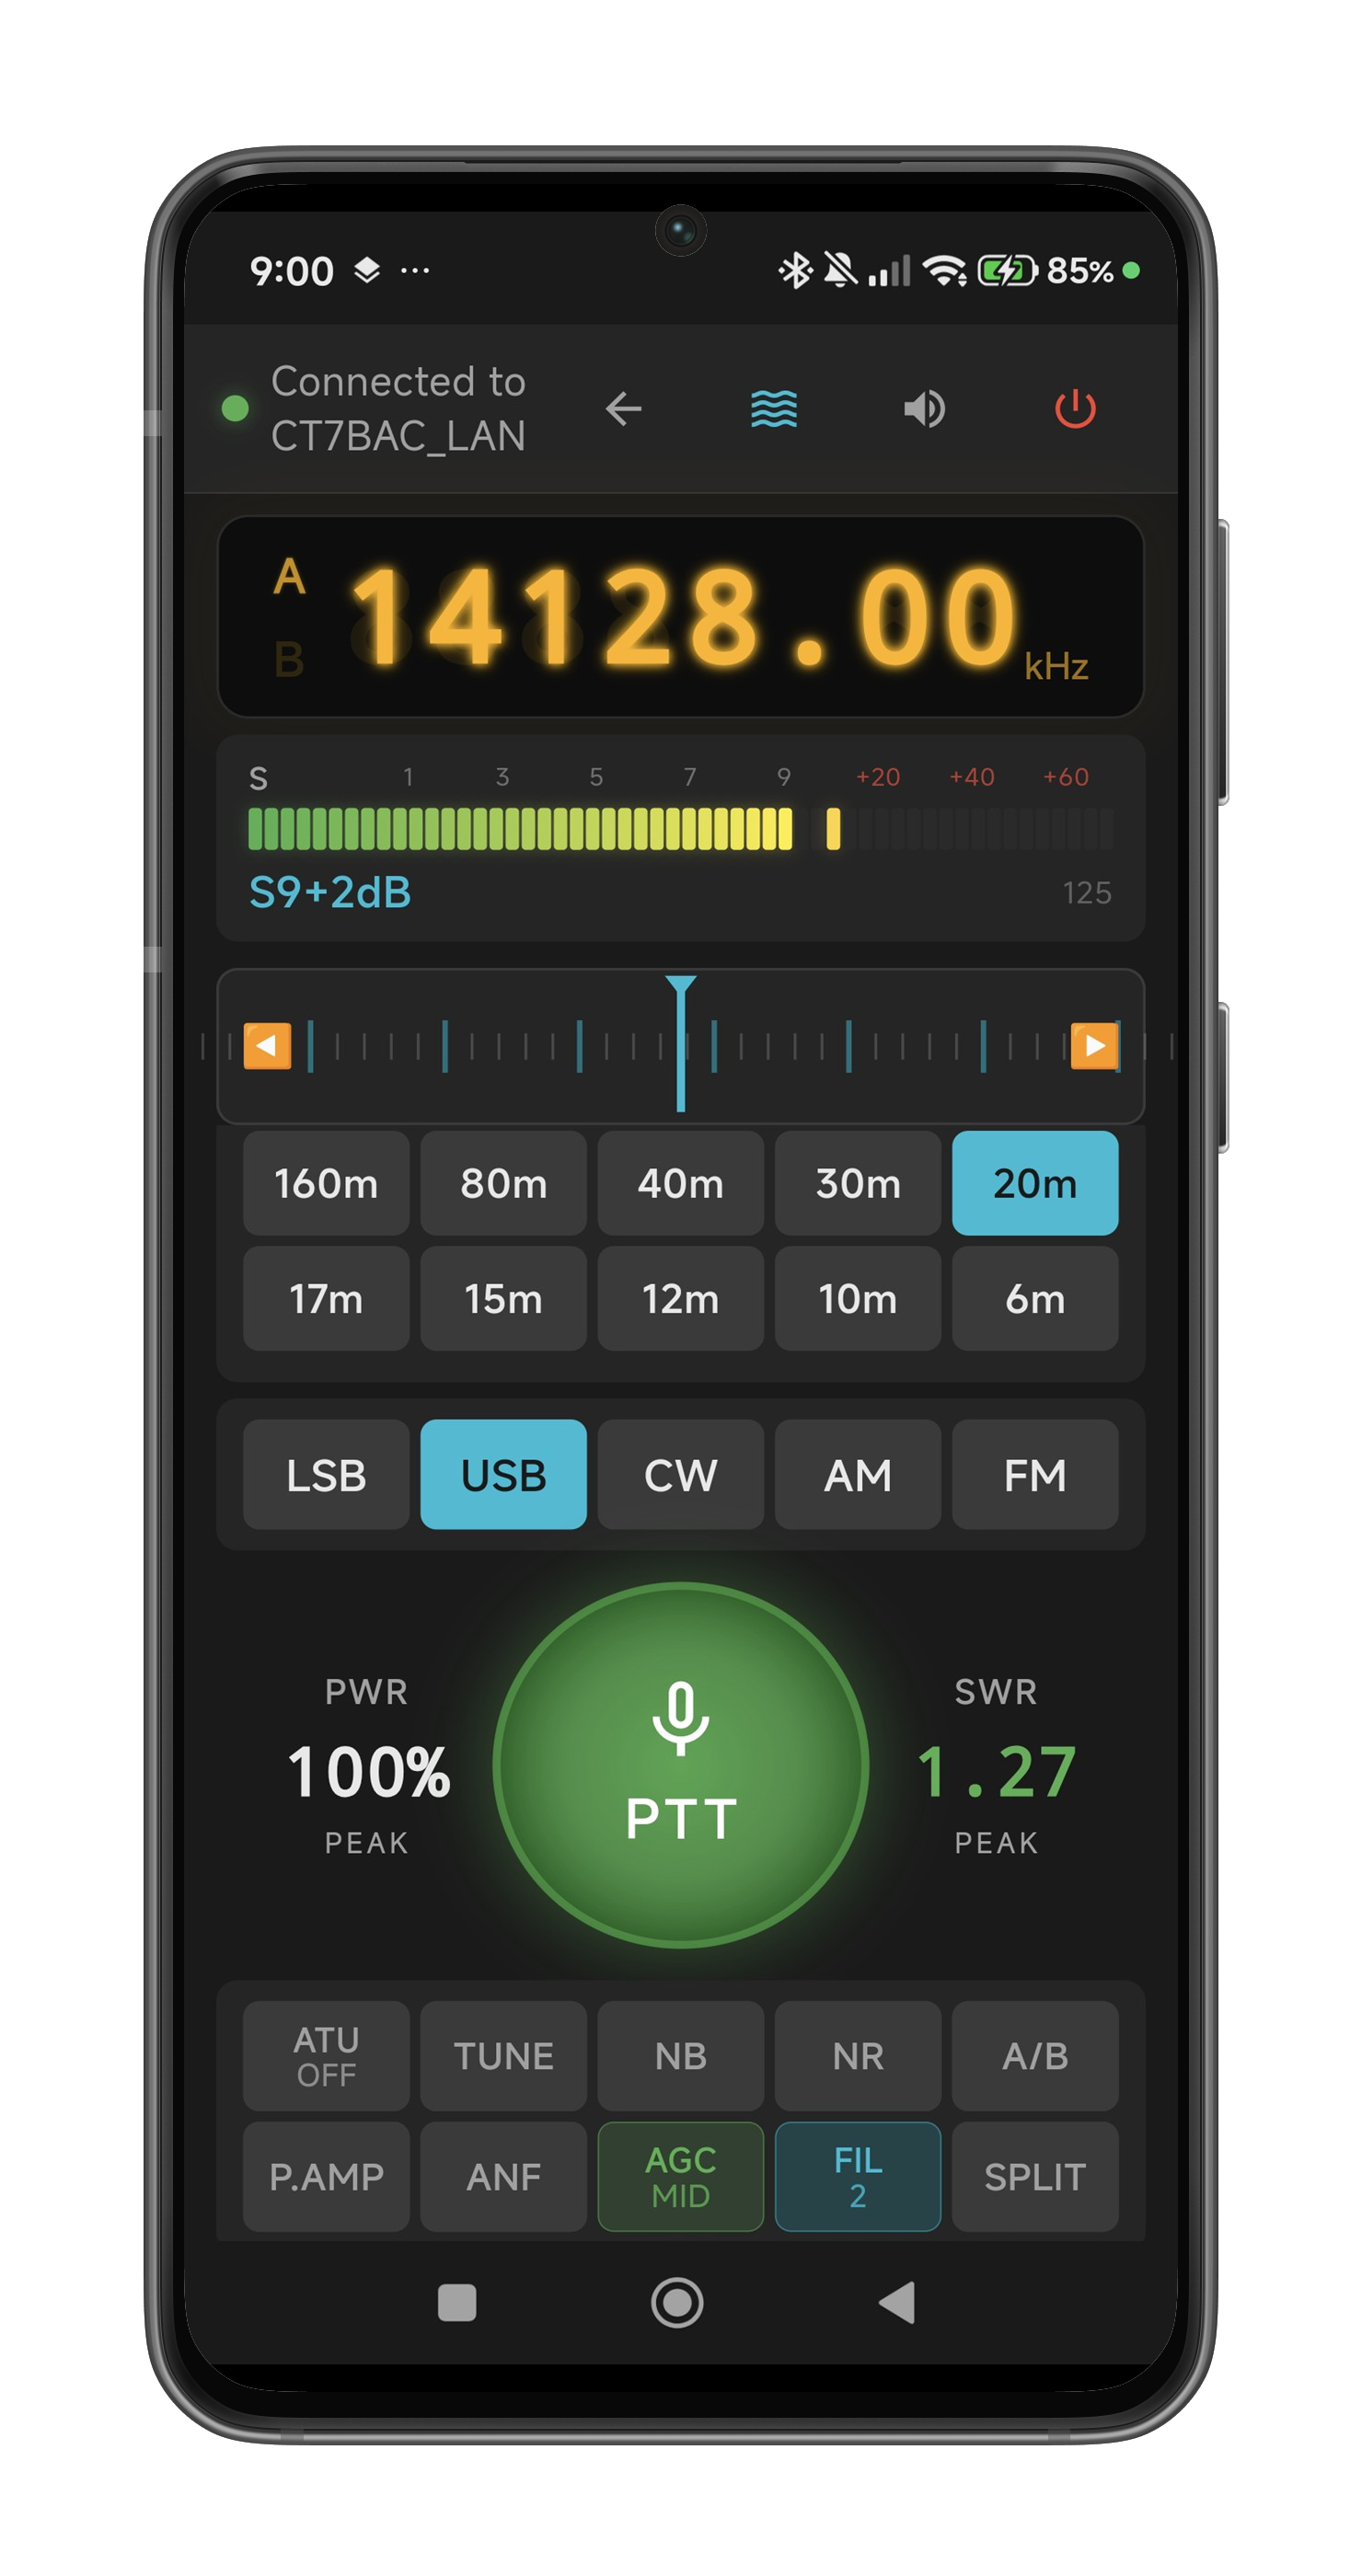 The main screen — full radio control from your mobile or tablet, connected to your home station.
02 Installation & First Launch
Download HamMixer from the App Store (search "HamMixer"). It's a free download — the app connects to your HamMixer Server running at the home station.
First Launch
On first launch, the app asks for permission:
- Microphone — needed for TX audio. If you deny this, the app still works for receive, but the PTT button is disabled and shows "NO MIC".
Grant it for the full experience. You can always change permissions later in your device's settings.
If the app detects a previous backup file (from a reinstall or device transfer), it automatically restores your settings — server configurations, DSP presets, CW macros, everything except passwords.
Where Things Are Stored
- Server credentials: System keychain — passwords are never stored in plain text
- Settings: App preferences, automatically backed up to your cloud account
- ADIF logs:
HamMixer_Log.adi— canonical log maintained internally; export via Settings > Backup & Restore > Export ADIF File. On iOS, also accessible via Files app. Full log is embedded in every settings backup. - All settings can be exported and imported manually (see Settings & Backup)
03 Server Management & Connecting
The connection screen is the first thing you see when you launch the app. It shows your saved servers as cards — tap one to connect.
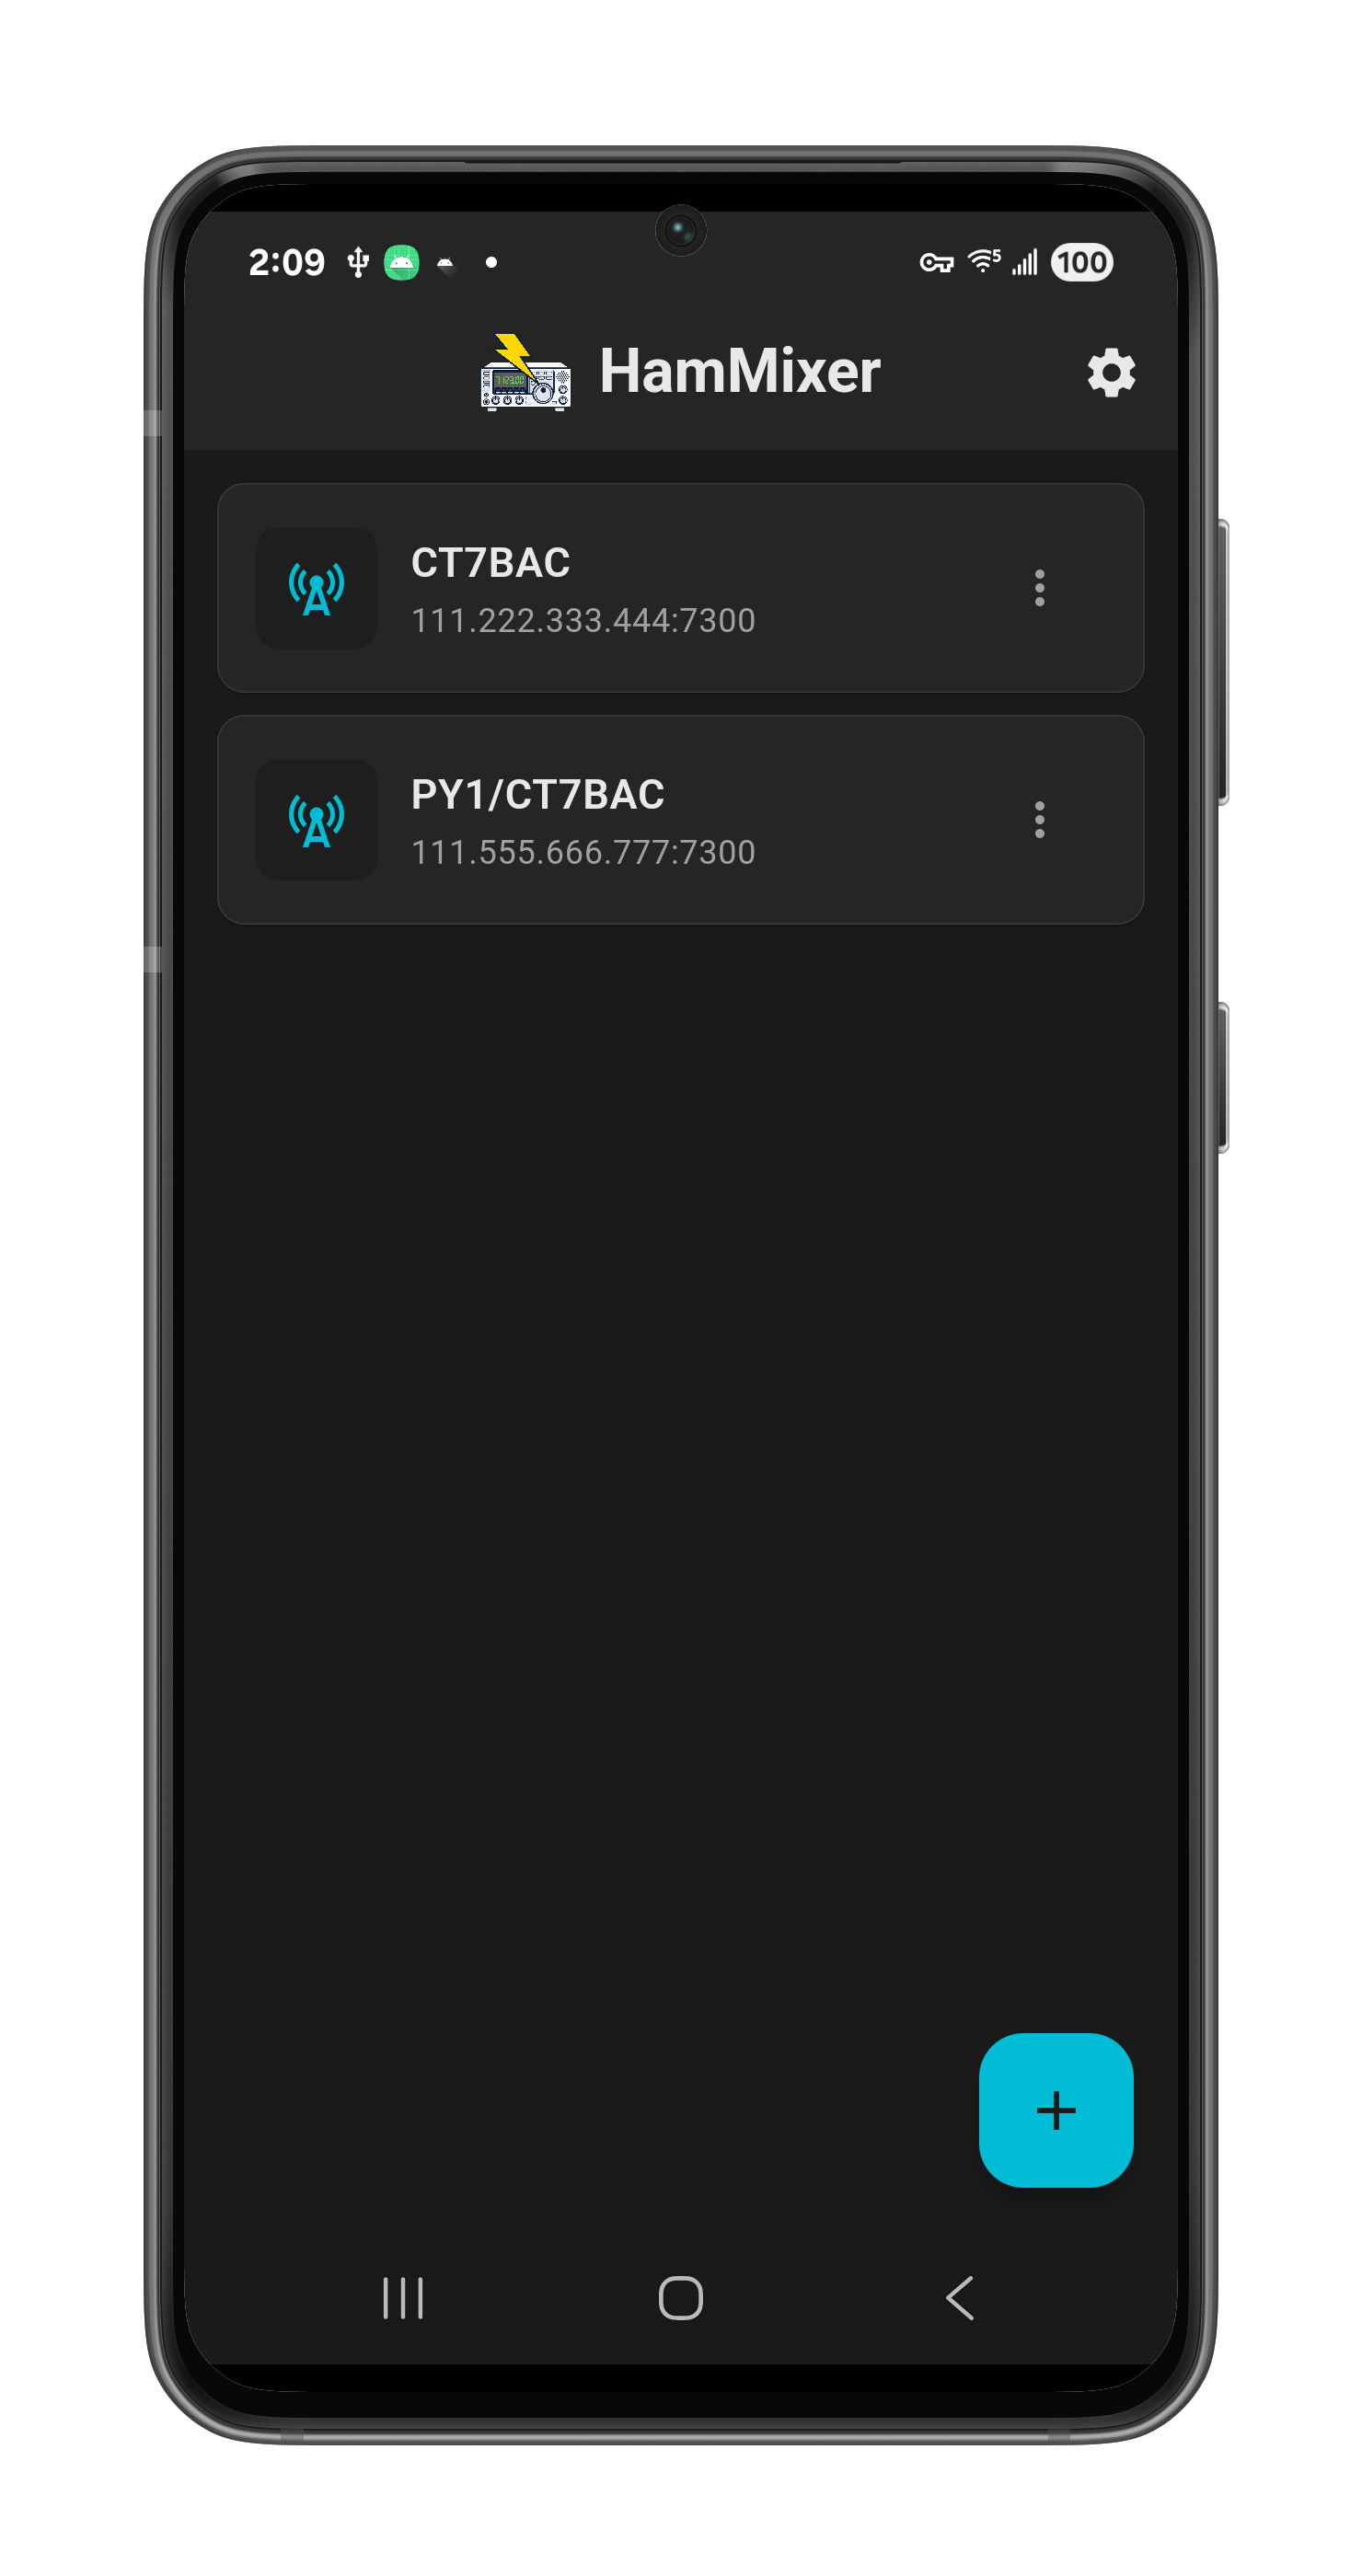 The connection screen — your saved servers as cards. Tap one to connect, or tap + to add a new server.
Adding a Server
- Tap the + button (bottom-right corner).
- Enter a station name (e.g., "Home QTH" — just a label for your reference).
- Enter the host — IP address or domain name (e.g.,
mystation.ddns.net). - TCP port — default 7300. Change only if your server uses a different port.
- Username and password — same credentials configured in HamMixer Server.
- Tap Save.
Editing & Deleting Servers
Each server card has a three-dot menu. Edit opens the same form with your saved details. Delete removes the server — you'll get a confirmation prompt before it's gone.
Password Security
Passwords are stored in the device's secure keychain — never in plain text, never included in backups. After restoring a backup on a new device, you'll need to re-enter passwords for each server.
Network Diagnostics
When you tap a server card to connect, the app first runs an automatic network check:
- DNS Resolution — resolves the hostname
- TCP Connection — tests the control port
- UDP Port — confirms the audio port is reachable
- UDP Streaming Quality — sends 140 UDP ping packets over 10 seconds (simulating real audio traffic) and measures packet loss, RTT jitter, and max inter-arrival gap. The max gap metric directly predicts whether audio hiccups will occur — if gaps exceed the audio buffer size, you'll hear silence. The 10-second window catches intermittent WiFi micro-dropouts that shorter tests miss. This is the most important test for real-world audio quality.
Results are color-coded: green (excellent), yellow (good), orange (fair), red (poor). The overall verdict is driven by the UDP streaming quality test. A "CONNECT" or "CONNECT ANYWAY" button is displayed based on the results.
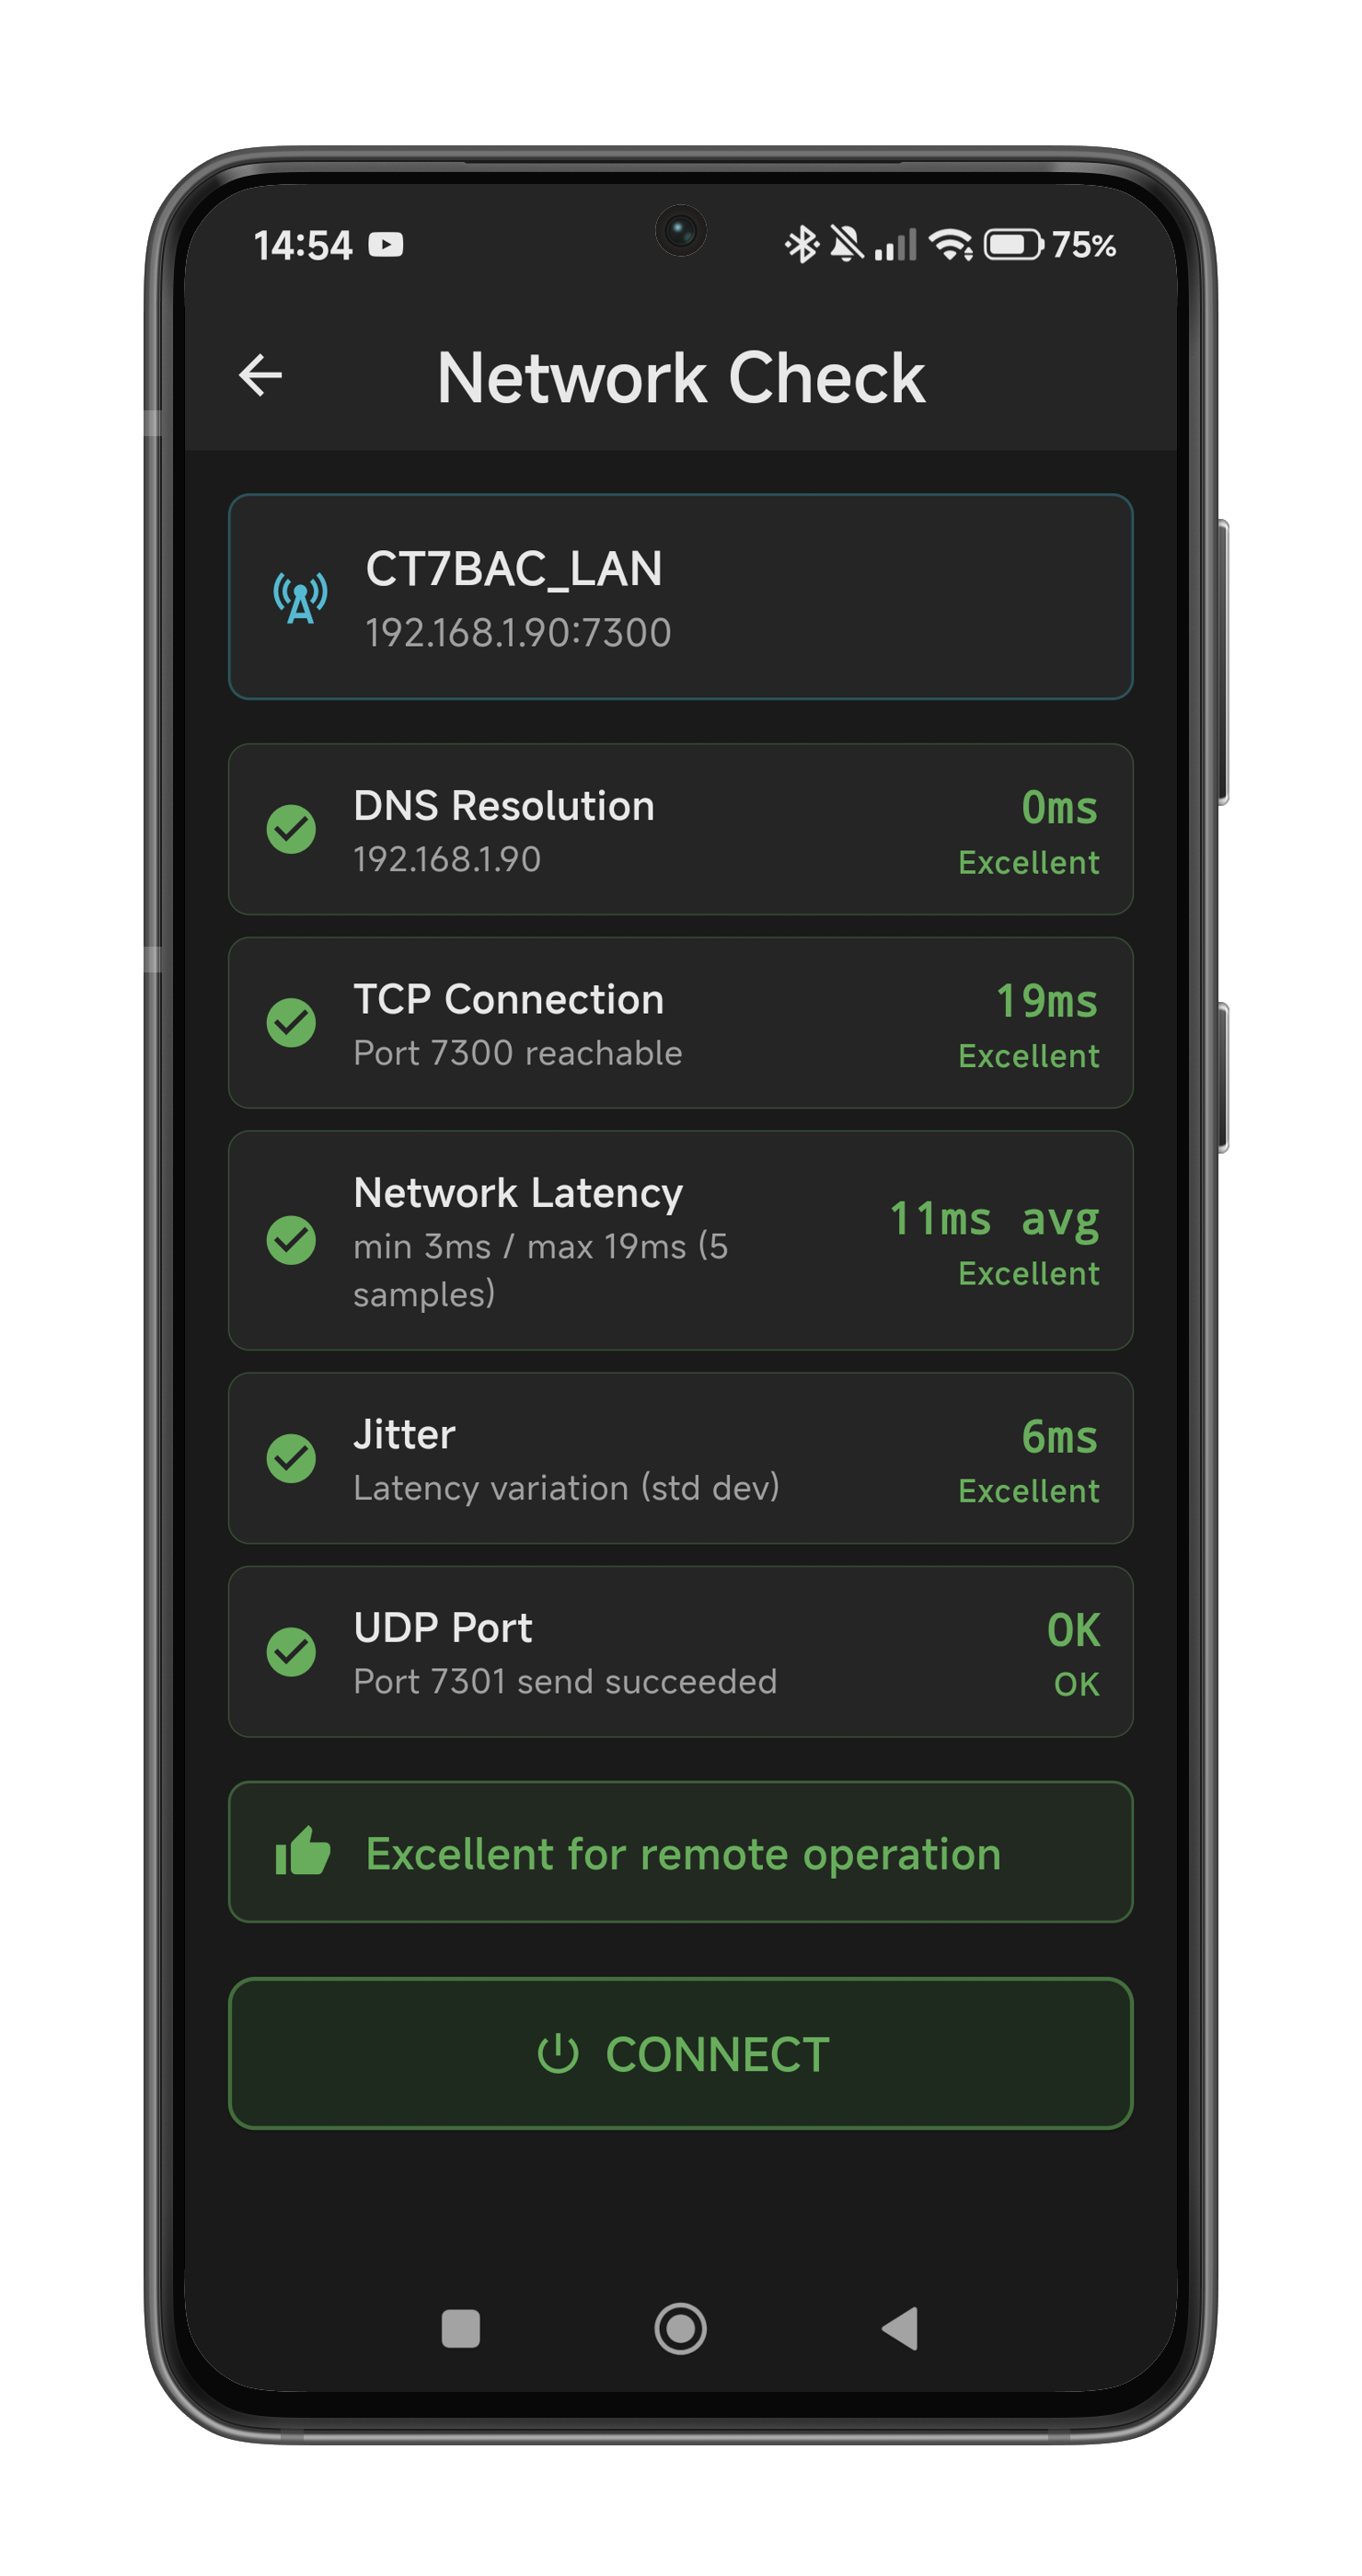 Network diagnostics — four tests including 10-second UDP streaming quality with color-coded results and an overall verdict.
Connection Flow
After diagnostics, the app connects via TLS, authenticates with your credentials, exchanges audio encryption keys, and starts streaming. The status bar turns green and you're taken to the main screen automatically.
Auto-Reconnect
If the connection drops (network switch, brief outage, walking between Wi-Fi and mobile data), the app reconnects automatically with exponential backoff — 1s, 2s, 4s, up to 30s between attempts. The status bar turns red during reconnection. Audio mutes cleanly during the process — no glitches or bursts of noise.
TX Safety During Network Failures
Worried about what happens if your internet drops while transmitting? HamMixer Server has multiple safety layers to protect your radio:
- Heartbeat timeout (10 seconds): The server expects a heartbeat every 5 seconds. Two missed heartbeats trigger automatic disconnect and immediate PTT release.
- TCP disconnect detection: If the connection drops cleanly, the server detects it within milliseconds and releases PTT.
- PTT watchdog (2 minutes): The server automatically releases PTT after 2 minutes of continuous transmission — an ultimate safety net regardless of client state.
- Emergency PTT release: The app sends PTT OFF as its last action before closing the connection.
In the worst case (silent network failure), your radio stops transmitting within 10 seconds. In most cases, within milliseconds.
04 The Main Screen — A Guided Tour
Once connected, this is where you'll spend your time. Let's walk through every element from top to bottom.
Status Bar
- Green dot + "Connected to [station name]" — your connection status at a glance
- Left arrow — returns to the connection screen (does NOT disconnect — you stay connected in the background)
- Waterfall button (wave icon) — opens the spectrum scope (only visible if your radio has built-in scope output)
- Mute button (speaker icon) — toggles RX audio. Red when muted.
- Disconnect button (power icon, red) — opens the disconnect dialog: Disconnect Only / Power Off & Disconnect / Cancel
Frequency Display
- Large amber-on-black LCD readout in the format
XXXX.XX kHz - Shows
----.--until the first poll response arrives (before the radio reports its frequency) - Ghost "8" digits in the background for that classic LCD effect
- Tap the frequency display to open the QSO Log (see Section 10)
- Shows a padlock icon when VFO is locked
S-Meter
- 54-segment horizontal LED bar matching the IC-7300's S-meter scale
- Green segments (S1–S9), yellow (S9), red (S9+20, +40, +60)
- 1-second peak hold LED for easy readback
- Numeric readout below: "S7", "S9+20 dB", etc.
Tuning Wheel
Horizontal drag bar for smooth VFO control. See Section 05 for detailed behavior.
Band Grid
2×5 buttons (160m through 6m) — active band highlighted. See Section 05.
Mode Row
LSB, USB, CW, AM, FM — active mode highlighted. See Section 05.
PTT Area
Large central PTT button flanked by PWR and SWR peak indicators. See Section 06.
DSP Control Grid
2×5 button matrix for filter, RF front-end, VFO exchange, and split mode control. See Section 07.
RF Power Slider
0–100% horizontal slider with lightning bolt icon. See Section 07.
Voice Memory / CW Macros
2×4 button grid — M1–M8 for voice memories, switches to CW macros in CW mode. See Section 06 and Section 09.
05 Tuning & Band Selection
The Tuning Wheel
Drag left to go down in frequency, drag right to go up. The wheel uses two-speed velocity: slow, careful finger movement gives you 50 Hz per step (fine tuning), while a quick swipe jumps 1 kHz per step (band scanning). Same feel as the physical tuning knob on your rig.
Haptic feedback clicks on every step — you can feel each frequency change under your finger. Tick marks scroll in real-time as the frequency changes. The wheel is disabled (greyed out, unresponsive) when VFO is locked.
Band Selection
Ten band buttons: 160m, 80m, 40m, 30m, 20m, 17m, 15m, 12m, 10m, 6m. Tap a band to QSY — the radio jumps to that band immediately.
The app uses a Band Stacking Register: it remembers the last frequency and mode you used on each band. When you return to a band, it restores your previous position. First visit uses mid-phone IARU Region 1 defaults (LSB for 40m and below, USB for 20m and above). Band memory persists across sessions — your selections survive app restarts.
Band buttons are disabled when VFO is locked.
Mode Selection
Five buttons: LSB, USB, CW, AM, FM. Active mode highlighted. Switching to CW mode triggers special behavior — the CW text entry panel becomes available and the voice memory buttons relabel to CW macros. Mode buttons are disabled when VFO is locked.
VFO A/B Exchange
Tap the A/B button in the DSP grid (see Section 07) to swap between VFO A and VFO B. The frequency and mode are exchanged on the radio, and the app refreshes after 400ms to show the new state. The frequency LCD displays a dual VFO indicator with ghost "A" and "B" letters — the active VFO is shown in full brightness while the inactive VFO appears as a subtle ghost, giving you a classic LCD split-display effect.
Split Mode
Split mode lets you listen on one VFO and transmit on the other — essential for working DX pileups where the DX station is listening on a different frequency. Tap the SPLIT button in the DSP grid to toggle split on/off. When split is active, the button lights up green and the frequency display automatically swaps to show the TX VFO during transmission, so you always know where you're transmitting.
BLE Module
If you have a wireless BLE module (Raspberry Pi Pico W with a rotary encoder and two buttons), it connects automatically when enabled in Settings > External Controls. The encoder provides a physical tuning knob experience — complete with two-speed acceleration (50 Hz slow / 500 Hz fast) — plus two fully configurable hardware buttons (default: PTT and Tune, with 27 available functions). See Section 14 for full setup instructions.
VFO Lock
Long-press (1.5 seconds) on the SWR peak area (right side of PTT) to toggle VFO lock. Heavy haptic feedback confirms the lock or unlock.
When locked: the tuning wheel, band buttons, and mode buttons are all greyed out and unresponsive. A padlock icon appears on the frequency display. Long-press the SWR area again to unlock.
06 Transmitting
PTT Button
The PTT button is a large 140px circle in the center of the screen — hard to miss, easy to hit.
- Press and hold to transmit — PTT activates instantly on finger down (zero delay) with a heavy haptic thump.
- Release to go back to RX — a 150ms debounce prevents accidental release from micro finger slips.
- During TX: the button turns red with a pulsing glow animation, the label changes from "PTT" to "TX", and the icon switches from outline to filled microphone.
- RX audio is instantly muted when you press PTT — you don't hear your own delayed audio bouncing back from the server.
- When mic permission is denied: the button shows "NO MIC" with a mic-off icon and is completely disabled.
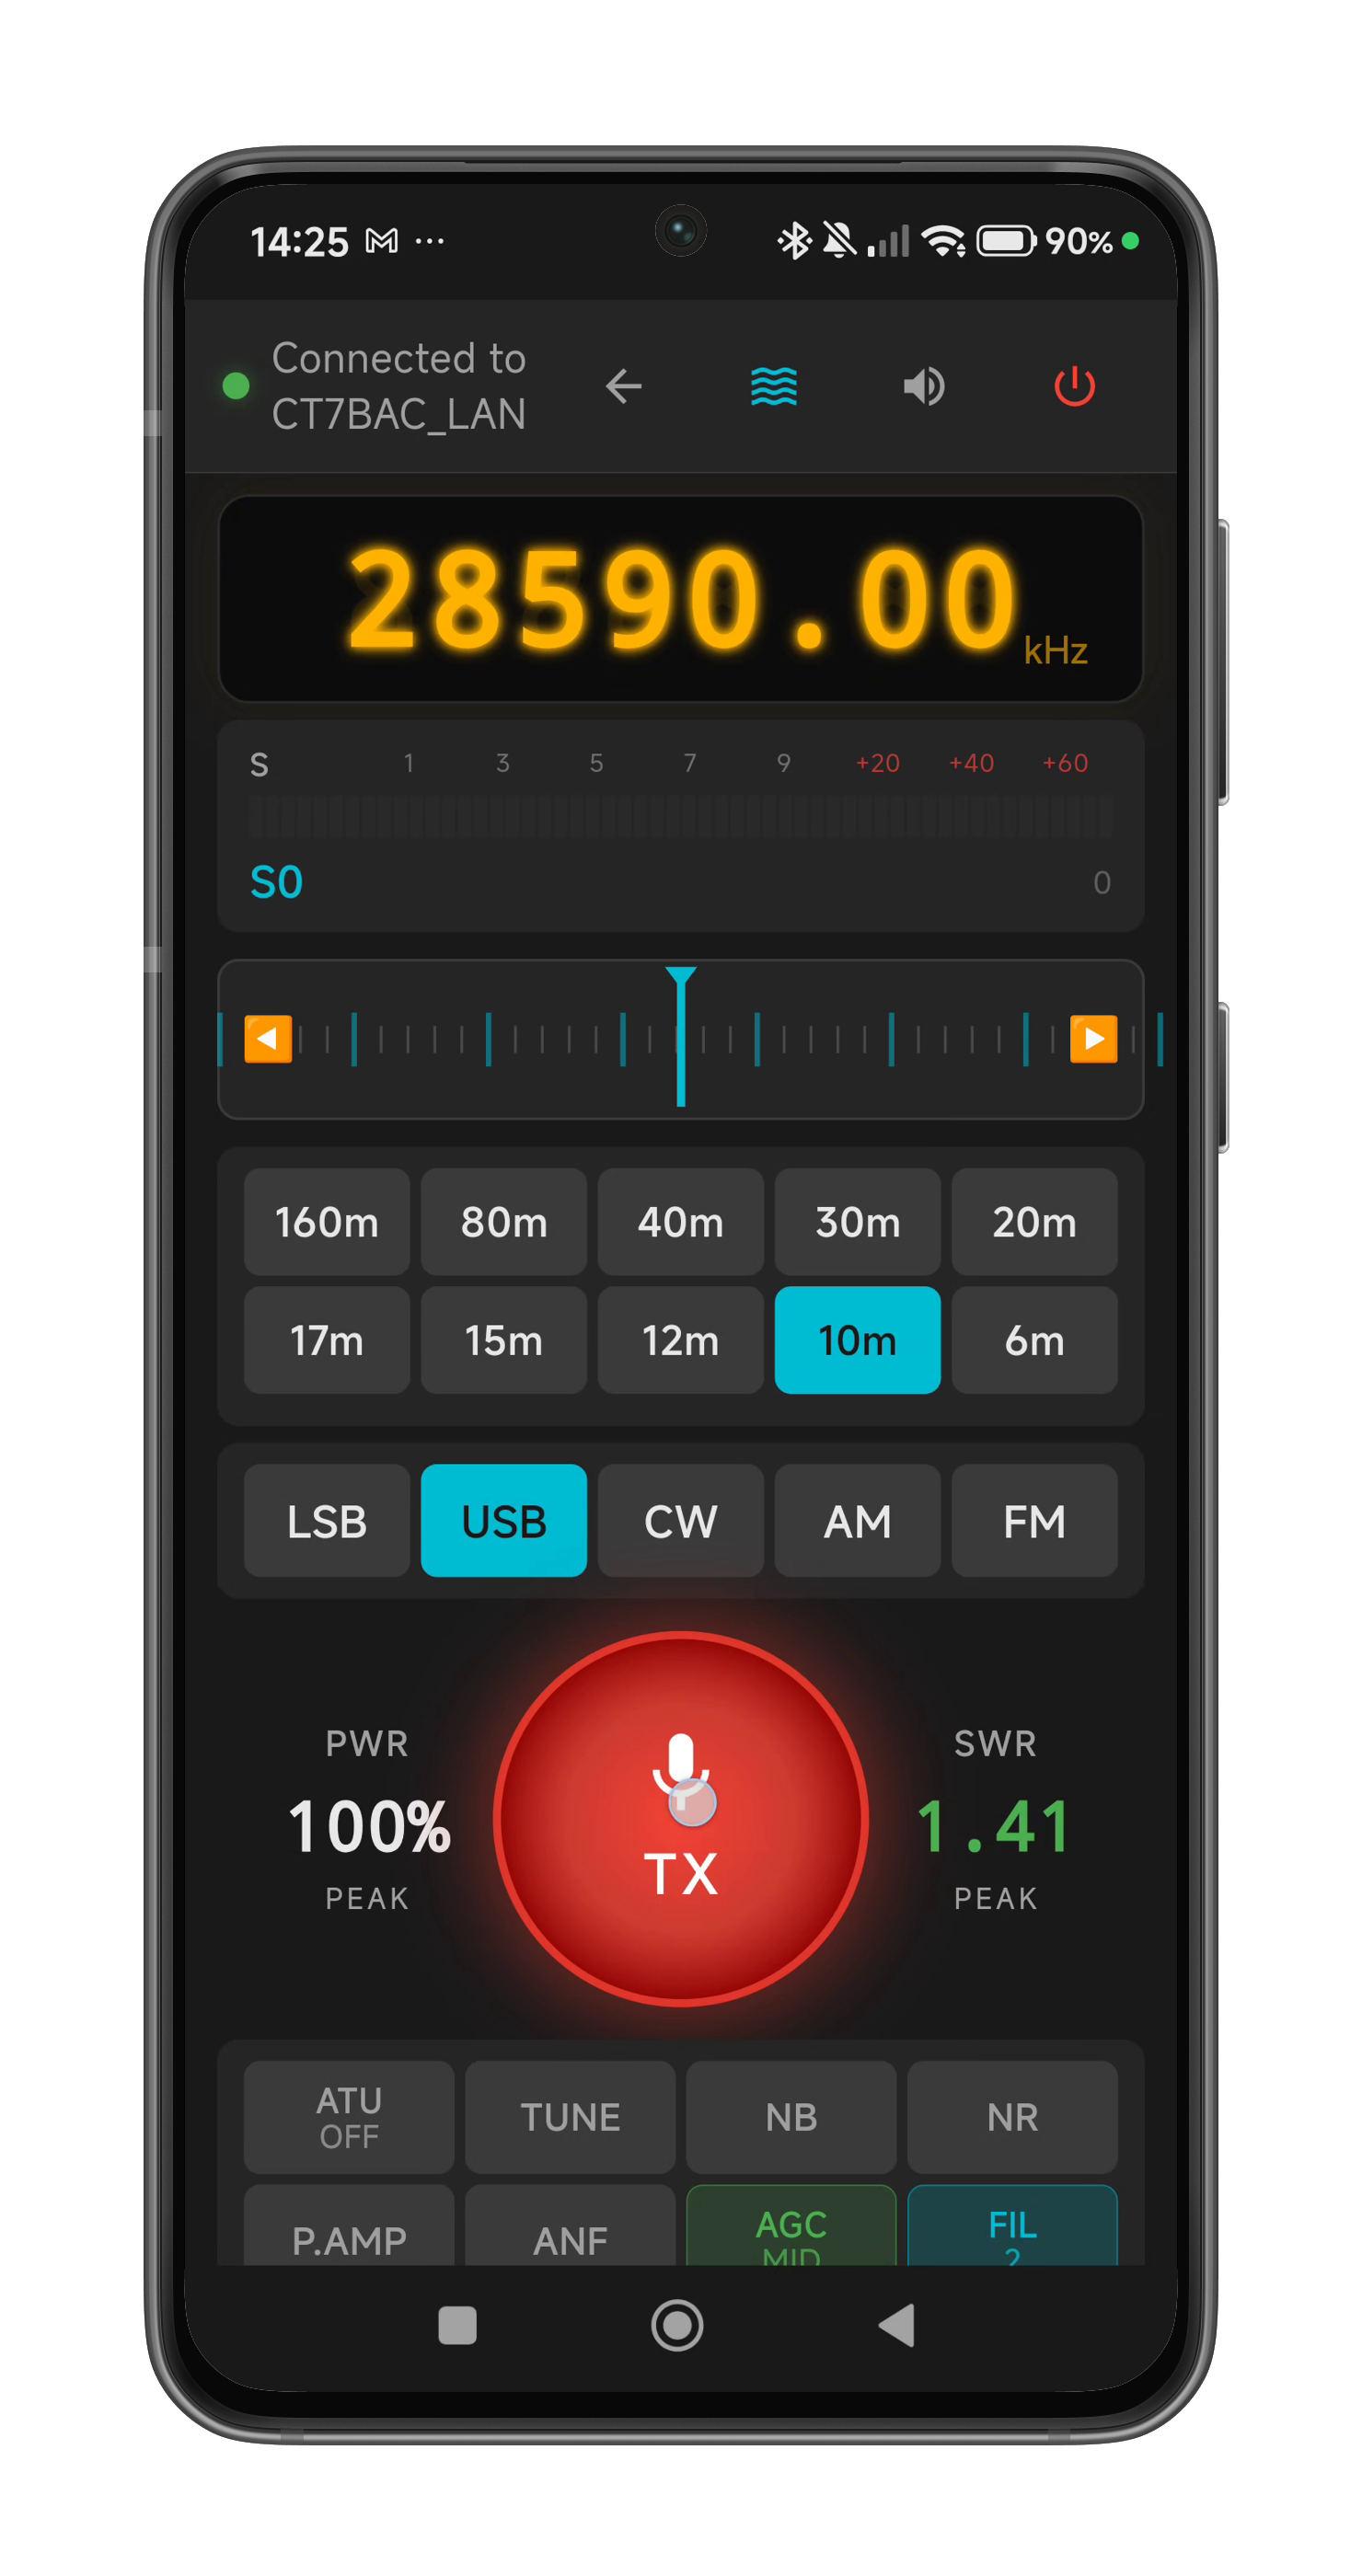 Transmitting — PTT button glows red, PWR and SWR peak indicators light up during TX.
PTT Lock
Long-press (1.5 seconds) on the PWR peak area (left side of PTT) to toggle PTT lock. Heavy haptic feedback confirms the lock or unlock.
When locked: the PTT button shows a padlock icon and is completely unresponsive. Voice memory buttons are also disabled. Prevents accidental transmission — handy when you're browsing settings or handing the device to someone. Long-press the PWR area again to unlock.
TX Power & SWR Indicators
- PWR Peak (left of PTT) — shows transmit power as a percentage during TX, holds the peak value after you release PTT.
- SWR Peak (right of PTT) — shows Standing Wave Ratio during TX. Color-coded: green (< 1.5), orange (1.5–2.0), red (> 2.0).
- Both indicators dim when idle and light up during transmission.
- These areas also serve as the long-press targets for PTT Lock (PWR) and VFO Lock (SWR).
Voice Memories
Eight buttons (M1–M8 by default, customizable in Settings > Voice Memory). Tap to trigger the radio's stored voice memory playback. In CW mode, these buttons automatically switch to CW macro labels (see Section 09). Long labels (more than 7 characters) auto-scroll horizontally. Disabled when PTT is locked.
Disconnect & Power Off
Tap the disconnect button (red power icon, top-right of the status bar). Three choices:
- Disconnect Only — closes the connection, leaves the radio running
- Power Off & Disconnect — sends a CI-V power-off command to the radio, waits 500ms, then disconnects
- Cancel — go back to operating
Tips for Clean TX Audio
- Use a quiet environment. Mobile and tablet microphones are extremely sensitive omnidirectional capsules — they capture everything. Ambient noise, keyboard clicks, traffic, fans. Even with the noise gate, a noisy room will degrade your TX audio quality. Find a reasonably quiet spot before calling CQ.
- Avoid Bluetooth headphones for TX. BT audio codecs (SBC, AAC, aptX) add 100–300ms of latency on top of the network delay. That's enough to make your audio feel sluggish and out-of-sync. For the best experience, use the device's loudspeaker or wired 3.5mm headphones. If you must use BT, be aware of the extra delay.
- The app processes all TX audio through the Mic DSP chain (gain, compressor, noise gate, EQ) before Opus encoding. See Section 11 for how to dial in your mic settings.
07 DSP & RF Controls
The 2×5 DSP control grid gives you direct access to your radio's front-end processing, antenna tuner, VFO exchange, and split mode — the same controls you'd reach for on the rig's front panel.
DSP Button Grid
| Button | Function | Behavior |
|---|---|---|
| ATU | Antenna Tuner Unit | Toggle on/off. Green when enabled. |
| TUNE | Auto-tune | Triggers ATU tune cycle. Orange while tuning. |
| NB | Noise Blanker | Toggle on/off. |
| NR | Noise Reduction | Toggle on/off. |
| P.AMP | Preamplifier | Cycles: OFF → P.AMP1 → P.AMP2 → OFF. Shows "1" or "2" sublabel. |
| ANF | Auto Notch Filter | Toggle on/off. Removes continuous carrier interference. |
| AGC | AGC Speed | Cycles: FAST (orange) → MID (green) → SLOW. |
| FIL | IF Filter | Cycles: FIL1 (wide) → FIL2 (mid) → FIL3 (narrow). |
| A/B | VFO Exchange | Swaps VFO A ↔ B. See Section 05. |
| SPLIT | Split Mode | Toggle split (TX on alternate VFO). Green when active. |
All buttons reflect the radio's actual state — if you change a setting on the radio's front panel, the button updates within 500ms (bi-directional sync via polling). All buttons are disabled when not connected.
RF Power Slider
0–100% in 5% steps. The slider adjusts the transmit power on the radio in real time. Disabled when not connected.
08 Waterfall & Spectrum Scope
If your radio has a built-in spectrum scope with data output (e.g., IC-7300, IC-7610, IC-705, IC-9700), you get a real-time waterfall display streamed directly from the radio through the server to your mobile or tablet. HamMixer reads and displays the scope data that the radio produces natively — it does not generate the waterfall itself.
Opening the Waterfall
Tap the waterfall button (wave icon) in the status bar. The screen automatically rotates to landscape orientation for maximum display area. When you close the waterfall, portrait is restored.
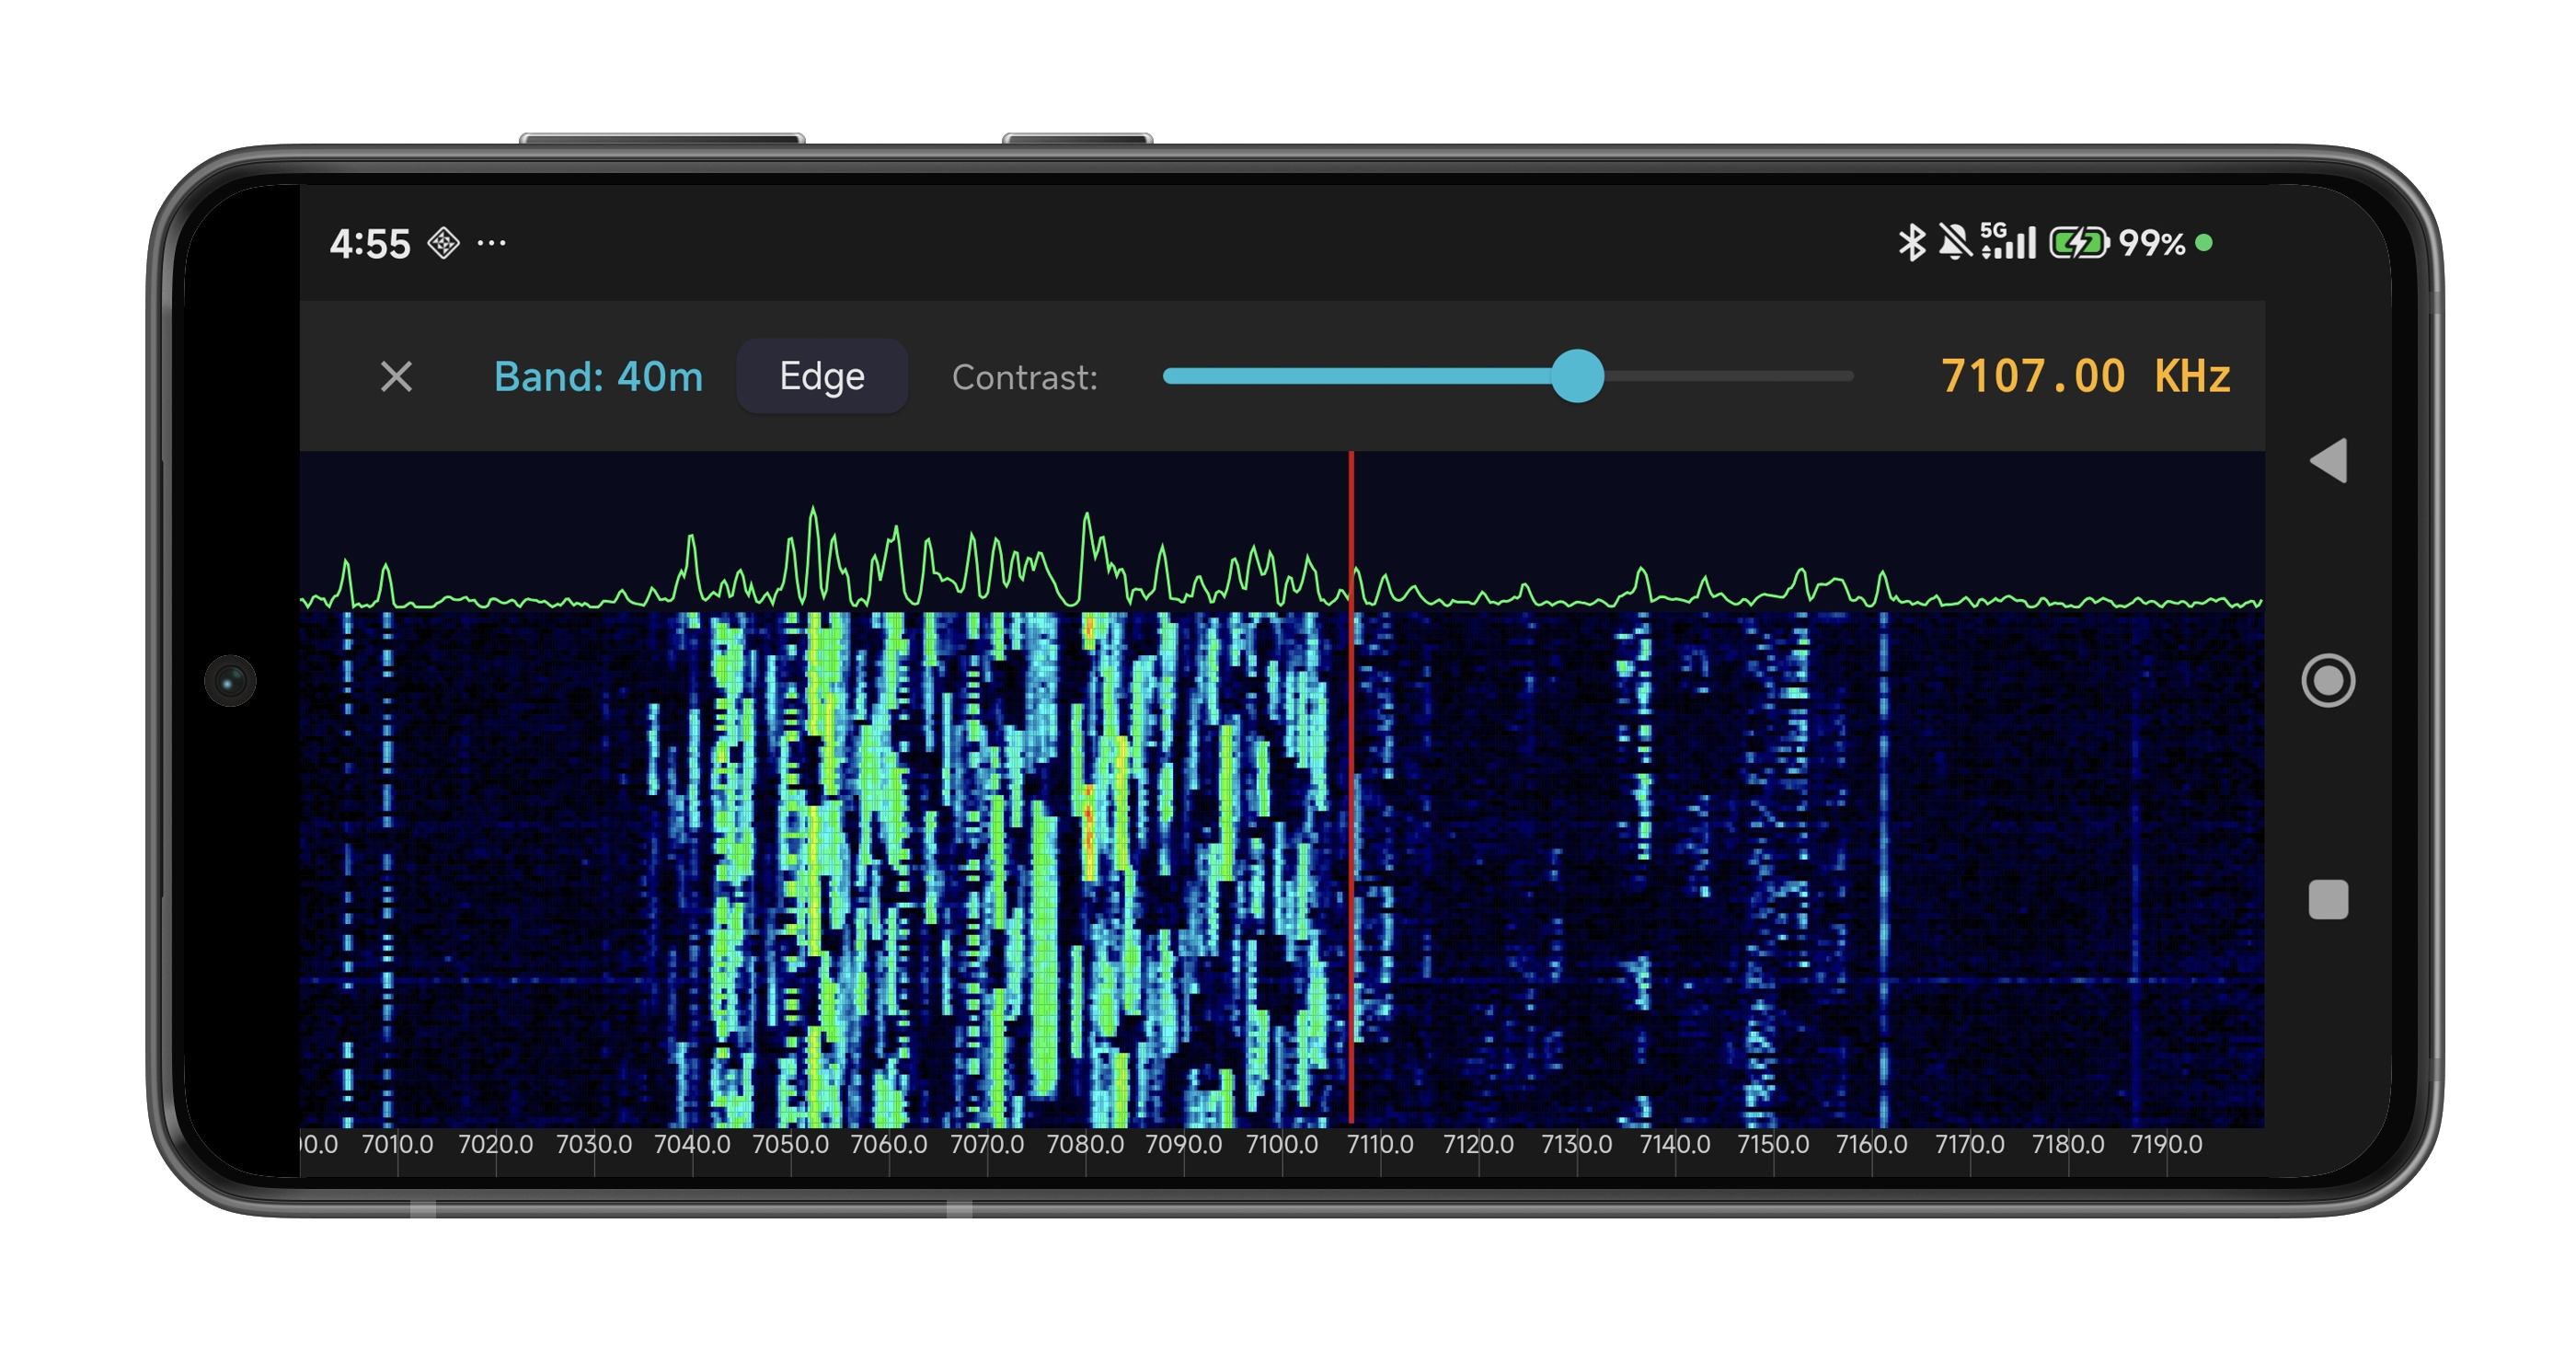 The waterfall in landscape — spectrum graph on top, scrolling spectrogram below, with Edge and contrast controls.
What You See
- Spectrum graph (top) — live amplitude-vs-frequency line
- Scrolling waterfall (main area) — color-mapped spectrogram. New data appears at the top and scrolls down.
- Frequency scale — automatic tick spacing based on the displayed bandwidth
- VFO line — your current frequency marked on the display
Controls
- Edge button — cycles through the radio's 4 preset bandwidth settings (narrow to wide)
- Contrast slider — adjusts the color mapping intensity for your viewing preference
- Close button (X) — exits the waterfall and returns to portrait mode
Tuning from the Waterfall
Drag horizontally on the waterfall to tune — same two-speed velocity as the tuning wheel (slow drag = 50 Hz, fast drag = 1 kHz). Haptic feedback on every step. Great for visually spotting a signal and tuning right to it.
09 CW Keyer
HamMixer Mobile supports text-based CW (keyboard CW) using the radio's internal keyer. You type text, and the radio converts it to perfectly timed Morse code. Since the radio handles all timing, network latency doesn't affect CW quality — your dits and dahs are always clean.
How It Works
- Switch to CW mode (tap CW in the mode row).
- Tap the PTT button — instead of activating PTT, it reveals the CW panel below the tuning wheel.
- Set your WPM speed using the dropdown selector (6–40 WPM). The speed is sent to the radio immediately when you change it.
- Choose your send mode with the LIVE / BUFFER toggle:
- LIVE — each character is sent to the radio as you type, character-by-character.
- BUFFER (default) — type your full message first, then tap SEND to transmit it all at once. This avoids ugly gaps when you type slower than the radio’s WPM speed.
- Tap STOP to halt transmission immediately, or X to close the panel.
The panel auto-hides when you switch away from CW mode. Your WPM and send mode choices are saved automatically and persist across sessions.
 CW mode — WPM selector and Live/Buffer toggle at the top, text entry field in the middle, SEND and STOP buttons below. CW macros on the buttons instead of voice memories.
CW Macros
In CW mode, the Voice Memory buttons (M1–M8) automatically switch to CW macro labels. Tap a macro button to send its pre-programmed text (e.g., "CQ CQ CQ DE MYCALL K"). Macros always send immediately, regardless of the Live/Buffer setting. Configure macro labels and texts in Settings > CW Config.
BLE CW Paddle (Iambic Keyer)
For a real CW experience, connect a standard CW paddle to the BLE accessory module (3.5 mm TRS jack) and key Morse wirelessly from your phone. The app runs a full Iambic keyer locally — paddle events are processed on the phone with a low-latency native sidetone, and only the resolved characters are sent to the radio through the server tunnel. This means network latency does not affect your keying timing.
Setup
- Connect a CW paddle to the 3.5 mm TRS jack on your BLE accessory module (Tip = Dit, Ring = Dah, Sleeve = GND). If your paddle is wired the opposite way, you can reverse the mapping in the app.
- In Settings > External Controls, enable Enable Paddle in the BLE Accessory section.
- Go to Settings > CW Config and select BLE Paddle as the CW input source. This option is only available when the paddle role is enabled.
- Choose Iambic Mode A or Mode B and set your preferred paddle WPM (6–48).
- Enable or disable Sidetone (700 Hz local tone for immediate audio feedback).
- Switch to CW mode on the radio, then tap PTT — the paddle monitor panel appears instead of the text entry panel.
Using the Paddle Monitor
When the paddle monitor is open, you'll see:
- Transcript — a scrolling display of resolved characters as you key.
- Current symbols — the in-progress morse pattern (e.g., "
-..-") before the character is committed. - Connection health — BLE sequence number, dropped events, and transport latency in milliseconds.
- STOP — halts CW transmission and clears the keyer state.
The sidetone is generated natively on the phone with 5 ms audio frames and a soft gate envelope (40 ms ramp) to prevent clicks. During keying, the server RX audio is automatically ducked so you hear only the sidetone.
Iambic Modes
- Mode A — releasing both paddles during a squeeze stops after the current element.
- Mode B — releasing both paddles during a squeeze completes the current element and plays one more of the opposite type (more automatic).
CW Configuration
Open Settings > CW Config to customize your CW setup. All changes save automatically as you edit — sliders save on release, toggles and selection changes save immediately, and text fields (macro labels and texts) save after a short typing pause.
- Radio replay speed: 6–48 WPM — controls the speed at which text-to-morse characters are sent to the radio. The speed is pushed to the radio in real time as you drag the slider. This slider is only available while connected to the radio — when disconnected, it is greyed out with a hint message, since the speed command has nowhere to go.
- CW input source: Choose between Keyboard (text-to-morse) and BLE Paddle (iambic keyer via the BLE accessory module)
- Iambic mode: Mode A or Mode B (paddle input only)
- Paddle WPM: Independent speed setting for the local paddle keyer (6–48 WPM) — this is always editable regardless of connection state, since the keyer runs locally on the phone
- Sidetone: Enable/disable the 700 Hz local sidetone during paddle keying
- Contact mapping: Swap Tip/Ring assignment if your paddle is wired the opposite way
- Weighting: Adjusts the dot-to-dash ratio (25–40 tenths, default 27). Higher values produce heavier dashes
- Rise time: Shapes the sidetone envelope attack (1–10 ms, default 6 ms). Shorter values give a sharper click, longer values give a softer onset
- External keyboard toggle: Suppresses the on-screen keyboard for use with a physical Bluetooth or USB keyboard
- 8 macros: Each with a label (shown on the button) and text (sent to the radio on tap). Defaults: CQ, ANS, TU, 73, AGN, QRZ, RST, NR
ACC/USB AF Beep/Speech… Output = ON
Also verify: ACC/USB Output Select = AF (not IF), and that your CW sidetone level is above zero. Once enabled, the radio's CW sidetone will stream through USB audio to HamMixer Server, and you'll hear it in the mobile app during CW keying. Note: when using the BLE paddle with local sidetone enabled, the app generates its own sidetone so this setting is less critical.
10 QSO Logging
After completing a QSO, log it right from the app — no need to switch to a separate logging program.
Opening the Log
Tap the frequency display on the main screen. A full-page QSO log form opens with everything auto-filled from the live radio state.
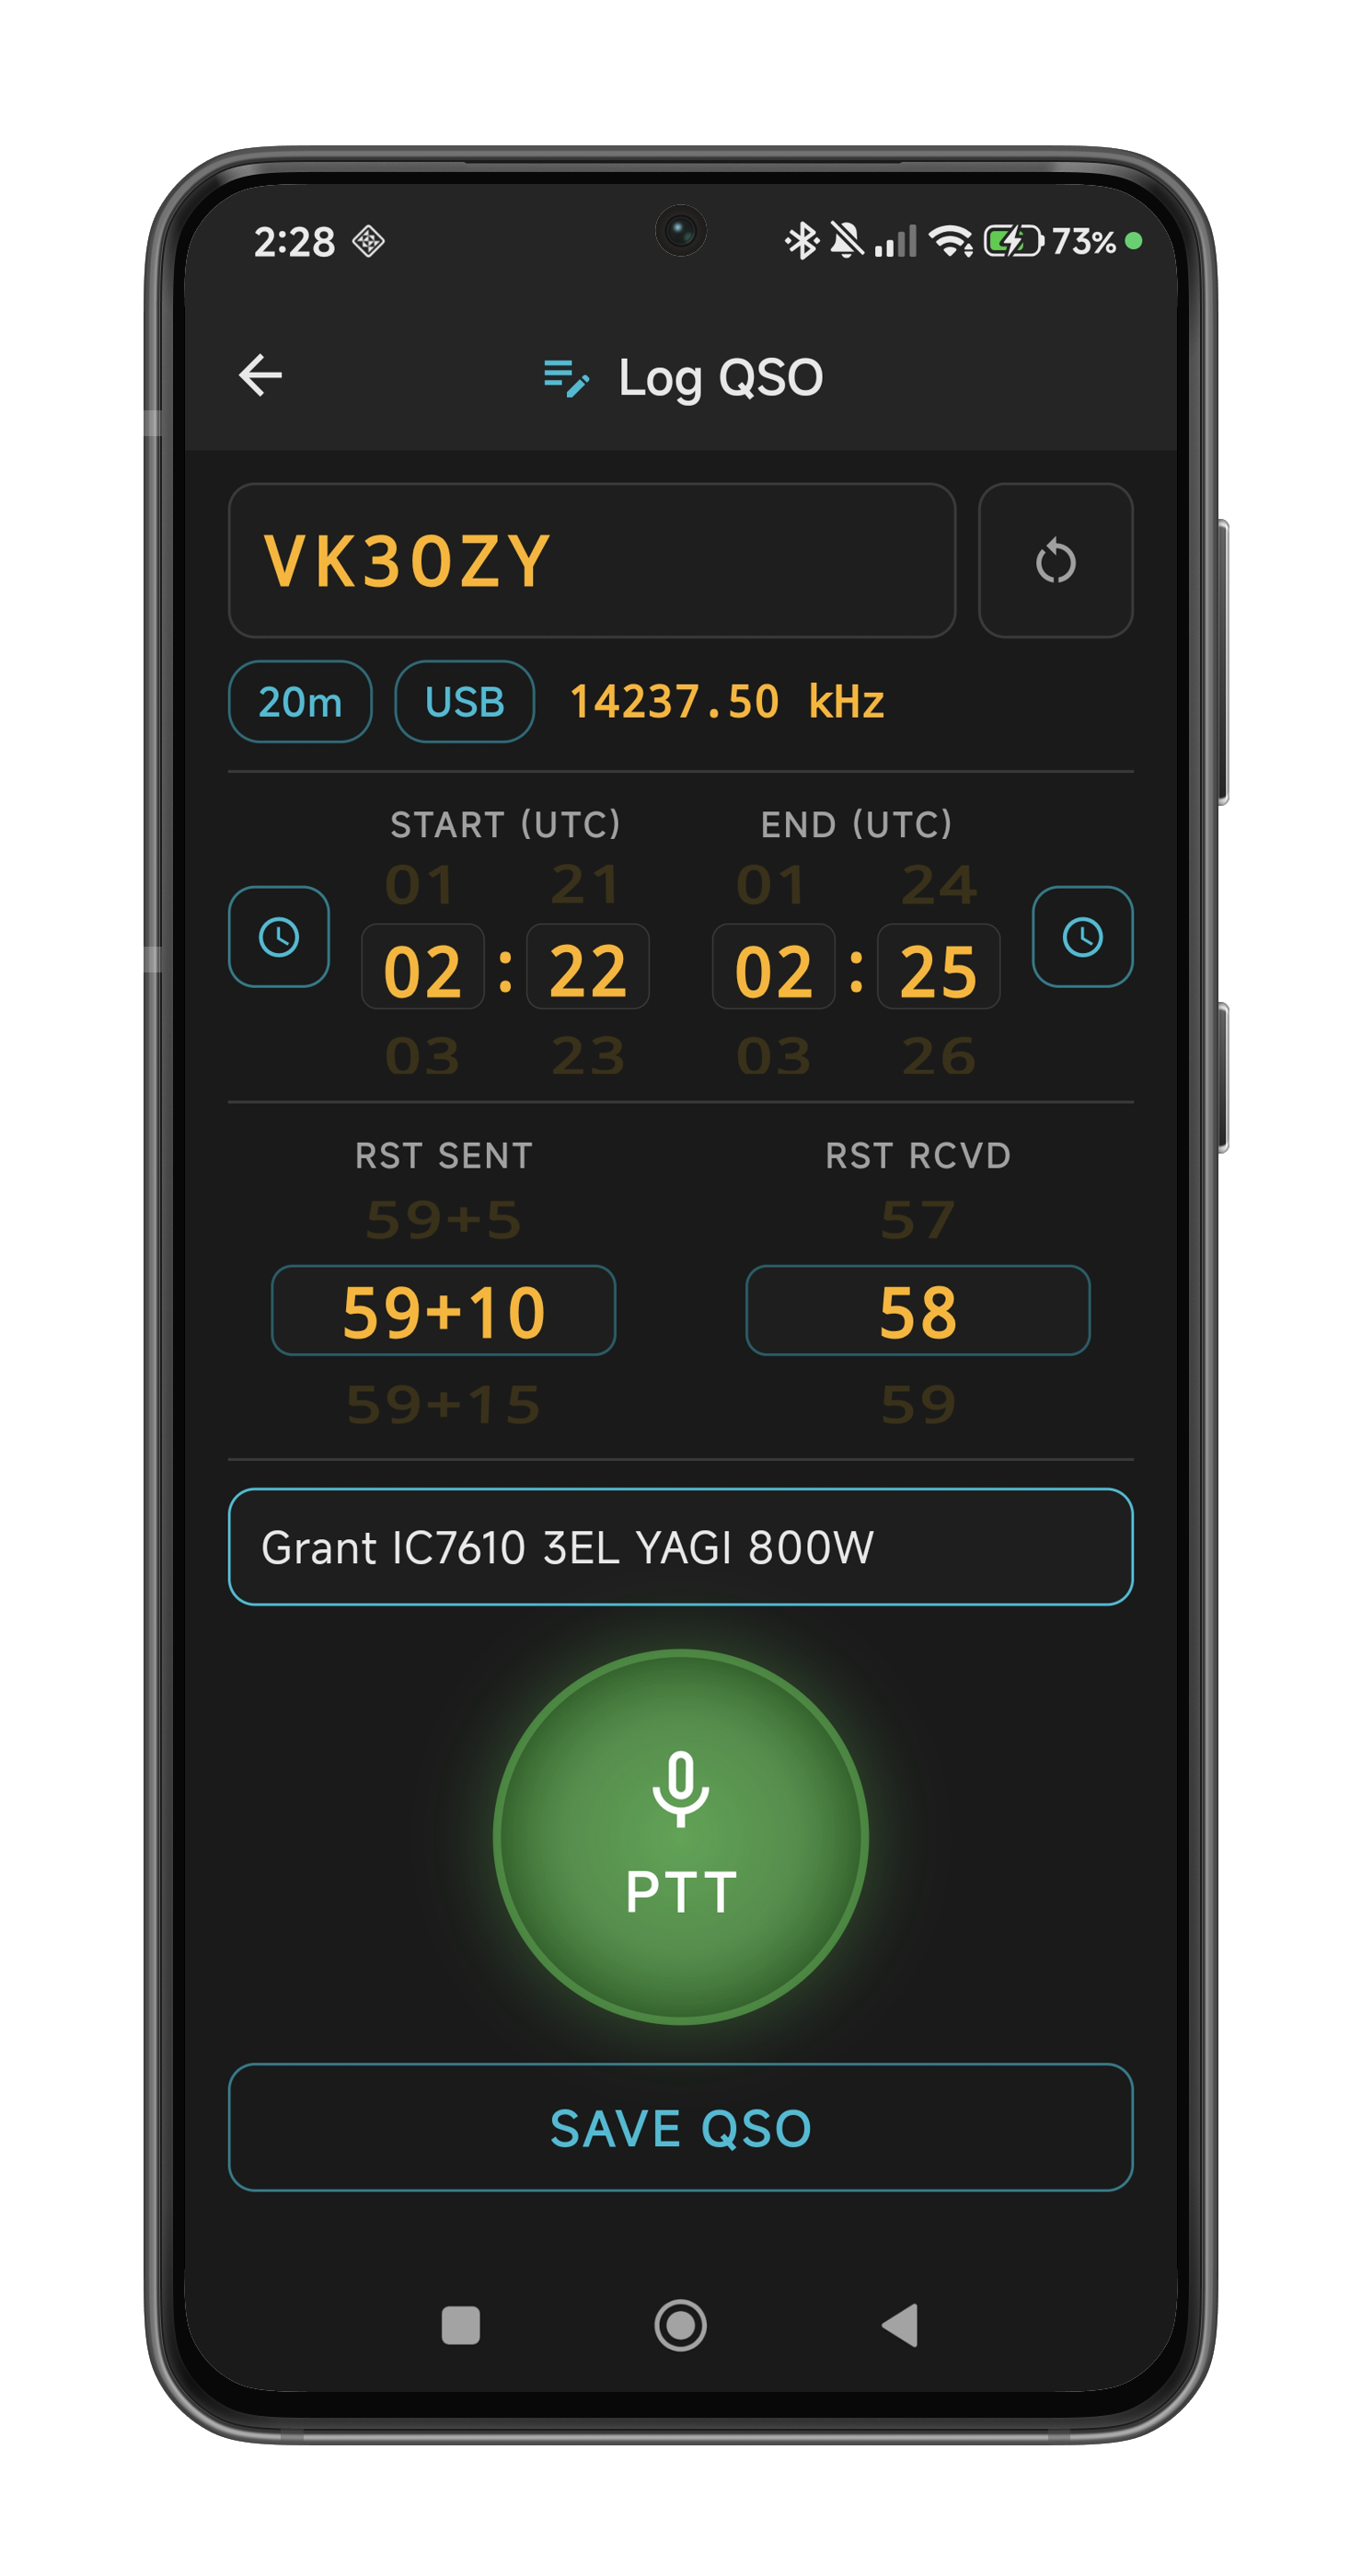 The QSO log form — callsign entry, UTC time wheels, RST reports, and live band/mode chips from the radio.
The Log Form
- Callsign field — large amber monospace text, auto-uppercase, auto-focused with the keyboard appearing immediately. Only allows A–Z, 0–9, and
/. - Band, Mode, Frequency — live chips that update in real-time as you tune. No need to fill these in manually.
- Start / End time (UTC) — slot-machine style scroll wheels for hours and minutes. "Now" buttons (clock icon) set the time to the current UTC with a smooth animation and haptic feedback. Mark the start when you begin the QSO, the end when you finish.
- RST Sent / Received — scroll wheels that auto-switch between phone values (11–59, 59+5..59+60) and CW values (119–599, 599+5..599+60) depending on the current mode. Default: 59 (phone) or 599 (CW).
- Comments — free-text field for notes about the QSO (e.g., "Great signal", "Portable /P"). Saved as the ADIF
COMMENTfield. Optional — leave blank if not needed. - QRZ Lookup button (person icon) — next to the callsign field. Tap it to open a QRZ.com callsign lookup modal for the entered callsign (see below). The button is greyed out when the callsign field is empty.
QRZ.com Callsign Lookup
While logging a QSO, tap the person icon next to the callsign field to instantly look up the station on QRZ.com. A modal dialog appears showing:
- Station photo — displayed full-width with tap to toggle between thumbnail and expanded view
- Name — operator's first and last name
- QTH — city and country
- Distance — great-circle distance from your station in km (calculated using the Haversine formula from your own QRZ.com coordinates)
- Previous QSOs — a table of your past contacts with this station from your QRZ.com logbook, showing date, time, band, mode, and RST reports. Requires a QRZ.com Logbook API key (configured in Logging Settings).
The callsign lookup uses the QRZ.com XML API, which requires a QRZ.com XML subscription. Add your QRZ.com account password in Settings > Logging Settings. If no password is configured, the lookup section shows an informational message while previous QSOs (which use the separate Logbook API key) still work independently.
Tap the X button or tap outside the modal to close it.
PTT on the Log Page
A full PTT button is available right on the log screen — you can continue the QSO while logging without going back. In CW mode, the full CW panel appears here too, with WPM selector, Live/Buffer toggle, and SEND/STOP buttons.
Saving the QSO
Tap SAVE QSO. The record is appended to a canonical ADIF 3.1.4 file named HamMixer_Log.adi in the app's internal storage. A success notification shows the QSO number (e.g., "QSO #42 logged: CT7BAC on 20m"), so you can track your contact count.
ADIF fields saved: call, band, mode, submode, freq, qso_date, time_on, time_off, rst_sent, rst_rcvd, station_callsign, comment. Compatible with Log4OM, HRD Logbook, LoTW, HAMRS, and any ADIF-compliant logger.
Heavy haptic feedback confirms a successful save. If start time is after end time, the save is rejected with a red error message. If a save fails for any reason, the actual error message is shown so you can diagnose the issue.
Viewing & Deleting Logged QSOs
Tap the QSO counter at the bottom of the log screen to open the Logged QSOs viewer. All your logged contacts are listed as cards showing callsign, band, mode, frequency, UTC time, RST reports, and DXCC country.
- Delete a single QSO: Swipe the card to the right to reveal a red delete button. Tap the delete icon to remove that QSO from the log. Tap the card again (or anywhere else) to close the delete action without deleting.
- Delete all QSOs: Tap the trash icon in the top-right corner of the app bar. A confirmation dialog asks "Delete All QSOs?" — tap Yes to clear the entire log, or No to cancel.
After any deletion, an automatic backup is triggered to keep your settings backup in sync with the current log state.
Exporting the ADIF File
The ADIF log is maintained as a canonical file inside the app. To export it:
- Both platforms: Go to Settings > Backup & Restore > Export ADIF File. A native file picker lets you choose where to save the file (e.g., Downloads, cloud storage, or share it directly).
- iOS (iPad / iPhone): The file is also accessible directly via the Files app → On My iPad (or On My iPhone) → HamMixer.
- Embedded in backups: The full ADIF log content is automatically included in every settings backup (both auto-backup and manual export), so your QSO history is always protected alongside your configuration.
QRZ.com Logbook Upload
Optional auto-upload to QRZ.com Logbook on every save. Configure in Settings > Logging Settings:
- Enter your station callsign and QRZ.com API key
- Enable auto-upload
- API key is stored securely in the device keychain
- Test API Key button validates your key with QRZ.com
- QRZ.com Password (optional) — your QRZ.com account password, required only for the callsign lookup feature (QRZ XML subscription). Not needed for logbook upload. Persisted in backup/restore.
Getting Your QRZ.com API Key
- Go to qrz.com and log in with your callsign and password as usual.
- Hover over your callsign at the right end of the top menu bar, then click "My Logbook" from the dropdown.
- On the logbook page, check the logbook selector (top-left corner) — make sure the correct logbook is selected for receiving your logs. If it's already right, leave it as-is.
- On the left side of the page, find the "QRZ Logbook API" section. The API Key field is blurred by default — click the eye icon (labelled "show") to reveal it.
- Copy the API key and paste it into Settings > Logging Settings > API Key in the mobile app.
ABCD-1234-EFGH-5678). Copy it exactly as shown on QRZ.com — preserve the uppercase/lowercase letters, include the dashes, and make sure no extra spaces sneak in before or after the key.
If the upload fails (no internet, QRZ.com down), the QSO is still saved locally — you'll see an orange notification.
11 DX Cluster
The DX Cluster gives you a real-time feed of DX spots from the worldwide DX Spider network, right inside the app. See who's active on each band, filter spots in real time, set alarms for stations of interest, tap to tune your radio instantly, and jump straight into logging the contact.
Opening the DX Cluster
There are two ways to open the DX Cluster:
- From the main screen — long-press the frequency LCD area (requires an active server connection).
- From Settings — tap Settings > DX Cluster. This works even without a server connection, so you can browse spots and manage alarms at any time.
If you haven't configured your station callsign yet, the app will prompt you to enter it — your callsign is used to log in to the cluster node. You can also set it in Settings > Logging Settings.
Always-On Background Operation
The DX Cluster connects automatically when the app starts and stays connected in the background, continuously accumulating spots even when you're on other screens or the app is minimized. If the connection drops, it auto-reconnects. Up to 500 spots are retained with deduplication, and spots older than 6 hours are automatically pruned.
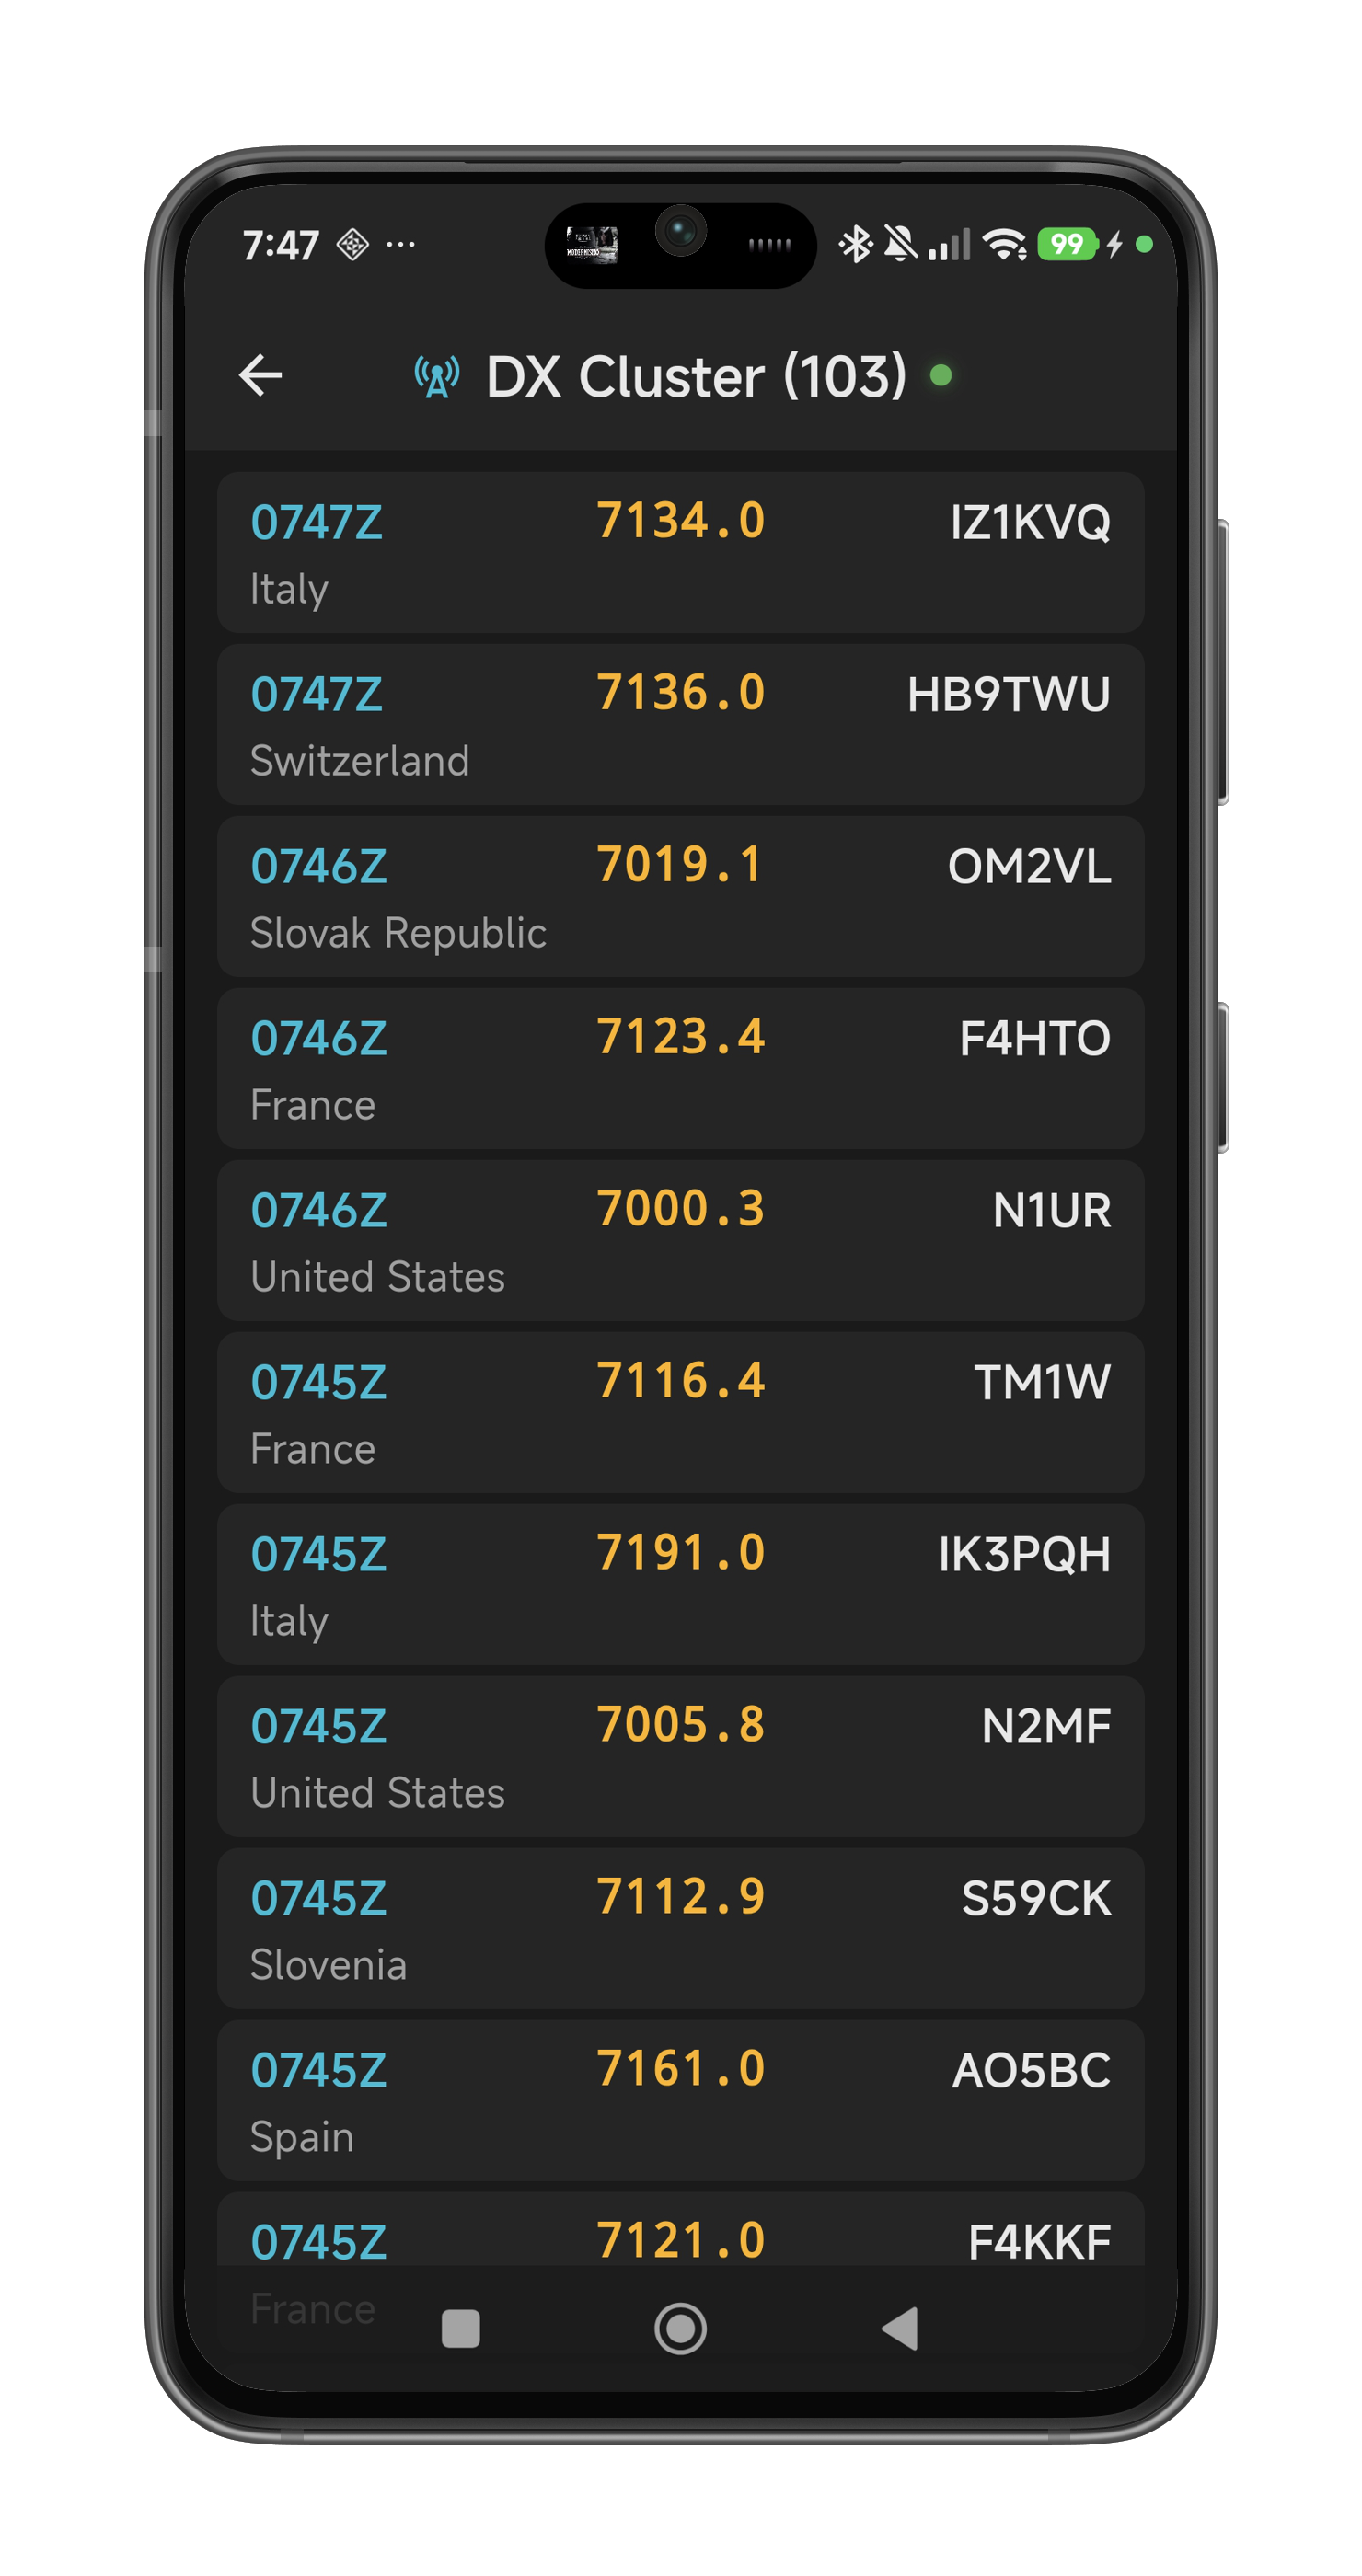 The DX Cluster screen — real-time spots filtered by your current band, with DXCC entity names resolved automatically.
Understanding the Screen
- Title bar — shows "DX Cluster (N)" where N is the number of spots currently displayed. A green dot indicates an active connection to the cluster node; red means disconnected (auto-reconnect is active).
- Spot cards — each card shows the UTC time, frequency (kHz), DX callsign, resolved DXCC country name, and spot comment (right-aligned, italic) when available. Spots are sorted newest-first.
- Band filtering — spots are automatically filtered to match the band your radio is currently tuned to. Change bands on the main screen and the cluster list updates to show only spots on that band.
QRZ.com Callsign Lookup (Tap to Expand)
Single tap on any spot card to expand it accordion-style with QRZ.com station information:
- Station photo — displayed full-width by default. Tap to toggle between full-width and thumbnail views.
- Name, QTH, Distance — the operator's name, city/country, and great-circle distance from your station in km.
- Previous QSOs — your past contacts with this station from your QRZ.com logbook (date, time, band, mode, RST). Requires a QRZ.com Logbook API key.
Only one card expands at a time — tapping another card collapses the previous one. Tap the same card again to collapse it. The expanded card shows a subtle green border to distinguish it visually.
Callsign lookup requires a QRZ.com XML subscription and your QRZ.com password configured in Settings > Logging Settings. If no password is set, the expanded card shows an informational message while previous QSOs still work independently (using the Logbook API key). Lookup results are cached per session so re-expanding a card is instant.
Tuning to a Spot
Long-press (tap and hold for 1.5 seconds) on any spot card. During the press, a green border animates around the card to show progress. When the timer completes:
- Your radio tunes to the spot's frequency
- The DX callsign is pre-filled into the QSO log form
- A green confirmation toast appears
While you're pressing, the spot list is frozen — even if new spots arrive, the list won't shift under your finger. This prevents accidentally tuning to the wrong station during high-activity periods like contests.
Filtering Spots
A search box at the top of the spot list lets you filter in real time. Type any text and the list instantly narrows to spots matching your query across all fields — callsign, frequency, country name, comment, and spotter. Clear the filter with the X button to see all spots again.
Alarm System
Tap the bell icon in the top-right corner of the DX Cluster screen to open the alarm manager. Alarms let you get notified instantly when a spot matching your interest appears.
- Add an alarm — tap the + button. Enter a text pattern (e.g., "CT7" for Portuguese stations, "Cayman" for Cayman Islands, "FT8" for a mode). Optionally add a label for display. The pattern is matched case-insensitively against callsign, frequency, country, comment, and spotter.
- Set Freq — enable this toggle on an alarm to automatically tune your radio to the spot's frequency when the alarm fires. Only works when connected to the server.
- Enable / Disable — use the switch on each alarm card to temporarily disable it without deleting.
- Edit / Delete — use the pencil and trash icons on each card.
When a spot triggers an alarm, the app plays a native alarm tone with vibration and displays a floating toast showing the callsign, frequency, country, and comment. A 30-second cooldown per alarm prevents repeated alerts for the same pattern. Alarms work even when the screen is off (a partial wake lock keeps the CPU active while any alarm is enabled).
DXCC Entity Resolution
Each spotted callsign is resolved to its DXCC entity (country) using the CTY_WT_MOD database — the same comprehensive dataset used by contest logging software. The bundled database covers 340 entities with over 28,000 prefix patterns. The database auto-updates weekly in the background from Win-Test's public mirror.
12 Microphone DSP
Your mobile or tablet mic wasn't designed for ham radio — but the built-in DSP chain shapes it into something usable. Open Settings > Mic DSP to configure the processing that's applied to your voice before Opus encoding.
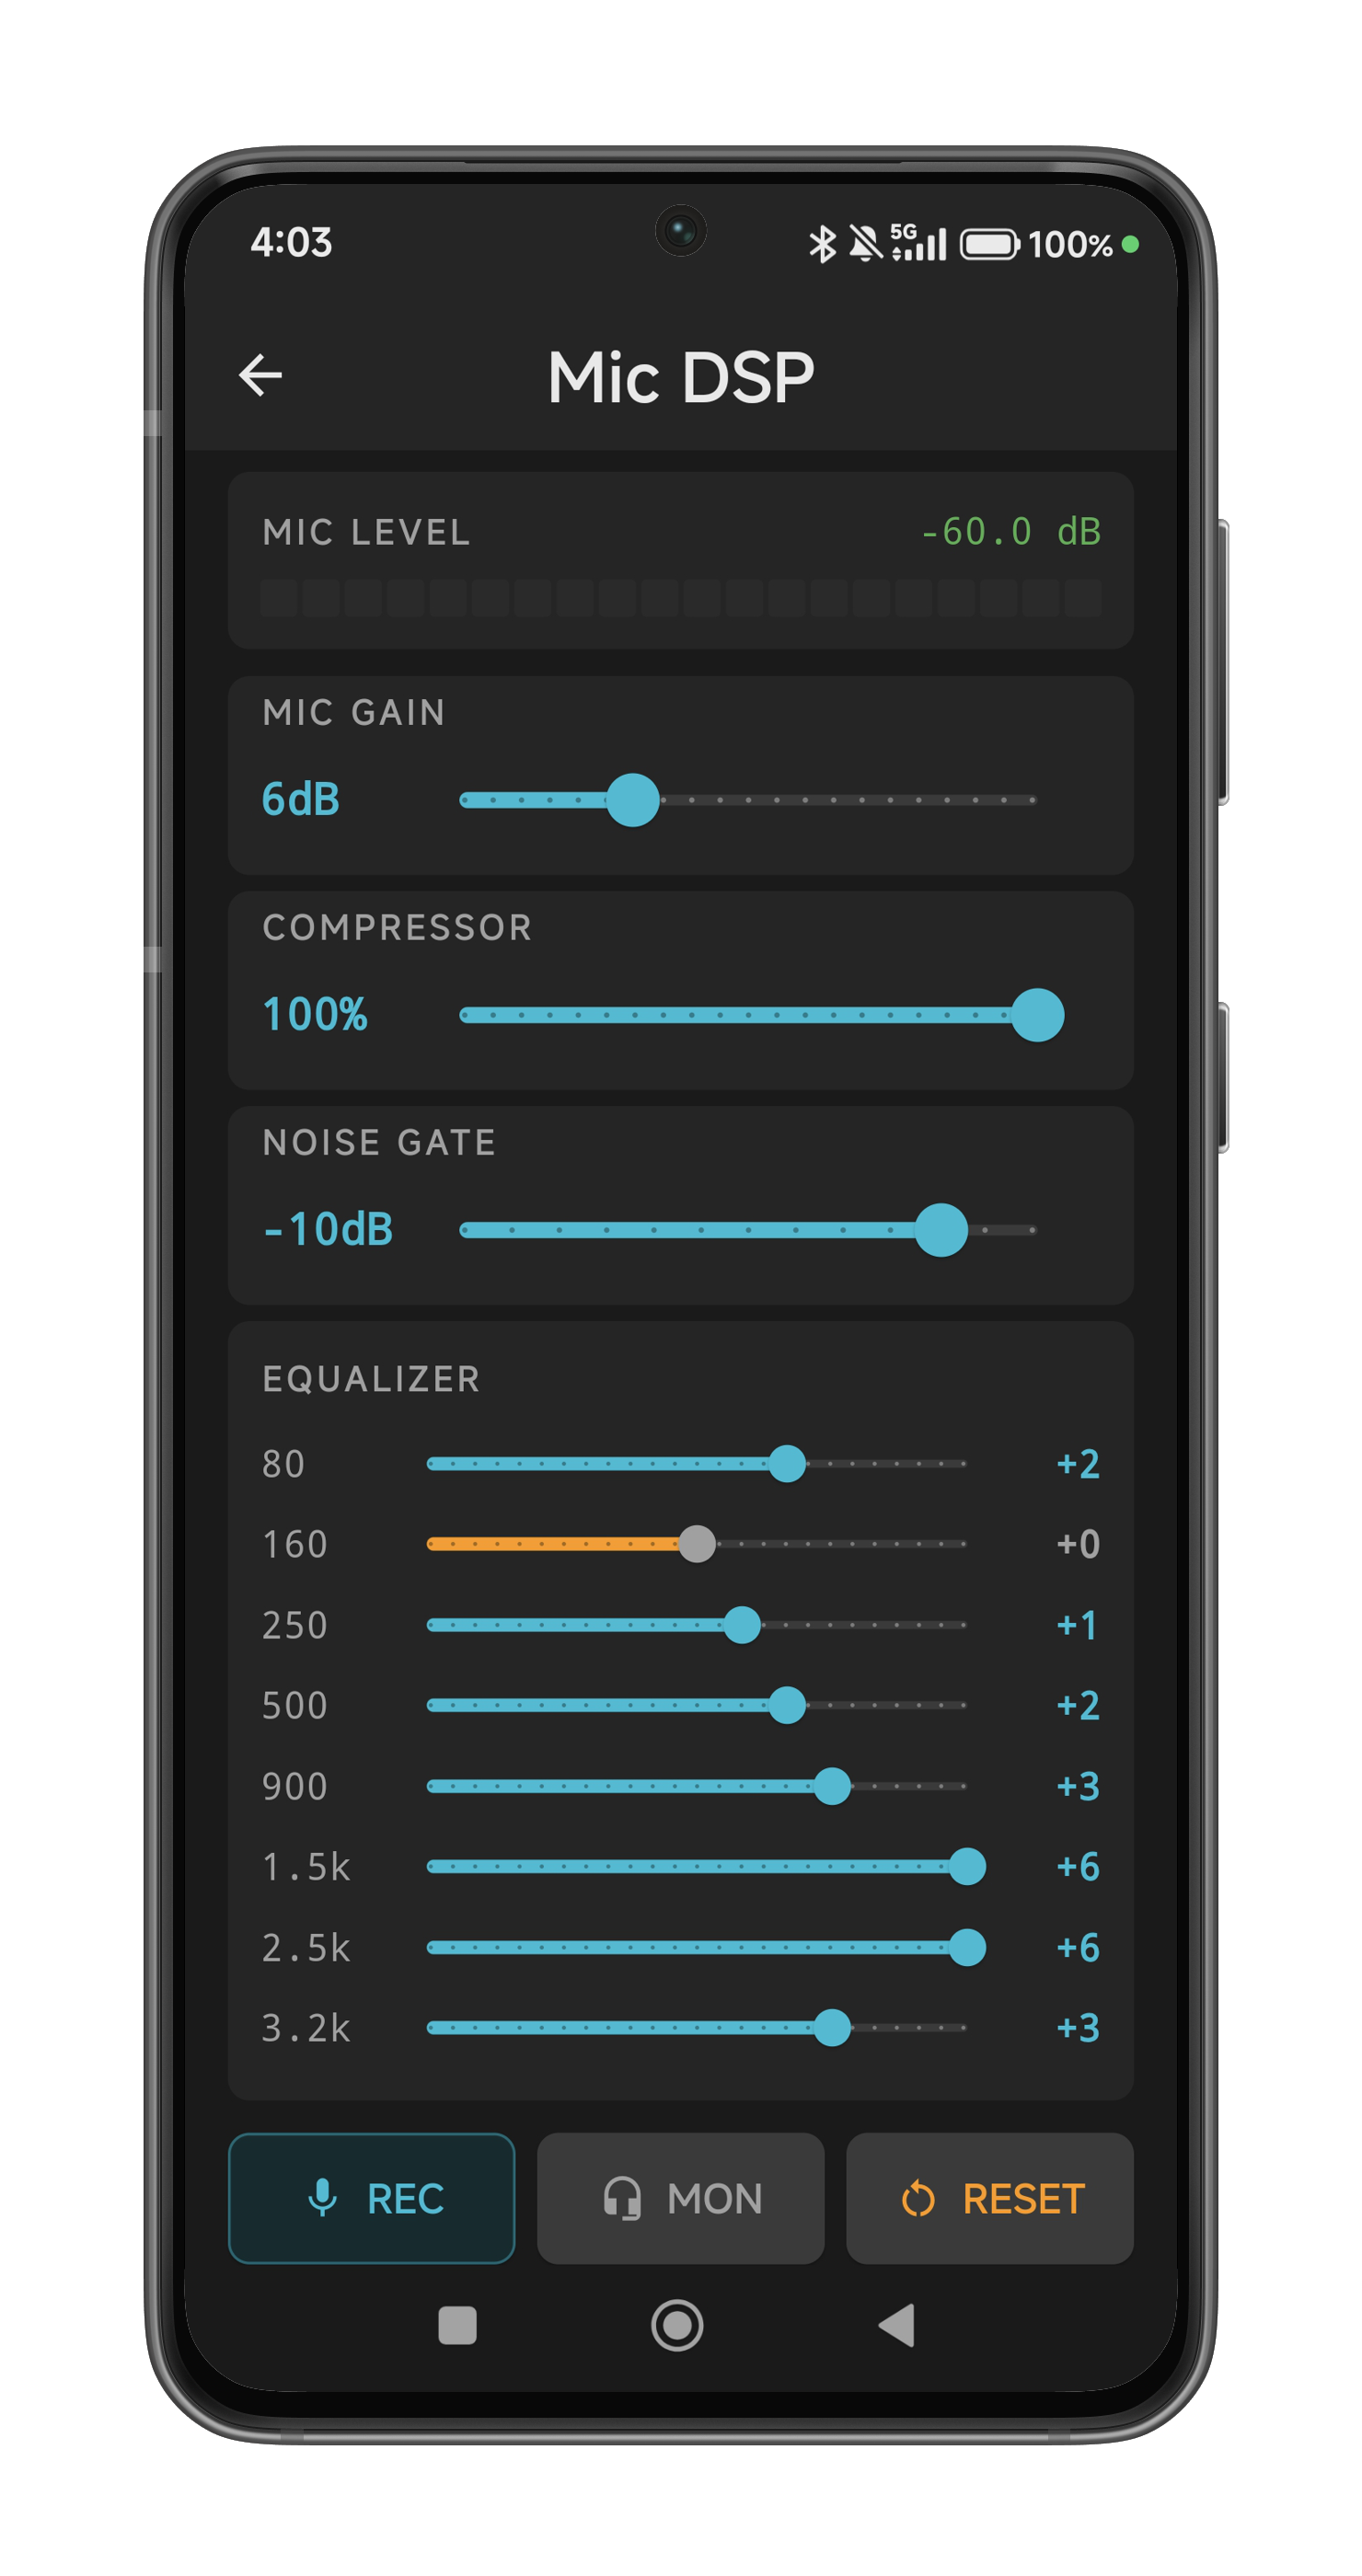 Mic DSP — LED level meter, processing sliders, and 8-band equalizer for shaping your TX audio.
Level Meter
20-segment LED bar at the top of the screen. Green (segments 1–12), yellow (13–17), red (18–20). The meter is live whenever the screen is open — no need to press anything. Numeric dB readout in the corner.
Processing Chain
All processing happens in the native audio thread before Opus encoding — zero additional latency.
- Mic Gain (0–20 dB, default 6 dB) — boost your mic level. Start at 6 dB and adjust until your peaks are in the yellow zone on the meter.
- Compressor (0–100%, default 100%) — evens out volume differences. Higher values mean more compression (tighter dynamic range). 100% is quite aggressive — back off to 50–70% if your audio sounds "squeezed."
- Noise Gate (OFF to 0 dB, default −10 dB) — silences the mic when you're not speaking. The gate opens on voice (1ms attack), holds for 150ms after you stop, then smoothly closes (50ms release). Set the threshold just above your ambient noise floor. Slide all the way left for OFF (gate bypassed entirely).
- 8-Band Equalizer — shape your mic's frequency response. Bands: 80, 160, 250, 500, 900, 1500, 2500, 3200 Hz. Range: ±6 dB per band. The defaults boost the presence range (900 Hz and above) for better intelligibility on HF.
Testing Your Audio
- REC button — records 5 seconds of your voice through the full DSP chain, then auto-plays it back through the speaker. No extra tap needed — the playback starts automatically. Great for hearing how you'll sound on the air.
- MON button (Monitor) — routes your processed mic audio to headphones in real time so you can hear yourself live. Requires headphones (wired, BT, or USB) — loudspeaker output is blocked to prevent feedback. Green when active.
- RESET button — all sliders smoothly animate back to factory defaults (400ms ease-out).
13 WebSDR Mixer
The WebSDR mixer brings the core HamMixer feature to your mobile device: mix live radio audio with any WebSDR receiver, with independent volume controls, delay synchronization, and real-time level meters.
Enabling the Mixer
Tap the antenna icon (cell tower) in the status bar at the top of the home screen. The icon turns green and the mixer controls appear below the voice memory buttons. Tap it again to hide the controls (and stop the mixer if running).
Starting the WebSDR
- Select a site from the dropdown. Six popular WebSDR sites are pre-loaded. You can add more in Settings > WebSDR Sites.
- Tap Start. A disclaimer dialog appears reminding you that the WebSDR mixer is for experimental and casual use only — not for DX credits or contest entries.
- Tap OK. The WebSDR page loads, audio starts flowing, and the mixer takes control of both audio channels.
Audio Channels
On Android, the mixer outputs stereo: radio audio on the left channel and WebSDR audio on the right channel. Use headphones or earbuds to hear the separation clearly. On iOS, both channels are summed to mono (AVAudioEngine handles stereo upmix at the output).
When you mute one channel, the other automatically plays mono on both sides so you always hear audio in both ears.
Mixer Controls
- RADIO (L) — Volume slider (0–150%) and mute button for the radio channel. Level meter shows real-time audio amplitude.
- WEBSDR (R) — Volume slider (0–150%) and mute button for the WebSDR channel. Muting WebSDR automatically sets the delay to zero; unmuting restores the previous delay value.
Delay & Synchronization
WebSDR audio always has some delay compared to your radio. Use the delay slider (0–1500 ms) to manually add delay to the radio channel so both signals align in time.
For automatic synchronization, tap the Sync button while a station is transmitting on both your radio and the WebSDR. The app captures 1.5 seconds of audio (2 seconds in CW mode) and runs a GCC-PHAT cross-correlation algorithm to find the optimal delay. A green LED indicates success; red indicates insufficient signal.
Toggle between Voice and CW mode for the sync algorithm — CW mode uses envelope extraction for better results with Morse code signals.
WebSDR Page
Below the controls, a collapsible section shows the WebSDR page itself. Tap to expand and view the waterfall or adjust WebSDR-specific settings. You can pinch-to-zoom and pan within the page. The WebSDR page is display-only — audio routing goes through the native mixer, not the WebView speakers.
Frequency Tracking
The WebSDR automatically follows your radio’s frequency and mode. Change bands or tune your dial on the main screen, and the WebSDR updates to match.
Managing WebSDR Sites
Go to Settings > WebSDR Sites to add, edit, or delete WebSDR and KiwiSDR sites. Each site has a name, URL, type (WebSDR or KiwiSDR), and optional port and password fields.
14 Audio & Network Tips
Remote operation over the internet introduces variables that don't exist when you're sitting in front of your rig. Here are the things that matter most for a good experience.
Network Quality Matters
The app runs on Opus at 48 kbps (about 60 kbps with overhead) — very efficient, but latency is the real enemy:
- Under 100ms: Feels like local operation — the rig responds instantly.
- 100–250ms: Perfectly usable, slight delay on PTT.
- 250–500ms: Noticeable delay. You'll hear a gap between pressing PTT and the radio keying up. Still fine for ragchewing, but fast contest exchanges feel sluggish.
- Above 500ms: Operational but uncomfortable. CW is unaffected (radio-side timing), but voice QSOs feel like a satellite phone call.
Wi-Fi is generally better than mobile data for stability (less jitter). 4G/5G works fine for bandwidth, but latency varies significantly with cell tower load.
Bluetooth vs. Wired Audio
Audio output device has a massive impact on latency — often bigger than the network itself:
- Device loudspeaker or wired headphones: ~29ms audio output latency. Combined with a good network, total end-to-end delay stays well under 100ms — feels like sitting in front of the rig.
- Bluetooth headphones: 150–350ms audio output latency depending on the codec (SBC ~250–350ms, AAC ~150–250ms, aptX ~80–150ms). This stacks on top of network delay. A 30ms network path becomes 350ms+ with Bluetooth — the difference is night and day.
Bottom line: For the lowest latency, use wired headphones or the device loudspeaker. Bluetooth is fine for casual listening, but if responsiveness matters (contest exchanges, quick PTT turnaround), go wired. For CW, latency doesn't affect keying quality (the radio handles all timing), but it does affect your ability to hear the sidetone in sync.
Background Audio
The app runs a foreground service that keeps audio alive when you switch to another app (WhatsApp, browser, email). A persistent notification shows "Connected to [station name]" — tap it to return. RX audio plays through the device speaker or headphones even when the screen is off or the app is in the background.
Audio Focus & Auto-Mute
- When a phone call comes in (cellular, WhatsApp, Telegram), radio audio automatically mutes and resumes when the call ends.
- Media apps (YouTube, Spotify) are NOT auto-muted due to system limitations. Use the manual mute button (speaker icon in the status bar) if you want to silence the radio temporarily.
Keep Screen On
Enabled by default (Settings > Keep Screen On). Prevents the screen from sleeping while the app is in the foreground — essential during a QSO. Disable it if you prefer battery savings.
15 External Controls (BLE Accessory & Keyboard)
HamMixer Mobile supports two types of external hardware controllers: the HamMixer Accessory Box (a BLE module with VFO encoder, two configurable buttons, and a CW paddle jack) and any Bluetooth keyboard with 26 mappable radio functions. The recommended hardware is the Seeed Studio XIAO nRF52840, which provides deterministic BLE scheduling and low-latency paddle response optimized for real-time remote CW operation. The encoder and buttons are configured in Settings > External Controls; the CW paddle is configured in Settings > CW Config.
HamMixer Accessory Box
The accessory box provides a physical rotary encoder for VFO tuning, two configurable hardware buttons, and a 3.5 mm TRS jack for connecting a CW paddle — all communicating wirelessly over a single Bluetooth Low Energy connection. The recommended board is the Seeed Studio XIAO nRF52840, running native Zephyr RTOS firmware with a dedicated BLE TX arbiter, hardware-precision timestamps, and a 30-second keepalive timeout that handles app force-kills gracefully. The encoder provides the same two-speed acceleration as the on-screen tuning wheel (50 Hz slow, 500 Hz fast). The CW paddle is covered in detail in Section 09 — CW Keyer.
Setup (XIAO nRF52840, Recommended)
- Build the firmware using
west build -b xiao_ble hammixer_ble_accessory_nrf, or use the pre-built.uf2file from the repository. - Double-tap the XIAO reset button — a USB drive appears. Copy
zephyr.uf2to the drive. The board reboots automatically. - The blue LED blinks slowly while advertising.
- In the app, go to Settings > External Controls and enable the BLE accessory roles you need: Enable Encoder (VFO tuning), Enable Macro Buttons (hardware buttons), and/or Enable Paddle (CW paddle jack). At least one role must be enabled before you can connect.
- Tap Scan — the app finds and connects to "HamMixer Accessory". The LED turns solid when connected.
- If buttons are enabled, choose a function for each button using the Button 1 and Button 2 dropdowns (default: PTT / Tune). Buttons can also be set to Disabled.
- Tap Save BLE Accessory Settings to persist your choices.
Encoder Behavior
- Rotation — turns the VFO just like the on-screen tuning wheel. Two-speed acceleration: slow rotation = 50 Hz steps, fast rotation = 500 Hz steps.
Configurable Buttons
Both hardware buttons can be assigned to any of 27 radio functions via the Button 1 and Button 2 dropdowns in Settings > External Controls. The defaults are PTT (Button 1, GP16) and Tune (Button 2, GP22).
- PTT (Hold) — press and hold to transmit, release to receive. Works identically to the on-screen PTT button, including CW mode interception.
- All other functions — trigger on a single button press (tap). No hold required.
Available functions include: PTT, Tune, ATU Toggle, NB/NR/P.AMP/ANF/AGC/FIL toggles, Band Up/Down, Mode Up/Down, Freq Up/Down, RF Power Up/Down, VFO A/B Exchange, Split Toggle, and Voice Memory M1–M8.
Auto-Reconnect
If the BLE connection drops (module powered off, out of range), the app automatically reconnects with exponential backoff (0 / 2 / 5 / 10 / 20 seconds) when the module is available again. No manual intervention needed. Auto-reconnect is active whenever at least one BLE accessory role is enabled and a saved device exists. Bringing the app back to the foreground resets the backoff for an immediate reconnection attempt.
CW Paddle Jack
The accessory module includes a 3.5 mm TRS jack for connecting any standard CW paddle. Plug in your paddle (Tip = Dit, Ring = Dah, Sleeve = GND), enable Enable Paddle in External Controls, then go to Settings > CW Config and select BLE Paddle as the CW input source. The BLE Paddle option is only selectable when the paddle role is enabled. See Section 09 — CW Keyer for full setup and usage instructions.
Encoder PPR Setting
The default encoder is a 600 PPR (pulses per revolution) model divided by 6 in firmware, yielding 100 effective steps per revolution. If you use a different encoder, adjust the Encoder PPR setting in External Controls to match your hardware. This controls the scaling between raw encoder ticks and frequency steps.
Bluetooth Keyboard
Any standard Bluetooth keyboard (or mini keypad) can be mapped to 26 radio control functions. This is particularly useful for CW operation, quick band changes, or hands-free control.
Setup
- Pair your Bluetooth keyboard with your phone or tablet via the device's Bluetooth settings.
- In the app, go to Settings > External Controls.
- Tap any function row to open the key capture dialog — press the physical key you want to assign, and the app captures it.
- The key is now mapped to that radio function.
Available Functions (26)
Each function can be assigned to any key on the keyboard:
- Frequency: Freq Up, Freq Down
- Band: Band Up, Band Down
- Mode: Mode Up, Mode Down
- VFO: VFO A/B Exchange, Split Toggle
- DSP: NB Toggle, NR Toggle, ANF Toggle, P.AMP Cycle, AGC Cycle, FIL Cycle
- Tuner: ATU Toggle, ATU Tune
- TX: PTT Toggle, RF Power Up, RF Power Down
- Voice Memory: M1, M2, M3, M4, M5, M6, M7, M8
16 Settings & Backup
The Settings screen (gear icon on the connection screen, or via the app menu) collects all configuration in one place.
Settings Overview
| Setting | What it does |
|---|---|
| Keep Screen On | Prevents screen sleep while the app is in the foreground (default: ON) |
| Mic DSP | Opens the mic processing screen (Section 11) |
| Voice Memory | Customize M1–M8 button labels |
| CW Config | CW input source (keyboard/BLE paddle), speed, iambic mode, sidetone, macros, external keyboard (Section 09) |
| Logging Settings | Station callsign, QRZ.com API key & password, auto-upload (Section 10) |
| External Controls | BLE module enable/PPR/button functions, Bluetooth keyboard mapping (Section 14) |
| Network Check | Run diagnostics against any saved server |
| Backup & Restore | Export/import settings, export ADIF file |
| Power Off Radio | Shut down the radio remotely (when connected) |
| About | App version, credits, contact |
Voice Memory Labels
Rename M1–M8 buttons to whatever you like — "CQ DX", "CONTEST", "73 TU", etc. Leave blank to keep the default. Reset button restores all defaults.
Backup & Restore
- Auto-backup: The app automatically saves your settings after every change (including after QSO saves and deletions). This backup is included in your device's cloud backup.
- Manual export: Settings > Backup & Restore > Export Settings — creates a JSON file you can share, save to cloud storage, or transfer to another device.
- Manual import: Select a previously exported file to restore all settings (including the ADIF log). Settings apply immediately — no app restart needed.
- Export ADIF File: Settings > Backup & Restore > Export ADIF File — opens a native file picker to save your complete
HamMixer_Log.adito any location (Downloads, cloud storage, etc.). - What's backed up: Server configs (without passwords), DSP settings, voice memory labels, CW macros, CW speed, CW send mode, band stacking register, QRZ.com settings, display preferences, and the full ADIF QSO log.
- What's NOT backed up: Passwords (security — re-enter them after restore).
Power Off Radio
Available when connected. Sends a CI-V power-off command to the transceiver. A confirmation dialog warns that the radio cannot be turned back on via software. Also available from the disconnect dialog (Disconnect button > Power Off & Disconnect).
About
Shows app version, build date, credits (architecture by CT7BAC, coding by Claude Code AI), contact email, website link, and the traditional "Good DX and 73!"
A Troubleshooting
Quick-reference solutions for the most common issues.
| Problem | Possible Cause | Solution |
|---|---|---|
| Can't connect to server | Server not running, wrong IP/port, firewall blocking | Verify server is running. Check IP and ports (TCP 7300, UDP 7301). Run Network Check from Settings. |
| "Another client may already be connected" | Exclusive lock — only one client at a time | Disconnect the other client (desktop or mobile) first, or restart the server. |
| No audio from radio | Output device issue, audio muted | Check the mute button (speaker icon). Check device volume. Ensure audio focus isn't taken by another app. |
| PTT not working | Mic permission denied, PTT locked | Check PTT lock (long-press PWR area to unlock). Check mic permission in device settings. |
| High latency / choppy audio | Poor network, BT headphones | Switch to wired headphones or loudspeaker. Check Network Diagnostics. Try Wi-Fi instead of mobile data. |
| Waterfall button missing | Radio has no built-in scope | The waterfall requires a radio with native spectrum scope output (e.g., IC-7300, IC-7610, IC-705, IC-9700). The button is hidden for radios without this capability. |
| CW not sending | Not in CW mode | Switch to CW mode first, then tap PTT to reveal the text entry. |
| QSO save fails | Empty callsign or start > end time | Enter a valid callsign. Ensure start time is before end time. |
| Settings lost after reinstall | Passwords not in backup | Re-enter passwords for each server after restoring a backup. Settings are restored automatically from cloud backup on fresh install. |
| Reconnecting loop | Server shut down, network dropped | Check server status. Check internet connection. The app will keep trying (exponential backoff up to 30s). |
| BLE module not found | Module not powered, Bluetooth off, iOS permissions | Check that the BLE accessory module is powered (LED should be blinking). Ensure Bluetooth is enabled on your device and at least one BLE accessory role is enabled in External Controls. On iOS, check Settings > Privacy > Bluetooth and allow HamMixer. |
| BLE module disconnects frequently | Range, 2.4 GHz interference | Move the BLE module closer to your phone/tablet. Avoid placing near Wi-Fi routers, microwaves, or other 2.4 GHz devices. The app auto-reconnects when the module is back in range. |
B Quick Reference Card
HamMixer Mobile at a Glance
| Audio codec | Opus 48 kHz mono, 48 kbps |
| Control channel | TCP 7300 (TLS 1.2+) |
| Audio channel | UDP 7301 (AES-128-CTR) |
| Sample rate | 48,000 Hz |
| Audio frame | 10ms (480 samples) |
| Tuning steps | 50 Hz (slow) / 1 kHz (fast) |
| CW speed range | 6–48 WPM |
| RF power range | 0–100% (5% steps) |
| S-meter segments | 54 (1s peak hold) |
| Max servers saved | Unlimited |
| Log format | ADIF 3.1.4 |
| BLE accessory | XIAO nRF52840 (recommended), Nordic UART, 100 PPR, 2 buttons, CW paddle (3.5 mm TRS), 30s keepalive |
| CW paddle keyer | Iambic A/B, 6–48 WPM, 700 Hz native sidetone (1ms Oboe / AudioUnit), 20% inter-element gap stretch |
Touch Gestures
| Gesture | Action |
|---|---|
| Tap frequency LCD | Open QSO Log |
| Long-press frequency LCD | Open DX Cluster |
| Drag tuning wheel | Tune frequency (velocity-sensitive) |
| Hold PTT button | Transmit (press-and-hold) |
| Tap PTT in CW mode | Toggle CW text entry |
| Long-press PWR area (1.5s) | Toggle PTT Lock |
| Long-press SWR area (1.5s) | Toggle VFO Lock |
| Tap DX Cluster spot card | Expand/collapse QRZ.com callsign info |
| Long-press DX spot card (1.5s) | Tune radio to spot frequency |
| Tap bell icon (DX Cluster) | Open alarm manager |
| Type in filter box (DX Cluster) | Filter spots by any field |
| Tap QRZ lookup button (QSO Log) | Open QRZ.com callsign lookup modal |
| Swipe right on QSO card (Logged QSOs) | Reveal delete button for that QSO |
| Tap disconnect button | Disconnect / Power Off dialog |
See also: Server Manual | Desktop Manual